My Garage
Cart
Make sure this part fits

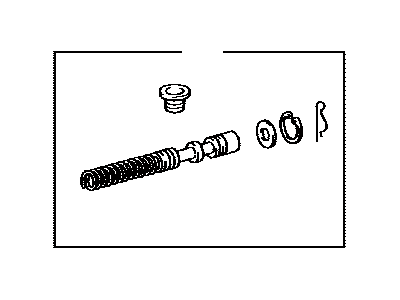
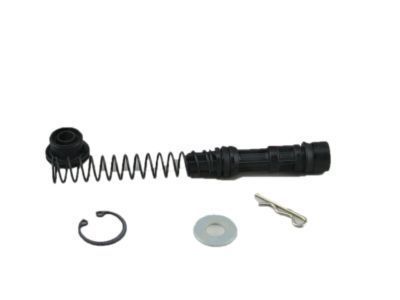
Toyota 04311-12110
Cylinder Kit, Clutch Master

1994-2010 Toyota 0431112110

Customer Questions & Expert Answers (61)
Toyota 04311-12110 Cylinder Kit, Clutch Master
  • Part Description
    Cylinder Kit Clutch; Clutch Master Cylinder
  • Part Name Code
    04311
  • Replaces
    04311-60150
  • Manufacturer
    Toyota
Make sure this part fits
$42.64 MSRP: $59.35
You Save: $16.71 (29%)
Ships in 1-3 Business Days
1
ADD TO CART
  • Product Specifications
  • Vehicle Fitment
  • Customer Questions & Expert Answers
  • Product Specifications

    BrandGenuine Toyota
    Part Name Code04311
    Manufacturer Part Number04311-12110
    Part DescriptionCylinder Kit Clutch; Clutch Master Cylinder
    Item Dimensions4.1 x 2.6 x 2.4 inches
    Item Weight0.50 Pounds
    ConditionNew
    Fitment TypeDirect Replacement
    Replaces04311-60150
    ManufacturerToyota
    SKU04311-12110
    WarrantyThis genuine Toyota part is guaranteed by Toyota's factory warranty.
    Shipping & ReturnShipping Policy Return Policy
    Warning: California's Proposition 65
  • Vehicle Fitment

    Year Make Model Trim Engine
    2005-2010 Scion tCBase, Spec4 Cyl 2.4 L GAS
    2004-2006 Scion xABase4 Cyl 1.5 L GAS
    2004-2006 Scion xBBase4 Cyl 1.5 L GAS
    1996-2000 Toyota 4RunnerBase, Limited, SR54 Cyl 2.7 L GAS, 6 Cyl 3.4 L GAS
    1997-2006 Toyota CamryBase, CE, LE, SE, XLE4 Cyl 2.2 L CNG, 4 Cyl 2.2 L GAS, 4 Cyl 2.4 L GAS, 6 Cyl 3.0 L GAS, 6 Cyl 3.3 L GAS
    1995-2005 Toyota CelicaGT, GTS, ST4 Cyl 1.8 L GAS, 4 Cyl 2.2 L GAS
    1994-2008 Toyota CorollaBase, CE, DX, LE, S, VE, XRS4 Cyl 1.6 L GAS, 4 Cyl 1.8 L GAS
    2000-2005 Toyota EchoBase4 Cyl 1.5 L GAS
    2000-2005 Toyota MR2 SpyderBase4 Cyl 1.8 L GAS
    2003-2008 Toyota MatrixBase, XR, XRS4 Cyl 1.8 L GAS
    View More
  • Customer Questions & Expert Answers

    Q:
    Will this 04311-12110 work for my car? Posted by ToyotaPartsNow Specialist
    A:
    Find out if part number 04311-12110 is the right fit for your car by Selecting Your Vehicle model.
    Posted by ToyotaPartsNow Specialist
    Q:
    How to service and repair the Clutch Master Cylinder on Toyota 4Runner? Posted by Customer
    A:
    It is necessary to draw fluid from the Clutch Master Cylinder by using a syringe before utilizing Special Service Tool: 09023-00100 to disconnect the clutch line. Preserve fluid in a suitable container while tightening the connection to 15 Nm (155 kgf-cm, 11 ft. lbs.). Begin by removing the clip and clevis pin after which you should take out the two mounting nuts to extract the master cylinder by using a torque of 13 Nm (130 kgf-cm, 9 ft. lbs.). The disassembly process begins with extracting the slotted spring pin through the use of a pin punch and hammer to remove the reservoir tank followed by its extraction with the grommet. Apply snap ring pliers to remove the push rod snap ring while pulling back the boot before extracting the piston. Put lithium soap base glycol grease on components before inserting the piston into the cylinder after attaching the brush rod with snap ring followed by placing the reservoir tank together with a fresh grommet while driving the slotted spring pin with a pin punch and hammer. Bleeding the system and adjusting the clutch pedal come at the end of installation after performing removal procedures in the reverse sequence.
    Posted by ToyotaPartsNow Specialist
    Q:
    How to overhaul the Clutch Master Cylinder Assembly (MTM) on Scion xA? Posted by Customer
    A:
    The replacement procedure for Clutch Master Cylinder Assy (MTM) begins with unattaching the brake master cylinder sub-assy followed by the brake actuator assy and brake booster assy and then clutch pedal spring and clutch master cylinder push rod clevis with hole pin while removing clip and hole pin. Cylinder fluid drainage must be followed by unclipping the clutch reservoir tube. Use Special Service Tool: 09023-00100 to disconnect the clutch master cylinder from its flexible hose tube while collecting fluid in a container. Clear the master cylinder clutch assembly through a procedure of removing the two retaining nuts. To replace the clutch master cylinder kit users must remove the slotted spring pin with a pin punch and hammer before taking off the inlet union and grommet while loosening the lock nut and removing the push rod clevis and lock nut. Push the push rod until the snap ring releases and then use snap ring pliers to pull it out from the cylinder body. Afterwards the push rod can be extracted. Handle the piston carefully because it could suddenly emerge out of the cylinder. Pull off both the stop plate and the piston with spring from inside the cylinder without harming its wall. The installation of the clutch master cylinder kit requires applying lithium soap base glycol grease onto parts before installing the piston with spring inside the cylinder while attaching the stop plate to the push rod which leads to attaching the push rod to the cylinder body. The push rod must be pushed forward while the snap ring should go in first then install the boot then fasten the lock nut on the push rod. Install the push rod clevis along with the lock nut prior to putting on the inlet union and new grommet while driving the slotted spring pin. Reinstall both clutch master cylinder nuts to 12 Nm torque before connecting the master cylinder to its flexible hose tube with Special Service Tool: 09023-00100 at 15 Nm torque (120 kgf-cm, 9 ft. lbs.). The clutch reservoir tube needs to be joined to the clutch master cylinder assy through the clip but ensure the assembly remains untwisted with the white mark facing upward. Place MP grease onto the hole pin contact surface and bush contact area before joining the clevis to the clutch pedal assy through the hole pin and then install the clip. The service concludes with installation of the clutch pedal spring followed by the brake booster assy and brake actuator assy and subsequent removal of the brake master cylinder sub-assy. Clutch pipeline bleeding requires filling the brake reservoir tank with clutch fluid at 8.4 Nm (86 kgf-cm, 74 inch lbs.), leakage inspection, reservoir fluid level check and clutch pedal sub-assy examination and adjustment.
    Posted by ToyotaPartsNow Specialist
    Q:
    How to disassemble the Clutch Master Cylinder on Scion tC? Posted by Customer
    A:
    The procedure for Clutch Master Cylinder disassembly starts by removing the Clutch Master Cylinder Kit through pin punch hammering on its slotted spring pin. You need to first remove the inlet union with grommet then let go of the lock nut before getting rid of the clevis. Loosen the threads on the lock nut attached to the push rod then remove both the lock nut and boot connected to the cylinder body. Use snap ring pliers to eliminate the snap ring when you push on the piston rod for removal. After that carefully lift out the push rod from the cylinder body. You must remove the stop plate together with the push rod before extracting the piston containing the spring from the cylinder maintaining care for the cylinder body inner components.
    Posted by ToyotaPartsNow Specialist
    Q:
    How to overhaul the Clutch Master Cylinder Assembly (MTM) on Scion xA? Posted by Customer
    A:
    The overhaul procedure for Clutch Master Cylinder Assembly (MTM) starts by removing the brake master cylinder sub-assembly and brake actuator assembly and brake booster assembly and clutch pedal spring and clutch master cylinder push rod clevis with hole pin along with its clip and hole pin. Pull out the clutch fluid while cleaning off each painted surface touched by the fluid. Special Service Tool: 09023-00101 enables users to disconnect the clutch master cylinder to flexible hose tube and disconnect the clutch reservoir tube from the clutch master cylinder assembly. Drain the clutch fluid into a container. The removal process for the clutch master cylinder assembly starts with two nut removal, then proceeds to dismantle the clutch master cylinder kit through slotted spring pin extraction using a pin punch and hammer to remove the inlet union, grommet, unlock the push rod clevis and push rod lock nut before removing both components. Unfasten the boot from the cylinder body then force the push rod while utilizing snap ring pliers to remove the snap ring before pulling the push rod from the cylinder body while paying attention to the possibility of the piston popping out. Unscrew the piston with spring along with the stop plate from the cylinder while keeping the cylinder interior free from damage. When installing the parts use lithium soap base glycol grease before placing the piston with spring inside the cylinder then secure the stop plate to the push rod and put the rod back into the cylinder body using the snap ring. Proceed with fitting the boot followed by lock nut before fixing the push rod clevis but only use the lock nut temporarily while you install new inlet components including the union and grommet before driving the slotted spring pin into place. After installing the clutch master cylinder assembly with two nuts torqued to 12 Nm, use Special Service Tool: 09023-00101 to secure the clutch master cylinder to the flexible hose tube with a torque of 15 Nm. You should connect the clutch reservoir tube with its clip in a straight position while having the white mark pointing upward. The hole pin requires MP grease application before connecting the clutch pedal assembly with the hole pin and installing the clip. The sequence finishes with the installation of clutch pedal spring followed by brake booster assembly and brake actuator assembly while taking out the brake master cylinder sub-assembly. Bleeding of the clutch pipeline requires fluent clutch fluid introduction into the brake reservoir tank followed by clutch system bleeding procedures before torquing the line to 8.4 Nm. The technician should verify fluid levels in reservoirs and inspect clutch pedal assembly adjustments.
    Posted by ToyotaPartsNow Specialist
    Q:
    How to service and repair the Clutch Master Cylinder on Toyota Echo? Posted by Customer
    A:
    You can start Clutch Master Cylinder repair work by removing the inlet union first through slotted spring pin disassembly with a pin punch (3 mm) and hammer. Proceed to take out the inlet union and grommet. The lock nut requires loosening before releasing the clevis along with removing the boot from the unit. The sequence to disassemble the push rod starts with applying pressure before using snap ring pliers to eliminate the snap ring thus removing the push rod together with washer and finally extracting the piston with spring. The assembly procedure requires lubricating all parts with lithium soap base glycol grease after which the piston with spring goes inside the cylinder and then the push rod gets installed with its boot by placing the washer on the push rod first followed by placing it to the piston before securing it with the snap ring through snap ring pliers. Proceed with installing the inlet union with fresh grommet while using the pin punch (3 mm) and hammer to drive in the slotted spring pin then add the lock nut and clevis before completing the installation process.
    Posted by ToyotaPartsNow Specialist
    Q:
    How to service and repair the Clutch Master Cylinder on Toyota Celica? Posted by Customer
    A:
    The first step to repair the Clutch Master Cylinder includes removing the brake booster followed by using pliers to disconnect the reservoir hose through its clip until the hose separates from the inlet union and collecting fluid in a container. The next step requires using Special Service Tool: 09023-00100 to detach the clutch line while catching fluid in a container. Long needle-nose pliers should be used to remove the clip and pin before taking out the master cylinder by removing its two mounting nuts. Start by using a 3 mm pin punch and hammer to drive out the slotted spring pin from the inlet union and proceed to remove the inlet union together with its grommet. Release the lock nut first to remove the clevis before the boot can be removed from the cylinder. Using snap ring pliers on the push rod while pushing it allows removal of the push rod and washer after removing its snap ring. Finish the operation by taking away both the piston and its spring from the cylinder. Reassemble components by applying lithium soap base glycol grease before inserting the piston along with its spring into the cylinder and installing the push rod attached to its washer which must be pushed deep into the piston and secured with the snap ring. Install the boot to the cylinder, put on the lock nut and clevis for a temporary fit before installing the inlet union along with a replacement grommet and hammer-driving the slotted spring pin with a 3 mm pin punch. First secure the master cylinder by mounting its two nuts while torquing them to 12 Nm (120 kgf-cm, 9 ft. lbs.) and finally install the pin followed by the clip. To connect the clutch line use Special Service Tool: 09023-00100 by applying 15 Nm (155 kgf-cm, 11 ft. lbs.), then attach the reservoir hose to the inlet union with the yellow mark pointing up before installing the clip. After installation of the brake booster the process requires filling brake reservoir and bleeding the clutch system and adjusting the clutch pedal before leak tests.
    Posted by ToyotaPartsNow Specialist
    Q:
    How to install the clutch master cylinder on Toyota Matrix? Posted by Customer
    A:
    The installation of the clutch master cylinder requires attaching it with 2 nuts which need to be torqued at 12 Nm (120 kgf-cm, 9 ft-lbf). ikh after connecting the clevis to the clutch pedal sub-assembly with the hole pin which must face from the right side of the vehicle - install the clip onto the hole pin. The clutch master cylinder installation requires Special Service Tool: 09023-00101 to connect the clutch master cylinder to the flexible hose tube at 15 Nm (155 kgf-cm, 11 ft-lbf). Install the clutch reservoir tube onto the clutch master cylinder assembly while using the clip which must have the white mark directed toward the top. You should install the brake booster assembly followed by installing the brake master cylinder sub-assembly. Bleed the brake line and then the clutch pipe line after filling the brake reservoir tank with clutch fluid through a torque of 8.4 Nm (85 kgf-cm, 74 in-lbf). The last procedures involve checking the brake pedal height as well examining the clutch pedal sub-assembly and inspecting both brake and clutch fluid leaks and reviewing the reservoir fluid level.
    Posted by ToyotaPartsNow Specialist
    Q:
    How to service and repair the Clutch Master Cylinder on Toyota MR2 Spyder? Posted by Customer
    A:
    Service and repair operations for the Clutch Master Cylinder require removal of the luggage compartment trim box cover followed by disconnecting the clutch line from the clutch master cylinder using Special Service Tool: 09023-38200 while containing any fluid in a container. Begin by removing the clutch master cylinder clamp elements followed by needle-nose plier usage to detach the pin and clip and finish by untightening the master cylinder's 2 nuts and pulling out the assembly whole. To remove the reservoir punch out the slotted spring pin with a pin punch and hammer while tapping until it releases from its place and then detach all parts including the reservoir grommet and cap and float. You need to loosen the lock nut before removing the clevis and lock nut. After that you should use snap ring pliers to remove the boot and snap ring, push rod and washer. Proceed by taking out the piston along with its spring component. Reassemble the hydraulic unit by applying lithium soap base glycol grease to all parts followed by piston spring insertion into the cylinder. Then put the push rod with washer into the piston while using a snap ring to secure it. Start by installing the boot to the cylinder and you should temporally add the lock nut and clevis then complete the installation by putting back the float and cap along with a new grommet before tapping in the slotted spring pin. The master cylinder must be fitted with its two nuts while torquing them to 12 Nm (120 kgf-cm, 9 ft. lbs.) before attaching the push rod to the clutch pedal through the pin and pin clip. Use Special Service Tool: 09023-38200 to connect the clutch line and apply force of 20 Nm (204 kgf-cm, 15 ft. lbs., or 18 Nm (185 kgf-cm, 13 ft. lbs. as per tool instructions while using a torque wrench with a 30 cm (11.81 inch) long fulcrum. The last steps entail reservoir filling up followed by clutch system bleeding then clutch pedal adjustment to finish with leak checking and bedocking the luggage compartment trim box cover.
    Posted by ToyotaPartsNow Specialist
    Q:
    How to service and repair the Clutch Master Cylinder on Toyota RAV4? Posted by Customer
    A:
    The service and repair process for the Clutch Master Cylinder begins with wiper assembly removal followed by pliers use to remove its reservoir hose clip before removing the hose from its inlet union while catching fluid in a container. The technician uses Special Service Tool: 09023-00100 to disconnect the clutch line before catching the fluid in a suitable container. First remove the clip and pin by using needle-nose pliers before taking out the clutch master cylinder by unfastening two nuts for pulling it out. Ultimately, remove the gasket and pedal stay bracket along with the master cylinder bracket. To disassemble the system remove the inlet union by hammering out its slotted spring pin with a pin punch then detach its grommet from the entrance union. First remove the clevis and lock nut after loosening the lock nut. Then take out both the boot and the snap ring by using snap ring pliers when you push the push rod. Finally pull out the push rod and washer from the assembly. End the process by taking away the cylinder piston together with its spring. Following part coating application using lithium soap base glycol grease, insert the piston combined with spring into the cylinder and position the push rod with washer before securing it with the snap ring. Begin by installing the boot onto its cylinder position while partially installing the lock nut and clevis alignment then add the new grommet attached to the inlet union to the cylinder body before sliding in the slotted spring pin through its slot. Secure the master cylinder by attaching gasket and pedal stay bracket along with master cylinder bracket before torquing 2 nuts to 12 Nm (120 kgf-cm, 9 ft. lbs.) then connect push rod to clutch pedal through pin and pin clip. Use Special Service Tool: 09023-00100 to connect the clutch line while torquing to 15 Nm (155 kgf-cm, 11 ft. lbs.) or 14 Nm (143 kgf-cm, 10 ft. lbs.) with Such tool attachment through a torque wrench that has a 30 cm (11.81 inch) fulcrum length. Secure the reservoir hose to the inlet union by fitting the pliers around its clip until it attaches the mark properly facing upwards. After installation of the wiper assembly proceed with filling brake fluid into the reservoir and performing clutch system bleeding followed by clutch pedal adjustment and leak inspection.
    Posted by ToyotaPartsNow Specialist
    Q:
    How to service and repair the Clutch Master Cylinder on Toyota Solara? Posted by Customer
    A:
    You can start servicing or repairing the Clutch Master Cylinder only after draining clutch fluid from it. Service of Clutch Master Cylinder begins by uninstalling brake master cylinder sub-assembly along with brake booster assembly. You need to detach the clutch reservoir tube by unfastening the clip while directing the fluid into a container during clutch master cylinder assembly work. Disconnect the clutch master cylinder to flexible hose tube by using Special Service Tool: 09023-00101 while collecting fluid in a container. The push rod clevis clutch master cylinder requires removal of the hole pin along with the clip before proceeding to detach the clutch master cylinder assembly through two nut unscrewing. The clutch master cylinder kit demands a pin punch (5 mm diameter) and hammer to break the slotted spring pin so you can remove the inlet union along with grommet. Begin by removing the push rod clevis using lock nut looseness and then proceed to remove lock nut from push rod and boot from cylinder body. When using snap ring pliers to remove the snap ring users should simultaneously push the piston rod which enables them to remove the push rod from the cylinder body yet they must exercise caution because the piston may become dislodged. End the process by removing the stop plate from the push rod and the piston with spring from cylinder body being careful not to harm cylinder interior.
    Posted by ToyotaPartsNow Specialist
    Q:
    What tool is needed to disconnect the clutch master cylinder to flexible hose tube for the 2010 Scion tC? Posted by Customer
    A:
    Use Special Service Tool: 09023-00101, again using a container to catch the fluid.
    Posted by ToyotaPartsNow Specialist
    See expert answers on similar Clutch Master Cylinder
    Q:
    What should be removed after draining the brake fluid for the 2008 Scion tC? Posted by Customer
    A:
    Next, remove the brake master cylinder sub-assembly, followed by the brake booster assembly.
    Posted by ToyotaPartsNow Specialist
    See expert answers on similar Clutch Master Cylinder
    Q:
    How do you connect the flexible hose tube to the clutch master cylinder for the 2009 Scion tC? Posted by Customer
    A:
    Use Special Service Tool: 09023-00101, torquing to 15 Nm (155 kgf-cm, 11 ft-lbf).
    Posted by ToyotaPartsNow Specialist
    See expert answers on similar Clutch Master Cylinder
    Q:
    How do you secure the clutch master cylinder assembly for the 2007 Scion tC? Posted by Customer
    A:
    Secure it with the 2 nuts, torquing to 12 Nm (120 kgf-cm, 9 ft. lbs.).
    Posted by ToyotaPartsNow Specialist
    See expert answers on similar Clutch Master Cylinder
    Q:
    How do you install the new parts during reassembly for the 2003 Toyota Camry? Posted by Customer
    A:
    Coat parts with lithium soap base glycol grease, install the piston with spring, stop plate, and push rod, then install the snap ring and boot.
    Posted by ToyotaPartsNow Specialist
    See expert answers on similar Clutch Master Cylinder
    Q:
    What is the first step to service and repair the clutch master cylinder for the 2006 Scion xA? Posted by Customer
    A:
    First, remove the brake master cylinder, brake actuator assembly, and brake booster assembly.
    Posted by ToyotaPartsNow Specialist
    See expert answers on similar Clutch Master Cylinder
    Q:
    How do you connect the Clutch Master Cylinder to the Flexible Hose Tube for the 2006 Scion xB? Posted by Customer
    A:
    Use Special Service Tool: 09023-00101, torquing to 15 Nm (155 kgf-cm, 11 ft. lbs.).
    Posted by ToyotaPartsNow Specialist
    See expert answers on similar Clutch Master Cylinder
    Q:
    How do you disassemble the reservoir tank for the 2001 Toyota Camry? Posted by Customer
    A:
    Drive out the slotted spring pin with a pin punch and hammer, then take out the reservoir tank and grommet.
    Posted by ToyotaPartsNow Specialist
    See expert answers on similar Clutch Master Cylinder
    Q:
    How do you install the snap ring and boot for the 2005 Toyota Camry? Posted by Customer
    A:
    While pushing the piston rod, install the snap ring and boot, then install the lock nut and temporarily attach the push rod clevis with the lock nut.
    Posted by ToyotaPartsNow Specialist
    See expert answers on similar Clutch Master Cylinder
    Q:
    What is the final step after completing the installation for the 2010 Scion tC? Posted by Customer
    A:
    Check the fluid level in the reservoir.
    Posted by ToyotaPartsNow Specialist
    See expert answers on similar Clutch Master Cylinder
    Q:
    How do you disconnect the clutch reservoir tube for the 2005 Scion tC? Posted by Customer
    A:
    Loosen the clip to disconnect the clutch reservoir tube and use a container to catch the fluid.
    Posted by ToyotaPartsNow Specialist
    See expert answers on similar Clutch Master Cylinder
    Q:
    What is the first step to overhaul the Clutch Master Cylinder Assy (MTM) for the 2004 Scion xB? Posted by Customer
    A:
    Begin by removing the brake master cylinder sub-assy, brake actuator assy, and brake booster assy.
    Posted by ToyotaPartsNow Specialist
    See expert answers on similar Clutch Master Cylinder
    Q:
    What torque is required when connecting the clutch master cylinder to the flexible hose tube for the 2007 Toyota Corolla? Posted by Customer
    A:
    Use a torque of 15 Nm (155 kgf-cm, 11 ft. lbs.).
    Posted by ToyotaPartsNow Specialist
    See expert answers on similar Clutch Master Cylinder
    Q:
    How do you secure the push rod and boot for the 2005 Scion xB? Posted by Customer
    A:
    While pushing the push rod, install the snap ring, then put the boot back on the cylinder body, followed by the lock nut on the push rod.
    Posted by ToyotaPartsNow Specialist
    See expert answers on similar Clutch Master Cylinder
    Q:
    What is the first step in servicing and repairing the Clutch Master Cylinder for the 2000 Toyota Echo? Posted by Customer
    A:
    Begin by removing the filler cap from the reservoir and drawing out brake fluid with a syringe, ensuring no fluid remains on painted surfaces.
    Posted by ToyotaPartsNow Specialist
    See expert answers on similar Clutch Master Cylinder
    Q:
    What should be done after connecting the clutch line for the 2001 Toyota Echo? Posted by Customer
    A:
    Connect the reservoir hose to the inlet union, securing it with a clip.
    Posted by ToyotaPartsNow Specialist
    See expert answers on similar Clutch Master Cylinder
    Q:
    How do you disassemble the Clutch Master Cylinder for the 2001 Toyota Corolla? Posted by Customer
    A:
    Remove the clevis and boot by loosening the lock nut, then take out the reservoir tank by driving out the slotted spring pin with a pin punch and hammer, followed by removing the push rod and washer using snap ring pliers to take out the snap ring. Proceed to remove the piston.
    Posted by ToyotaPartsNow Specialist
    See expert answers on similar Clutch Master Cylinder
    Q:
    What should be done for reassembly for the 2005 Toyota Celica? Posted by Customer
    A:
    Coat the parts with lithium soap base glycol grease, insert the piston with spring into the cylinder, and install the push rod with the washer, securing it with the snap ring.
    Posted by ToyotaPartsNow Specialist
    See expert answers on similar Clutch Master Cylinder
    Q:
    What should be done if equipped with ABS for the 2002 Toyota Echo? Posted by Customer
    A:
    Remove the ABS actuator.
    Posted by ToyotaPartsNow Specialist
    See expert answers on similar Clutch Master Cylinder
    Q:
    How do you remove the master cylinder for the 2002 Toyota Celica? Posted by Customer
    A:
    Remove the clip and pin with needle-nose pliers, then take out the master cylinder by removing the two mounting nuts.
    Posted by ToyotaPartsNow Specialist
    See expert answers on similar Clutch Master Cylinder
    Q:
    How do you secure the reservoir hose for the 2005 Toyota Echo? Posted by Customer
    A:
    Attach it to the inlet union and secure it with the clip.
    Posted by ToyotaPartsNow Specialist
    See expert answers on similar Clutch Master Cylinder
    Q:
    How do you remove the push rod from the cylinder body for the 2008 Toyota Corolla? Posted by Customer
    A:
    While pushing the push rod, use snap ring pliers to remove the snap ring, then extract the push rod from the cylinder body, being cautious as the piston may pop up.
    Posted by ToyotaPartsNow Specialist
    See expert answers on similar Clutch Master Cylinder
    Q:
    How is the clutch master cylinder assembly reinstalled for the 2005 Toyota Corolla? Posted by Customer
    A:
    Reinstall the clutch master cylinder assembly with the two nuts, torquing to 12 Nm (120 kgf-cm, 9 ft. lbs.).
    Posted by ToyotaPartsNow Specialist
    See expert answers on similar Clutch Master Cylinder
    Q:
    How do you install the clutch master cylinder kit for the 2003 Toyota Corolla? Posted by Customer
    A:
    Coat parts with lithium soap base glycol grease, install the piston with spring into the cylinder, attach the stop plate to the push rod, and then install the push rod to the cylinder body.
    Posted by ToyotaPartsNow Specialist
    See expert answers on similar Clutch Master Cylinder
    Q:
    How do you disconnect the reservoir hose for the 2000 Toyota Celica? Posted by Customer
    A:
    Use pliers to disconnect the clip and remove the hose from the inlet union, ensuring to catch any fluid in a container.
    Posted by ToyotaPartsNow Specialist
    See expert answers on similar Clutch Master Cylinder
    Q:
    What should be done during reassembly of the Clutch Master Cylinder for the 2000 Toyota Corolla? Posted by Customer
    A:
    Coat parts with lithium soap base glycol grease, insert the piston into the cylinder, and install the push rod assembly with a new gasket and washer, ensuring the washer is installed to the push rod, pushing the push rod to the piston, and using snap ring pliers to install the snap ring before installing the boot. Install the reservoir tank with a new grommet and drive in the slotted spring pin.
    Posted by ToyotaPartsNow Specialist
    See expert answers on similar Clutch Master Cylinder
    Q:
    What components need to be removed after disconnecting the clutch line for the 2002 Toyota Corolla? Posted by Customer
    A:
    Remove the lower finish panel, lower insert, No. 2 heater to register duct, clip, and pin, then take out the two mounting nuts to pull out the master cylinder and remove the gasket.
    Posted by ToyotaPartsNow Specialist
    See expert answers on similar Clutch Master Cylinder
    Q:
    What should be noted when removing the push rod from the cylinder body for the 2006 Toyota Corolla? Posted by Customer
    A:
    The piston may pop out.
    Posted by ToyotaPartsNow Specialist
    See expert answers on similar Clutch Master Cylinder
    Q:
    How do you ensure the clutch reservoir tube is properly connected for the 2006 Toyota Matrix? Posted by Customer
    A:
    Connect the clutch reservoir tube with the clip to the clutch master cylinder assembly, ensuring the white mark is facing upward.
    Posted by ToyotaPartsNow Specialist
    See expert answers on similar Clutch Master Cylinder
    Q:
    What is the first step to overhaul the Clutch Master Cylinder for the 2004 Toyota Matrix? Posted by Customer
    A:
    Drain the clutch fluid and remove the brake master cylinder sub-assembly and brake booster assembly.
    Posted by ToyotaPartsNow Specialist
    See expert answers on similar Clutch Master Cylinder
    Q:
    What is the process for disassembling the clutch master cylinder for the 2000 Toyota MR2 Spyder? Posted by Customer
    A:
    Remove the reservoir by tapping out the slotted spring pin with a pin punch and hammer, then take off the reservoir, grommet, cap, and float. Loosen the lock nut to remove the clevis and lock nut, then remove the boot, use snap ring pliers to take out the snap ring while pushing the push rod, and pull out the push rod and washer. Finally, remove the piston with spring.
    Posted by ToyotaPartsNow Specialist
    See expert answers on similar Clutch Master Cylinder
    Q:
    What should be done to remove the clevis and lock nut for the 2004 Toyota RAV4? Posted by Customer
    A:
    Loosen the lock nut to remove the clevis and lock nut, then remove the boot.
    Posted by ToyotaPartsNow Specialist
    See expert answers on similar Clutch Master Cylinder
    Q:
    What is the first step to reassemble the Clutch Master Cylinder for the 2008 Toyota Matrix? Posted by Customer
    A:
    Coat the components with lithium soap base glycol grease.
    Posted by ToyotaPartsNow Specialist
    See expert answers on similar Clutch Master Cylinder
    Q:
    What is the final step in disassembly for the 2004 Toyota Celica? Posted by Customer
    A:
    Remove the piston with spring from the cylinder.
    Posted by ToyotaPartsNow Specialist
    See expert answers on similar Clutch Master Cylinder
    Q:
    What is the procedure for connecting the clutch line for the 2005 Toyota RAV4? Posted by Customer
    A:
    Connect the clutch line using Special Service Tool: 09023-00101, torquing to 15 Nm (155 kgf-cm, 11 ft. lbs.) or 14 Nm (143 kgf-cm, 10 ft. lbs.) with the tool, using a torque wrench with a fulcrum length of 30 cm (11.81 inch).
    Posted by ToyotaPartsNow Specialist
    See expert answers on similar Clutch Master Cylinder
    Q:
    What are the final steps after installation for the 2001 Toyota MR2 Spyder? Posted by Customer
    A:
    Fill the reservoir, bleed the clutch system, adjust the clutch pedal, check for leaks, and finally reinstall the luggage compartment trim box cover.
    Posted by ToyotaPartsNow Specialist
    See expert answers on similar Clutch Master Cylinder
    Q:
    What should be done during reassembly for the 2003 Toyota MR2 Spyder? Posted by Customer
    A:
    Coat parts with lithium soap base glycol grease, insert the piston with spring into the cylinder, and install the push rod with the washer, pushing it into the piston and securing it with the snap ring. Install the boot to the cylinder, temporarily install the lock nut and clevis, then install the reservoir by adding the float and cap, placing a new grommet, and tapping in the slotted spring pin.
    Posted by ToyotaPartsNow Specialist
    See expert answers on similar Clutch Master Cylinder
    Q:
    What precautions should be taken when removing the piston for the 2007 Toyota Matrix? Posted by Customer
    A:
    Ensure not to damage the inside of the cylinder body while removing the stop plate and the piston with spring.
    Posted by ToyotaPartsNow Specialist
    See expert answers on similar Clutch Master Cylinder
    Q:
    How do you disassemble the master cylinder for the 2000 Toyota RAV4? Posted by Customer
    A:
    Remove the inlet union by driving out the slotted spring pin with a pin punch and hammer, then take out the inlet union and grommet.
    Posted by ToyotaPartsNow Specialist
    See expert answers on similar Clutch Master Cylinder
    Q:
    What should be done during reassembly for the 2003 Toyota RAV4? Posted by Customer
    A:
    Coat parts with lithium soap base glycol grease, insert the piston with spring into the cylinder, and install the push rod with the washer, pushing it into the piston and securing it with the snap ring. Install the boot to the cylinder, temporarily install the lock nut and clevis, and then install a new grommet and inlet union to the cylinder body, tapping in the slotted spring pin.
    Posted by ToyotaPartsNow Specialist
    See expert answers on similar Clutch Master Cylinder
    Q:
    What is the procedure for reassembly for the 2002 Toyota Tacoma? Posted by Customer
    A:
    Coat all parts with lithium soap base glycol grease, insert the piston into the cylinder, install the push rod assembly with the snap ring, and then install the reservoir tank along with a new grommet, securing it by driving in the slotted spring pin.
    Posted by ToyotaPartsNow Specialist
    See expert answers on similar Clutch Master Cylinder
    Q:
    How do you disassemble the reservoir tank for the 2000 Toyota Tacoma? Posted by Customer
    A:
    Drive out the slotted spring pin with a pin punch and hammer, then take out the reservoir tank and grommet.
    Posted by ToyotaPartsNow Specialist
    See expert answers on similar Clutch Master Cylinder
    Q:
    What is the final step in the reassembly process for the 2003 Toyota Tacoma? Posted by Customer
    A:
    Install the reservoir tank along with a new grommet, and secure it by driving in the slotted spring pin using a pin punch and hammer.
    Posted by ToyotaPartsNow Specialist
    See expert answers on similar Clutch Master Cylinder
    Q:
    What should be done after installing the clutch master cylinder assembly for the 2007 Toyota Solara? Posted by Customer
    A:
    Apply MP grease to the contact surface of the hole pin and bush, connect the clevis to the clutch pedal assembly with the hole pin, and install the clip afterward.
    Posted by ToyotaPartsNow Specialist
    See expert answers on similar Clutch Master Cylinder
    Q:
    What should be done after installing the master cylinder for the 2004 Toyota Tacoma? Posted by Customer
    A:
    After installation, bleed the system and adjust the clutch pedal.
    Posted by ToyotaPartsNow Specialist
    See expert answers on similar Clutch Master Cylinder
    Q:
    What is the procedure for removing the piston from the cylinder for the 2006 Toyota Solara? Posted by Customer
    A:
    Remove the boot from the cylinder body, use snap ring pliers to take out the snap ring while pushing on the piston rod, then remove the push rod from the cylinder body, being cautious as the piston may pop out.
    Posted by ToyotaPartsNow Specialist
    See expert answers on similar Clutch Master Cylinder
    Q:
    What is the torque specification for installing the clutch master cylinder assembly for the 2005 Toyota Solara? Posted by Customer
    A:
    Ensure a torque of 12 Nm (120 kgf-cm, 9 ft. lbs.).
    Posted by ToyotaPartsNow Specialist
    See expert answers on similar Clutch Master Cylinder
    Q:
    What is the torque specification for connecting the flexible hose tube for the 2008 Toyota Solara? Posted by Customer
    A:
    Torquing to 15 Nm (155 kgf-cm, 11 ft-lbf).
    Posted by ToyotaPartsNow Specialist
    See expert answers on similar Clutch Master Cylinder
    Q:
    How do you disconnect the clutch reservoir tube for the 2004 Toyota Solara? Posted by Customer
    A:
    Loosen the clip and use a container to catch the fluid.
    Posted by ToyotaPartsNow Specialist
    See expert answers on similar Clutch Master Cylinder
    Q:
    How do you disassemble the master cylinder for the 2001 Toyota Tacoma? Posted by Customer
    A:
    Remove the reservoir tank by driving out the slotted spring pin with a pin punch and hammer, then take out the reservoir tank and grommet.
    Posted by ToyotaPartsNow Specialist
    See expert answers on similar Clutch Master Cylinder
    If you have any questions about this product, please don't hesitate to ask us. We will be happy to help you!

OEM Toyota 04311-12110, Excellent Performance and Perfect Fitment

To ensure reliability, purchase Toyota part # 04311-12110 Cylinder Kit, Clutch Master. It is sometimes referred to as Toyota Clutch Master Cylinder, Toyota Clutch Master Repair Kit. OEM parts are unrivaled in terms of quality. They go through extensive quality control inspections and are produced in accordance with Toyota's official factory specifications. All of these remove defects and imperfections. So you can relax knowing they promise exceptional lifespan and flawless fitment.

ToyotaPartsNow.com is a leading supplier of genuine Toyota parts such as Toyota 0431112110 Cylinder Kit, Clutch Master. At ToyotaPartsNow.com, we have a wide variety of OEM Toyota parts available at competitive prices. Our comprehensive range of genuine Toyota parts come with a manufacturer's warranty for peace of mind. We also prioritize customer satisfaction, providing a hassle-free return policy and expedited delivery for all our parts. For detailed Toyota parts information, click here.
Choose ToyotaPartsNow for discounted prices, exceptional service and fast delivery