×
ToyotaParts- Hello
- Login or Register
- Quick Links
- Live Chat
- Track Order
- Parts Availability
- RMA
- Help Center
- Contact Us
- Shop for
- Toyota Parts
- Scion Parts
My Garage
My Account
Cart
OEM Toyota Solara Brake Master Cylinder
- Select Vehicle by Model
- Select Vehicle by VIN
Select Vehicle by Model
orMake
Model
Year
Select Vehicle by VIN
For the most accurate results, select vehicle by your VIN (Vehicle Identification Number).
9 Brake Master Cylinders found


Toyota Solara Cylinder Sub-Assembly, Brake Master Part Number: 47201-33210
$209.80 MSRP: $299.55You Save: $89.75 (30%)Ships in 1-3 Business Days
Toyota Solara Master Cylinder Part Number: 47201-33130
$257.34 MSRP: $367.42You Save: $110.08 (30%)Ships in 1-2 Business Days
Toyota Solara Master Cylinder Part Number: 47201-06290
$237.07 MSRP: $338.48You Save: $101.41 (30%)Ships in 1 Business Day
Toyota Solara Master Cylinder Part Number: 47201-33230
$241.03 MSRP: $344.14You Save: $103.11 (30%)Ships in 1-2 Business DaysToyota Solara Master Cylinder Part Number: 47201-06120
$253.26 MSRP: $361.60You Save: $108.34 (30%)Ships in 1-3 Business DaysToyota Solara Master Cylinder Part Number: 47201-06260
Toyota Solara Master Cylinder Part Number: 47201-06130
Toyota Solara Master Cylinder Part Number: 47201-33110
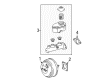
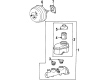
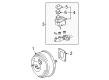
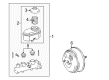
Toyota Solara Brake Master Cylinder
Choose genuine Brake Master Cylinder that pass strict quality control tests. You can trust the top quality and lasting durability. Shopping for OEM Brake Master Cylinder for your Toyota Solara? Our website is your one-stop destination. We stock an extensive selection of genuine Toyota Solara parts. The price is affordable so you can save more. It only takes minutes to browse and find the exact fit. Easily add to cart and check out fast. Our hassle-free return policy will keep you stress-free. We process orders quickly for swift delivery. Your parts will arrive faster, so you can get back on the road sooner.
Toyota Solara Brake Master Cylinder Parts and Q&A
- Q: How to overhaul the brake master cylinder sub-assembly on Toyota Solara?A:The beginning stage of brake master cylinder subassembly overhaul requires draining brake fluid together with proper cleaning of remaining fluid from painted surfaces. Separated components start with removing the air cleaner assembly followed by disconnecting the level warning switch connector. Special Service Tool: 09023-00100 enables workers to disconnect the 6 brake tubes from the master cylinder while removing the two nuts to slide out the 2-way and brake master cylinder sub-assembly. The brake master cylinder reservoir filler cap assembly and reservoir strainer need removal first while proceeding to remove the reservoir sub-assembly with the screw. The technician should first take out the two master cylinder reservoir grommets from the system before proceeding with the brake master cylinder removal process. They should place the master cylinder into the vise to remove the o-ring and piston snap ring with snap ring pliers. Push the piston once more to evacuate the piston stopper bolt along with its gasket before retrieving the No. 1 piston sub-assembly straight out from the cylinder bore without causing damage. To remove the No. 2 piston sub-assembly use a shop rag together with two wooden blocks while lightly edging it out until it drops free while keeping the rag at 100 mm (3.94 inches) distance from the blocks' tops. During brake master cylinder kit with VSC assembly the straight pin needs removal when the piston is pushed with a screwdriver. Before putting on the brake master cylinder kit without VSC you should first check the master cylinder body for any trace of rust or scoring. Then apply lithium soap base glycol grease to the new No. 1 and No. 2 piston sub-assemblies before inserting them with care to protect the rubber lips and adding a new gasket and piston stopper bolt with 10 Nm (100 kgf-cm, 7 ft. lbs.) torque. With VSC included kit, position the groove of No. 2 piston horizontally when inserting it before installing the straight pin and snap ring. After oiling a new O-ring users must place it into the master cylinder. Proceed with the installation of grommets for the master cylinder reservoir before fitting the reservoir component with screw attachment and strainer assembly then fill cap assembly. The inspection procedure requires Special Service Tool: 09737-00013 for brake booster push rod clearance measurement which must be set at 0 mm (0 inch). You should utilize Special Service Tool: 09737-00020 for adjusting the length of the protruding adjusting bolt after fixing the push rod. Install the master cylinder sub-assembly while securing 2 nuts before connecting 6 brake tubes by using Special Service Tool: 09023-00100 and restoring the level warning switch connector. Add brake fluid into the reservoir while performing a bleed of the master cylinder along with the brake line before you install the air cleaner assembly and verify the fluid level then check for any brake fluid leaks.
- Q: How to reassemble the brake master cylinder on Toyota Solara?A:The master cylinder assembly should begin with placing the cylinder in a vise followed by lubricating new No.1 and No.2 piston sub-assembly units with lithium soap base glycol grease before final installation. Straigt insertion of the piston prevents broken cylinder bore while safeguarding the rubber lips on pistons. After pushing the piston into place, install new components including the gasket and piston stopper bolt while torquing them to 10 Nm (100 kgf-cm, 7 ft-lbf). You should attach the snap ring working with snap ring pliers afterward apply lithium soap base glycol grease to a fresh O-ring before putting it on the master cylinder. To install the No.2 piston on the VSC version position its groove horizontally before adding a straight pin followed by pushing in the piston and placing the snap ring. The two new master cylinder reservoir grommets need lithium soap base glycol grease before they can be installed onto the master cylinder reservoir sub-assembly. Determine the proper placement of the master cylinder reservoir sub-assembly on the master cylinder by screwing it in then secure the brake master cylinder reservoir strainer followed by installation of the brake master cylinder reservoir filler cap assembly. Install the master cylinder sub-assembly and 2-way with the two nuts while torquing to 13 Nm (127 kgf-cm, 9 ft-lbf) before using Special Service Tool: 09023-00101 to attach six brake lines to the sub-assembly and torque them to 15 Nm (155 kgf-cm 11 ft-lbf). The workflow includes connecting the level warning switch connector followed by adding brake fluid to the reservoir and executing brake master cylinder bleeding of the brake line then examining the fluid level in the reservoir before leak inspection and finishing with air cleaner assembly installation.

Related Toyota Solara Parts
 Toyota Solara Brake Booster
 Toyota Solara Brake Caliper Bracket
 Toyota Solara Brake Caliper Piston
 Toyota Solara Brake Master Cylinder Reservoir
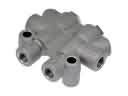 Toyota Solara Brake Proportioning Valve
 Toyota Solara Hydraulic Hose
 Toyota Solara Master Cylinder Repair Kit
 Toyota Solara Parking Brake Cable
 Toyota Solara Parking Brake Shoes
 Toyota Solara Wheel Bearing
 Toyota Solara Wheel Hub
 Toyota Solara Wheel Stud