×
ToyotaParts- Hello
- Login or Register
- Quick Links
- Live Chat
- Track Order
- Parts Availability
- RMA
- Help Center
- Contact Us
- Shop for
- Toyota Parts
- Scion Parts
My Garage
My Account
Cart
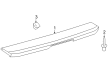
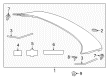
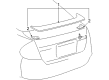
OEM Toyota Prius Spoiler
Spoiler Wing- Select Vehicle by Model
- Select Vehicle by VIN
Select Vehicle by Model
orMake
Model
Year
Select Vehicle by VIN
For the most accurate results, select vehicle by your VIN (Vehicle Identification Number).
16 Spoilers found


Toyota Prius Spoiler Assembly Side Cover, Rear Driver Side Part Number: 76898-47020
$8.83 MSRP: $12.29You Save: $3.46 (29%)Ships in 1-3 Business Days

Toyota Prius Spoiler Assembly Side Cover, Passenger Side Part Number: 76897-47020
$8.83 MSRP: $12.29You Save: $3.46 (29%)Ships in 1-3 Business Days


Toyota Prius Spoiler Assembly, Black, Rear Part Number: 76085-47910
$345.99 MSRP: $494.00You Save: $148.01 (30%)Ships in 1 Business Day

Toyota Prius Spoiler Assembly, Black, Rear Part Number: 76085-47907
$371.70 MSRP: $544.73You Save: $173.03 (32%)Ships in 1-2 Business Days


Toyota Prius Spoiler, Front Part Number: 76851-47030
$132.18 MSRP: $187.11You Save: $54.93 (30%)Ships in 1-3 Business Days

Toyota Prius Spoiler, Passenger Side Part Number: 76087-47010
$151.56 MSRP: $214.56You Save: $63.00 (30%)Ships in 1-3 Business Days

Toyota Prius Side Spoiler, Rear Driver Side Part Number: 76088-47020
$35.12 MSRP: $48.89You Save: $13.77 (29%)Ships in 1 Business Day


Toyota Prius Side Spoiler, Rear Passenger Side Part Number: 76087-47020
$56.39 MSRP: $78.49You Save: $22.10 (29%)Ships in 1-2 Business Days
Toyota Prius Spoiler Assembly, Rear Part Number: 76085-47903
$377.49 MSRP: $553.22You Save: $175.73 (32%)Ships in 1-3 Business DaysToyota Prius Spoiler Assembly, Rear Part Number: 76085-47902
$377.49 MSRP: $553.22You Save: $175.73 (32%)Ships in 1-3 Business Days
Toyota Prius Spoiler Assembly, Rear Part Number: 76085-47916
$454.44 MSRP: $665.99You Save: $211.55 (32%)Ships in 1-3 Business Days
Toyota Prius Spoiler Center, Rear Part Number: 76891-47010
$146.04 MSRP: $206.74You Save: $60.70 (30%)Ships in 1 Business DayToyota Prius Spoiler, Rear Side Driver Side Part Number: 76088-47010
$169.54 MSRP: $240.01You Save: $70.47 (30%)Ships in 1-3 Business Days
Toyota Prius Spoiler, Front Part Number: 76851-47010
$77.37 MSRP: $108.60You Save: $31.23 (29%)Ships in 1-2 Business Days
Toyota Prius Spoiler Center, Rear Part Number: 76891-47020
$108.53 MSRP: $152.34You Save: $43.81 (29%)Ships in 1 Business Day
Toyota Prius Spoiler, Rear Part Number: 76085-47904
Toyota Prius Spoiler
Choose genuine Spoiler that pass strict quality control tests. You can trust the top quality and lasting durability. Shopping for OEM Spoiler for your Toyota Prius? Our website is your one-stop destination. We stock an extensive selection of genuine Toyota Prius parts. The price is affordable so you can save more. It only takes minutes to browse and find the exact fit. Easily add to cart and check out fast. Our hassle-free return policy will keep you stress-free. We process orders quickly for swift delivery. Your parts will arrive faster, so you can get back on the road sooner.
The Toyota Prius Spoiler functions as a crucial element which strengthens vehicle performance while creating durable reliability that elevated Toyota Prius status as a technology leader of hybrid vehicles. The Toyota Prius Spoiler enhances vehicle aerodynamics by streamlining airflow and thus boosts fuel efficiency which makes it crucial for people who care about environmental impact. Both fuel efficiency and high-speed stability improve after the aerodynamic modifications establish better handling performance during brake activities and making cornering safer. All Toyota Prius models at Standard Base and Touring levels can equip the Toyota Prius Spoiler which provides universal benefit accessibility to drivers. The Toyota Prius Spoiler provides a range of design choices from functional aerodynamic options to decorative styles which offer something for diverse drivers without compromising its aerodynamic functionality. Special features like downward force generation make the car Spoiler unique in the automotive market because it combines performance with appearance. Since 1997 when the automaker launched the model the automotive manufacturer has maintained a dedication to innovation by adding the spoiler as a profiled component in the vehicle's evolution. The car Spoiler serves both to improve the appearance of the vehicle while creating a major contribution to increased safety and efficiency which positions it as a powerful feature in modern vehicle markets.
Toyota Prius Spoiler Parts and Q&A
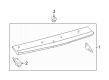
- Q: How to remove the rear spoiler on Toyota Prius?A:Starting with the installation of the rear spoiler begins with disconnecting the negative battery terminal cable then waiting 90 seconds to stop Air Bag and seat belt pretensioner activation. The first part of this process requires you to disconnect the rear wiper arm assembly along with the back door lower trim board assembly, back door upper trim board assembly and the rear Wiper Motor assembly. After applying protective tape below the rear spoiler you should remove its 4 bolts. To detach the 3 clips associated with the regular type utilize a taped screwdriver. A screwdriver will detach the 3 clips from the large type while you peel off the double-sided tape from this portion as well by applying protective tape to the screwdriver tip. To complete the rear spoiler replacement the technician should disconnect the center stop light connector followed by removing the rear spoiler prior to uninstalling the center stop light assembly.
- Q: How to install the rear spoiler and its components on Toyota Prius?A:Installation of the rear spoiler requires proper setup of the center stop light assembly first. You should warm both the vehicle body and the spoiler sub-assembly with a heat light when installing large type rear spoilers but avoid overheating them. Protective tape goes underneath the rear spoiler before you start heating both the vehicle body along with the rear spoiler. Both surfaces need a clean of double-sided tape adhesive before starting installation procedures. Set both sides of newly applied double-sided tape on the rear spoiler and repeat the heating process before removing protective materials. Prior to activating the exposed adhesive on the rear spoiler eliminate all foreign substances affixed to its surfaces. Proceed to connect the center stop light connector followed by attaching three clips after that install four bolts. The installation process should include the rear Wiper Motor assembly followed by the back door upper trim board assembly while concluding with the back door lower trim board assembly and rear wiper arm assembly. Installation requires that you apply the cable to the terminal of the negative (-) battery while performing initialization because several systems need initialization when disconnecting and reconnecting the cable.


Related Toyota Prius Parts
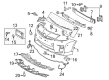
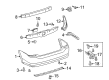
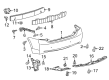
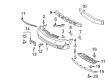
 Toyota Prius Bumper
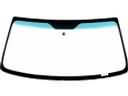 Toyota Prius Windshield
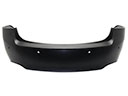 Toyota Prius Bumper Cover
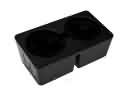 Toyota Prius Cup Holder
 Toyota Prius Instrument Cluster
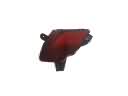 Toyota Prius Bumper Reflector
 Toyota Prius Grille
 Toyota Prius Hood Hinge
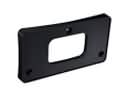 Toyota Prius License Plate
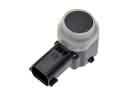 Toyota Prius Parking Assist Sensor
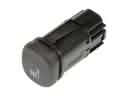 Toyota Prius Seat Heater Switch
 Toyota Prius Window Regulator