×
ToyotaParts- Hello
- Login or Register
- Quick Links
- Live Chat
- Track Order
- Parts Availability
- RMA
- Help Center
- Contact Us
- Shop for
- Toyota Parts
- Scion Parts
My Garage
My Account
Cart
OEM Toyota Land Cruiser Parking Brake Shoe
Emergency Parking Brake Shoe- Select Vehicle by Model
- Select Vehicle by VIN
Select Vehicle by Model
orMake
Model
Year
Select Vehicle by VIN
For the most accurate results, select vehicle by your VIN (Vehicle Identification Number).
6 Parking Brake Shoes found


Toyota Land Cruiser Shoes, Driver Side
Part Number: 46580-60050$46.12 MSRP: $64.19You Save: $18.07 (29%)Ships in 1-3 Business Days

Toyota Land Cruiser Shoes
Part Number: 46550-60060$45.52 MSRP: $63.36You Save: $17.84 (29%)Ships in 1-3 Business Days


Toyota Land Cruiser Shoes, Passenger Side Or Center
Part Number: 46540-60050$46.12 MSRP: $64.19You Save: $18.07 (29%)Ships in 1-3 Business Days


Toyota Land Cruiser Shoe Assembly, Parking Brake, Passenger Side Or Center, Rear
Part Number: 46530-34010$32.01 MSRP: $44.56You Save: $12.55 (29%)Ships in 1 Business Day
Toyota Land Cruiser Parking Brake Shoe
Choose genuine Parking Brake Shoe that pass strict quality control tests. You can trust the top quality and lasting durability. Shopping for OEM Parking Brake Shoe for your Toyota Land Cruiser? Our website is your one-stop destination. We stock an extensive selection of genuine Toyota Land Cruiser parts. The price is affordable so you can save more. It only takes minutes to browse and find the exact fit. Easily add to cart and check out fast. Our hassle-free return policy will keep you stress-free. We process orders quickly for swift delivery. Your parts will arrive faster, so you can get back on the road sooner.
Toyota Land Cruiser Parking Brake Shoe Parts and Q&A
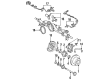
- Q: How to service and repair the parking brake shoe on Toyota Land Cruiser?A:The first step for parking brake shoe maintenance requires initial removal of the wheel at 103 Nm torque and subsequent removal of the rear disc brake assembly by removing its 2 mounting bolts at 103 Nm torque. Securely suspend the assembly without stretching the hose. First create match marks on the disc and rear hub before taking off the component. Wheel rotation should be effortless if the disc shows signs of being difficult to detach. To proceed use needle-nose pliers to take out the tension spring from the backing plate alongside the rear shoe followed by the lower side tension spring. For removal of the 2 shoe return springs Special Service Tool: 09717-20010 should be used along with Special Service Tool: 09718-20010 to install the shoes on both the front and rear of the assembly. Start by taking off the shoe strut accompanied by its spring and then slide out the rear shoe including its adjuster while removing the shoe hold-down spring and 2 cups and pin until you reach the front shoe attached to the Parking Brake Cable No. 2 from the lever with its respective shoe hold-down spring along with 2 cups and pin. The parking brake bellcrank assembly requires disassembly by removing the C-washer, pin, clip followed by 2 tension springs and then two bolts torqued at 13 Nm (130 kgf-cm, 9 ft. lbs.). To begin the inspection process, all components must be checked for signs of damage, rust and wear. Measurement of brake shoe lining material thickness should be taken at two points: 4.0 mm standard with a minimum acceptable value of 1.0 mm. Replacement of worn parts needs to occur if these measurements indicate so. Check and either replace or grind the brake disc when its inside diameter measures between 230-231 mm since uneven wear or scoring patterns are present. You should check the parking brake lining-disc contact point during this process while making adjustments when necessary before measuring the shoe-to-lever clearance (standard for less than 0.25 mm). Replace the shim if it is out of specification. The reassembly process occurs in the opposite order of disassembly by using high-temperature grease and lithium soap base glycol grease on designated parts. The parking brake shoe clearance adjustment requires cable disconnect followed by bellcrank tension spring removal followed by adjusting bolt loosening to temporarily install hub nuts, hole plug removal, shoe expansion until disc locking occurs and finally returning the adjuster 8 notches before reinserting the hole plug. The bellcrank adjustments begin with pulling it to remove play while screwing the adjusting bolt until it matches the dust seal position followed by loosening the bolt once and securing the lock nut to 5.4 Nm (55 kgf-cm, 48 inch lbs.). Afterward, reinstall the bellcrank tension springs followed by connecting the parking brake cable. The final step involves operating the vehicle at a 50-km/h (31-mph) speed while applying 88-N-force (9-kgf, 19.8-lbs.) to the lever across two or three consecutive 400-meter trips (0.25-mile) for checking and readjusting parking brake lever operation.

Related Toyota Land Cruiser Parts
 Toyota Land Cruiser ABS Pump And Motor Assembly
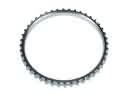 Toyota Land Cruiser ABS Reluctor Ring
 Toyota Land Cruiser Brake Disc
 Toyota Land Cruiser Brake Fluid Pump
 Toyota Land Cruiser Brake Line
 Toyota Land Cruiser Brake Master Cylinder Reservoir
 Toyota Land Cruiser Brake Pad Set
 Toyota Land Cruiser Hydraulic Hose
 Toyota Land Cruiser Master Cylinder Repair Kit
 Toyota Land Cruiser Spindle Nut
 Toyota Land Cruiser Wheel Hub
 Toyota Land Cruiser Wheel Stud