×
ToyotaParts- Hello
- Login or Register
- Quick Links
- Live Chat
- Track Order
- Parts Availability
- RMA
- Help Center
- Contact Us
- Shop for
- Toyota Parts
- Scion Parts
My Garage
My Account
Cart
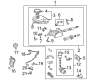
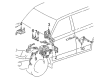
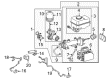
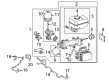
OEM Toyota Land Cruiser Brake Master Cylinder
- Select Vehicle by Model
- Select Vehicle by VIN
Select Vehicle by Model
orMake
Model
Year
Select Vehicle by VIN
For the most accurate results, select vehicle by your VIN (Vehicle Identification Number).
25 Brake Master Cylinders found


Toyota Land Cruiser Brake Booster Assembly, W/Master Cylinder Part Number: 47050-60010
$1358.81 MSRP: $1991.35You Save: $632.54 (32%)Ships in 1-3 Business Days

Toyota Land Cruiser Brake Booster Assembly, W/Master Cylinder Part Number: 47050-60043
$1369.03 MSRP: $2006.33You Save: $637.30 (32%)Ships in 1-3 Business Days

Toyota Land Cruiser Cylinder Sub-Assembly, Brake Master Part Number: 47025-60330
$953.50 MSRP: $1397.37You Save: $443.87 (32%)Ships in 1-3 Business Days

Toyota Land Cruiser Brake Booster Assembly, W/Master Cylinder Part Number: 47050-60500
$1259.73 MSRP: $1846.14You Save: $586.41 (32%)Ships in 1-3 Business Days
Toyota Land Cruiser Brake Booster Assembly, W/Master Cylinder Part Number: 47050-60042
$1369.03 MSRP: $2006.33You Save: $637.30 (32%)Ships in 1-3 Business Days
Toyota Land Cruiser Master Cylinder Part Number: 47050-60012
$1459.83 MSRP: $2139.40You Save: $679.57 (32%)Ships in 1-3 Business Days


Toyota Land Cruiser Cylinder Sub-Assembly, Brake Master Part Number: 47201-60551
$238.46 MSRP: $340.47You Save: $102.01 (30%)Ships in 1-3 Business Days

Toyota Land Cruiser Master Cylinder Part Number: 47201-60540
$231.47 MSRP: $330.49You Save: $99.02 (30%)Ships in 1-3 Business Days
Toyota Land Cruiser Cylinder Sub-Assembly, Brake Master Part Number: 47025-60520
$837.16 MSRP: $1226.88You Save: $389.72 (32%)Ships in 1-3 Business DaysToyota Land Cruiser Cylinder Sub-Assembly, Brake Master Part Number: 47052-60641
$1180.50 MSRP: $1730.04You Save: $549.54 (32%)Ships in 1-3 Business DaysToyota Land Cruiser Master Cylinder Part Number: 47025-60550
$1180.50 MSRP: $1730.04You Save: $549.54 (32%)Ships in 1-3 Business DaysToyota Land Cruiser Cylinder Sub-Assembly, Brake Stroke Simulator Part Number: 47025-60361
$1205.93 MSRP: $1767.30You Save: $561.37 (32%)Ships in 1-3 Business DaysToyota Land Cruiser Cylinder Sub-Assembly, Brake Master Part Number: 47025-60190
$1205.93 MSRP: $1767.30You Save: $561.37 (32%)Ships in 1-3 Business DaysToyota Land Cruiser Brake Booster Part Number: 47050-60641
$1259.73 MSRP: $1846.14You Save: $586.41 (32%)Ships in 1-3 Business Days
Toyota Land Cruiser Cylinder Assembly, Brake Part Number: 47050-60C00
$1373.00 MSRP: $2012.15You Save: $639.15 (32%)Ships in 1-2 Business Days
Toyota Land Cruiser Master Cylinder Part Number: 47052-60630
$769.79 MSRP: $1128.13You Save: $358.34 (32%)Ships in 1-3 Business Days
Toyota Land Cruiser Master Cylinder Repair Kit Part Number: 04493-60070
$59.73 MSRP: $83.13You Save: $23.40 (29%)Ships in 1-3 Business Days
Toyota Land Cruiser Brake Booster Assembly, W/Master Cylinder Part Number: 47050-60041
$1379.24 MSRP: $2021.30You Save: $642.06 (32%)
Toyota Land Cruiser Brake Booster Assembly, W/Master Cylinder Part Number: 47050-60290
$1401.37 MSRP: $2053.73You Save: $652.36 (32%)Toyota Land Cruiser Brake Booster Part Number: 47050-60480
$1443.48 MSRP: $2115.44You Save: $671.96 (32%)
| Page 1 of 2 |Next >
1-20 of 25 Results
Toyota Land Cruiser Brake Master Cylinder
Choose genuine Brake Master Cylinder that pass strict quality control tests. You can trust the top quality and lasting durability. Shopping for OEM Brake Master Cylinder for your Toyota Land Cruiser? Our website is your one-stop destination. We stock an extensive selection of genuine Toyota Land Cruiser parts. The price is affordable so you can save more. It only takes minutes to browse and find the exact fit. Easily add to cart and check out fast. Our hassle-free return policy will keep you stress-free. We process orders quickly for swift delivery. Your parts will arrive faster, so you can get back on the road sooner.
Toyota Land Cruiser Brake Master Cylinder Parts and Q&A
- Q: How to service and repair the brake master cylinder on Toyota Land Cruiser?A:Begin brake master cylinder service and repair by mounting the hydraulic brake booster onto Special Service Tool: 09630-00014 (09631-00142) and 09950-60010 (09951-00180 and 09951-00190). Start repairs of the brake master cylinder by detaching the fluid level warning switch connector followed by unbolt and unclamp removal. First step entails removing the reservoir cap followed by extracting three set screws which allows safe removal of the reservoir after securing proper torque to 1.7 Nm (17.5 kgf-cm, 15.2 inch lbs.) together with the three grommets. Loosen the lock nut before extracting the clevis and lock nut through a torque of 25 Nm (260 kgf-cm, 19 ft. lbs.). This will allow removal of the cylinder boot. Brake Actuator Tube No.1 should be removed using Special Service Tool: 09023-00100 followed by a torque adjustment to 15 Nm (155 kgf-cm, 11 ft. lbs.). The booster pump and assembly requires initial removal of the actuator hose before proceeding to take out the four screws and wire harness and next extracting two accumulator bracket bolts and two booster pump motor assembly bolts followed by a bolt from the No. 1 pump bracket and lastly the two bolts and cushion from the No. 2 pump bracket. Use a part No: 89637-30050 to replace the master cylinder pressure sensor by applying a 30 mm deeper socket wrench with 81 Nm torque (830 kgf-cm, 60 ft. lbs.). A screwdriver will push in the piston so a pin can force out the snap ring before removing the piston in a straight direction to protect the cylinder bore. Use Special Service Tool: 09318-12010 to remove the booster pump accumulator while torquing it to 54 Nm (550 kgf-cm, 36 ft. lbs.). Remove the silencer tube and spring together with its O-ring. Test the hydraulic pump motor through terminal connection of battery leads to keeper terminals. To dispose of the accumulator position it in a vise while covering it with a piece of cloth before carefully sawing the body only at the stretch section to allow safe gas discharge. Reassembly requires the opposite sequence of disassembly while properly adjusting the accumulator bracket through clearance measurements as point A should add point B for no more than 4.1 mm (0.161 inch) and point C should maintain a range of 0.3 - 3.8 mm (0.012 - 0.150 inch) with at least 0.3 mm (0.012 inch) allowed for A and B.

Related Toyota Land Cruiser Parts
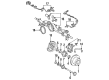
 Toyota Land Cruiser Speed Sensor
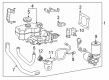
 Toyota Land Cruiser ABS Pump And Motor Assembly
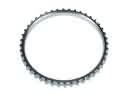 Toyota Land Cruiser ABS Reluctor Ring
 Toyota Land Cruiser Backing Plate
 Toyota Land Cruiser Brake Booster Vacuum Hose
 Toyota Land Cruiser Brake Caliper
 Toyota Land Cruiser Brake Caliper Piston
 Toyota Land Cruiser Brake Master Cylinder Reservoir
 Toyota Land Cruiser Brake Shoe Set
 Toyota Land Cruiser Master Cylinder Repair Kit
 Toyota Land Cruiser Wheel Cylinder Repair Kit
 Toyota Land Cruiser Wheel Stud