×
ToyotaParts- Hello
- Login or Register
- Quick Links
- Live Chat
- Track Order
- Parts Availability
- RMA
- Help Center
- Contact Us
- Shop for
- Toyota Parts
- Scion Parts
My Garage
My Account
Cart
OEM Toyota Land Cruiser Air Injection Pump
SAI Pump- Select Vehicle by Model
- Select Vehicle by VIN
Select Vehicle by Model
orMake
Model
Year
Select Vehicle by VIN
For the most accurate results, select vehicle by your VIN (Vehicle Identification Number).
6 Air Injection Pumps found


Toyota Land Cruiser Pump Assembly, Air, Driver Side Part Number: 17600-0F010
$491.10 MSRP: $719.72You Save: $228.62 (32%)Ships in 1-3 Business Days


Toyota Land Cruiser Pump Assembly, Air, Driver Side Part Number: 17610-0S010
$402.46 MSRP: $589.81You Save: $187.35 (32%)Ships in 1 Business Day


Toyota Land Cruiser Air Pump Part Number: 17610-0S030
$477.37 MSRP: $699.59You Save: $222.22 (32%)Ships in 1-3 Business Days
Toyota Land Cruiser A.I.R. Pump Part Number: 17610-61050

Toyota Land Cruiser A.I.R. Pump Part Number: 17610-61040


Toyota Land Cruiser A.I.R. Pump Part Number: 17610-61030
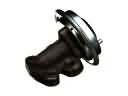
Toyota Land Cruiser Air Injection Pump
Choose genuine Air Injection Pump that pass strict quality control tests. You can trust the top quality and lasting durability. Shopping for OEM Air Injection Pump for your Toyota Land Cruiser? Our website is your one-stop destination. We stock an extensive selection of genuine Toyota Land Cruiser parts. The price is affordable so you can save more. It only takes minutes to browse and find the exact fit. Easily add to cart and check out fast. Our hassle-free return policy will keep you stress-free. We process orders quickly for swift delivery. Your parts will arrive faster, so you can get back on the road sooner.
Secondary Air Injection System or popularly called as Air Injection Pump is a highly essential part of every car and the Toyota Land Cruiser Air Injection Pump is none exception to this where it could be considered acclaimed for its dependability and efficiency in terms of the car's performance. This system is known as the Air Injection Reactor or short AIR, it helps to improve the level of rating and safety of the car Toyota Land Cruiser by injecting fresh air into the exhaust. This process helps to combust unburned fuel hence minimizing dangerous emission such as the Hydrocarbons (HC) and the Carbon Monoxide (CO). The major working of the Toyota Land Cruiser Air Injection Pump is electrical or belt-driven and provides pressurized air to the exhaust ports and the catalytic converter in respect of various engine temperatures. It fit multiple Land Cruiser models in the course of the years proving that it is versatile even if it has lacks, then, the air control valve and the diverters valves ensure that the airflow is the premier that can be offered without exhaust gases back flow. Toyota Land Cruiser Air Injection Pump requires diagnostics frequently because it is does not effectively work, it increases emissions and decreases fuel economy. The Toyota Land Cruiser is known to be coated to stand the test and push in harsh terrains and the Air Injection Pump plays a pivotal role in this journey. Thus, the beneficiary element of the Toyota Land Cruiser that increases performance levels, while decreasing adverse environmental effects, the Air Injection Pump is a perfect example of how the brand creates quality, innovative automotive products with minimal detrimental consequences on the environment.
Toyota Land Cruiser Air Injection Pump Parts and Q&A
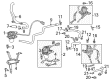
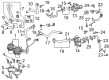
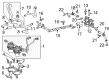
- Q: How to install the air injection pump assembly on Toyota Land Cruiser?A:The air injection pump assembly installation requires attaching 6 air pump insulators to the air pump bracket before securing it to the bracket and connecting 2 wire harness clamps to the bracket. Attaching the hoses to the air pump requires proper alignment of their ends with the stoppers. The air pump inlet must be connected to 2 No. 1 air injection system hoses through the stopper ends until alignment occurs before tightening 2 bolts to 8.0 Nm (82 kgf-cm, 71 in-lbf). Fasten the air pump assembly together with the bracket by sliding the bracket tab into the first slot allowing a stud bolt into the bracket hole followed by placing the bracket into the second slot before applying two bolts and two nuts at 18 Nm (184 kgf-cm, 13 ft-lbf) torque. The 2 air pump connectors need to connect while the 3 wire harness claws should attach. When you connect the No. 3 air injection system hose it must face towards the air pump rib while the clamp direction remains proper before clamping the hose onto the No. 3 pipe and fastening the bracket clip with paint marks aligned to the clamp edge. Position the paint mark of the No. 3 hose facing upward before connecting the hose to the air tube. Confirm proper hose clamp positioning before fixing the clamp on the No. 3 hose and wire harness to the body hole using the clip. The No. 2 air injection system hose requires proper paint mark alignment with the air pump rib before placing the clamp correctly and attaching it to the air tube with paint mark facing upward and clamp in position. When installing the No. 2 hose and wire harness use 2 white clamps which must orient with their paint mark up and you should also apply the black clamp to these components before inserting the body hole clip through the paint mark alignment. To finish the rebuild of this system the mechanic should install the air cleaner assembly before adding the air cleaner hose assembly followed by the V-bank cover sub-assembly then front fender apron seal front RH by installing 3 bolts with a screw and 5 clips and 3 screws with a T30 "TORX" socket for the front fender liner RH. Lastly connect the liner to the front bumper cover with a screw install the front fender splash shield sub-assembly RH and reconnect the cable to the negative battery terminal.
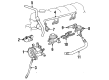
- Q: How to service and repair the Air Injection Pump on Toyota Land Cruiser?A:The service and repair of the Air Injection Pump demands an initial step of fuel system pressure discharge and negative battery terminal cable disconnection for at least 90 seconds to stop Air Bag and seat belt pretensioner activation. You should drain the engine coolant then take out the V-bank cover sub-assembly before cutting the fuel return and main hoses. Service the Air Injection System by beginning with intake air connector pipe and Intake Manifold assembly removal and finally removing the vacuum control valve set through disconnection of the 2 bolts and valve set from the intake manifold along with the 2 vacuum hoses. Begin air pump assembly removal by disconnecting No. 2 air hose and air switching valve connector and pressure sensor connector before removing its securing 4 bolts. To remove the No. 2 air switching valve proceed by removing 4 nuts combined with 2 gaskets and disconnecting 2 No. 3 air tubes from the Exhaust Manifolds. Then install the 4 bolts alongside 2 gaskets and 2 No. 3 air tubes on the 2 No. 2 air switching valves. Additional steps involve removing the 4 bolts with 2 gaskets and 2 No. 2 air switching valves from the rear water by-pass joint followed by uninstalling 2 vacuum hoses from the No. 2 air switching valves. Disconnect both connectors from the air injection control driver followed by removing its two bolts. Start by attaching the air injection control driver into position with its two bolts torqued to 19.5 N.m before linking the two connectors. The process starts by connecting the vacuum hoses to No. 2 air switching valves before placing new gaskets and installing the valves to the rear water by-pass joint with 4 bolts at 10 N.m torque. Afterward, secure the No. 3 air tubes to the exhaust manifold with 4 nuts at 10 N.m torque. Insert the air pump assembly using 4 bolts which need a torque of 16 N.m. Also reinstall the pressure sensor connector and the air switching valve connector and the No. 2 air hose. Fasten the vacuum control valve onto the intake manifold via 2 bolts while tightening it to 7.5 N.m and proceed to connect both vacuum hoses. You should reinstall the intake manifold assembly after connecting the fuel main and return hoses together with the intake air connector pipe as well as the V-bank cover sub-assembly. Reconnect the cable to the negative battery terminal and perform initialization during which specific systems must be initiated apart from reconnecting the cable. After this you should add engine coolant while checking for both engine coolant and fuel leaks.


Related Toyota Land Cruiser Parts
 Toyota Land Cruiser EGR Valve
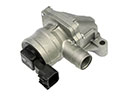 Toyota Land Cruiser Air Pump Check Valve
 Toyota Land Cruiser Canister Purge Valve
 Toyota Land Cruiser Diverter Valve
 Toyota Land Cruiser EGR Tube
 Toyota Land Cruiser EGR Valve Gasket
 Toyota Land Cruiser Exhaust Hanger
 Toyota Land Cruiser PCV Valve
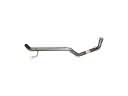 Toyota Land Cruiser Tail Pipe
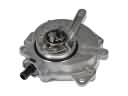 Toyota Land Cruiser Vacuum Pump
 Toyota Land Cruiser Vapor Canister
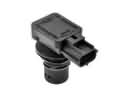 Toyota Land Cruiser Vapor Pressure Sensor