×
ToyotaParts- Hello
- Login or Register
- Quick Links
- Live Chat
- Track Order
- Parts Availability
- RMA
- Help Center
- Contact Us
- Shop for
- Toyota Parts
- Scion Parts
My Garage
My Account
Cart
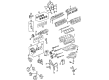
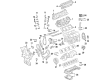
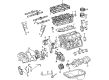
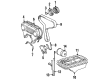
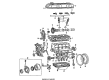
OEM Toyota 4Runner Timing Cover
Engine Timing Cover- Select Vehicle by Model
- Select Vehicle by VIN
Select Vehicle by Model
orMake
Model
Year
Select Vehicle by VIN
For the most accurate results, select vehicle by your VIN (Vehicle Identification Number).
21 Timing Covers found


Toyota 4Runner Cover Sub-Assembly, Timing Belt, Passenger Side Part Number: 11304-AC010
$104.51 MSRP: $146.69You Save: $42.18 (29%)Ships in 1-3 Business Days


Toyota 4Runner Timing Cover Part Number: 11310-31014
$703.92 MSRP: $1031.60You Save: $327.68 (32%)Ships in 1-3 Business Days


Toyota 4Runner Timing Cover, Lower Part Number: 11321-62900
$55.56 MSRP: $77.32You Save: $21.76 (29%)Ships in 1-3 Business Days


Toyota 4Runner Timing Cover, Driver Side Part Number: 11308-AC010
$102.25 MSRP: $143.53You Save: $41.28 (29%)Ships in 1-2 Business Days

Toyota 4Runner Timing Cover, Upper Outer Part Number: 11322-62901
$113.27 MSRP: $159.00You Save: $45.73 (29%)Ships in 1-3 Business Days

Toyota 4Runner Cover, Timing Belt Part Number: 11302-50040
$55.56 MSRP: $77.32You Save: $21.76 (29%)Ships in 1-2 Business Days

Toyota 4Runner Timing Cover Part Number: 11302-65010
$51.97 MSRP: $72.34You Save: $20.37 (29%)Ships in 1-3 Business Days


Toyota 4Runner Timing Cover Part Number: 11302-35010
$294.03 MSRP: $419.82You Save: $125.79 (30%)Ships in 1-3 Business Days


Toyota 4Runner Cover Sub-Assembly, Timing Belt Part Number: 11303-50030
$46.35 MSRP: $64.52You Save: $18.17 (29%)Ships in 1-3 Business Days
Toyota 4Runner Timing Cover Part Number: 11310-31030
$701.42 MSRP: $1027.94You Save: $326.52 (32%)Ships in 1-3 Business DaysToyota 4Runner Front Cover Part Number: 11310-31010
$475.76 MSRP: $697.23You Save: $221.47 (32%)Ships in 1-3 Business Days
Toyota 4Runner Timing Cover Part Number: 11310-75073
$555.09 MSRP: $813.50You Save: $258.41 (32%)
Toyota 4Runner Timing Cover Part Number: 11310-31012
$885.04 MSRP: $1297.03You Save: $411.99 (32%)Ships in 1-3 Business Days
Toyota 4Runner Case Assembly, Timing Chain Or Belt Part Number: 11310-25060
$247.08 MSRP: $352.78You Save: $105.70 (30%)Ships in 1-2 Business Days
Toyota 4Runner Cover Assembly, Timing Chain Or Belt Part Number: 11320-25041
$271.31 MSRP: $387.37You Save: $116.06 (30%)Ships in 1-2 Business Days


Toyota 4Runner Timing Cover Part Number: 11302-38010
$307.96 MSRP: $439.69You Save: $131.73 (30%)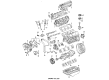
Toyota 4Runner Timing Cover Part Number: 11302-35020

Toyota 4Runner Inner Gasket Part Number: 11304-65011

Toyota 4Runner Timing Cover Part Number: 11303-65020

Toyota 4Runner Timing Cover, Upper Inner Part Number: 11323-62050
| Page 1 of 2 |Next >
1-20 of 21 Results
Toyota 4Runner Timing Cover
Choose genuine Timing Cover that pass strict quality control tests. You can trust the top quality and lasting durability. Shopping for OEM Timing Cover for your Toyota 4Runner? Our website is your one-stop destination. We stock an extensive selection of genuine Toyota 4Runner parts. The price is affordable so you can save more. It only takes minutes to browse and find the exact fit. Easily add to cart and check out fast. Our hassle-free return policy will keep you stress-free. We process orders quickly for swift delivery. Your parts will arrive faster, so you can get back on the road sooner.
Toyota 4Runner Timing Cover Parts and Q&A
- Q: How to remove and replace the timing cover on Toyota 4Runner?A:The first step for removing and changing the timing cover includes power steering link assembly disassembly followed by differential carrier assembly front removal. Starting with coolant and oil drainage the technician should remove battery components together with V-bank cover before proceeding. The removal process starts with removing the radiator support seal upper through unfastening its 11 retaining clips. Start by releasing the fan through fluid coupling until you can remove both the generator V belt and the fan with fluid coupling attached. The user should disconnect ventilation hose No.2 while removing the air cleaner assembly. Start by removing the oil level gauge guide after removing its bolt as well as the gauge and O-ring. Disassemble the vane pump unit and extract the generator unit after eliminating the water inlet. The first task is to separate the cooler compressor assembly before removing the V-ribbed belt tensioner assembly alongside the No.2 idler pulley sub-assembly and the No.1 idler pulley sub-assembly. The maintenance begins by removing the crankshaft pulley followed by No.2 oil pan sub-assembly and oil strainer sub-assembly and oil pan sub-assembly. The service engineer should detach the intake air surge tank followed by the Ignition Coil assembly and each one of the right and left cylinder head cover sub-assemblies. Uninstall the camshaft timing oil control valve assembly by disconnecting its two connectors then removing the two bolts and valves. First disconnect the VVT sensor along with the oil filter bracket sub-assembly through removal of three bolts and two nuts and a gasket. First complete the timing chain cover removal by extracting the 24 bolts and two nuts before gently separating the cover with care toward shield contact surfaces while taking out the O-ring from the left-hand cylinder head. The technician should extract the timing chain cover oil seal using a screwdriver but should protect the oil pump assembly by wrapping the screwdriver tip with tape.

Related Toyota 4Runner Parts
 Toyota 4Runner Oil Filter
 Toyota 4Runner Timing Belt
 Toyota 4Runner Oil Drain Plug Gasket
 Toyota 4Runner Oil Pan
 Toyota 4Runner Timing Chain
 Toyota 4Runner Valve Cover Gasket
 Toyota 4Runner Crankshaft Pulley
 Toyota 4Runner Cylinder Head Gasket
 Toyota 4Runner Dipstick Tube
 Toyota 4Runner Engine Mount
 Toyota 4Runner Timing Idler Gear
 Toyota 4Runner Variable Timing Sprocket