×
ToyotaParts- Hello
- Login or Register
- Quick Links
- Live Chat
- Track Order
- Parts Availability
- RMA
- Help Center
- Contact Us
- Shop for
- Toyota Parts
- Scion Parts
My Garage
My Account
Cart
OEM Toyota 4Runner Parking Brake Shoe
Emergency Parking Brake Shoe- Select Vehicle by Model
- Select Vehicle by VIN
Select Vehicle by Model
orMake
Model
Year
Select Vehicle by VIN
For the most accurate results, select vehicle by your VIN (Vehicle Identification Number).
8 Parking Brake Shoes found


Toyota 4Runner Brake Shoes, Rear
Part Number: 04495-35250$89.69 MSRP: $125.90You Save: $36.21 (29%)Ships in 1-2 Business Days


Toyota 4Runner Brake Shoes, Passenger Side Or Center
Part Number: 46580-60060$42.65 MSRP: $59.36You Save: $16.71 (29%)Ships in 1-3 Business Days

Toyota 4Runner Shoe Assembly, Parking Brake, Passenger Side Or Center, Rear
Part Number: 46550-60070$42.65 MSRP: $59.36You Save: $16.71 (29%)Ships in 1-3 Business Days

Toyota 4Runner Brake Shoes, Driver Side
Part Number: 46540-60060$42.65 MSRP: $59.36You Save: $16.71 (29%)Ships in 1-3 Business Days
Toyota 4Runner Shoes, Rear
Part Number: 04495-35180$90.64 MSRP: $127.23You Save: $36.59 (29%)Ships in 1-3 Business Days
Toyota 4Runner Shoes, Rear
Part Number: 04495-35131$78.79 MSRP: $110.59You Save: $31.80 (29%)Ships in 1-3 Business Days
Toyota 4Runner Parking Brake Shoe
Choose genuine Parking Brake Shoe that pass strict quality control tests. You can trust the top quality and lasting durability. Shopping for OEM Parking Brake Shoe for your Toyota 4Runner? Our website is your one-stop destination. We stock an extensive selection of genuine Toyota 4Runner parts. The price is affordable so you can save more. It only takes minutes to browse and find the exact fit. Easily add to cart and check out fast. Our hassle-free return policy will keep you stress-free. We process orders quickly for swift delivery. Your parts will arrive faster, so you can get back on the road sooner.
Toyota 4Runner Parking Brake Shoe Parts and Q&A
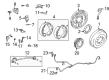
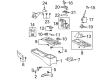
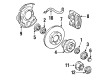
- Q: How to overhaul the Parking Brake Shoe on Toyota 4Runner?A:As a first step to overhaul the parking brake assembly the mechanic must remove the rear wheel before disassembling the rear disc Brake Caliper assembly LH by removing 2 bolts without disconnecting the flexible hose. Remove the parking brake and take out the rear disc while marking both the disc and Axle Shaft. Adjust the shoe until wheel rotation becomes easy if needing to remove difficult discs. The brake drum gauge should measure the disc's inside diameter to confirm it remains within the specifications of 210 mm and 211 mm. Utilize needle-nose pliers to remove the 2 return tension springs before sliding out the front shoe for compression spring extraction. Proceed to remove the parking brake shoe strut LH and the brake shoe by releasing the cup claw to disconnect the Parking Brake Cable from the shoe lever followed by removing the tension spring and shoe adjuster screw set as well as the pair of shoe hold-down springs and 4 cups and 2 pins. A screwdriver should be used to remove the C-washer along with the parking brake shoe shim and shoe lever. Use a ruler to check if the lining on the shoe meets the required standards of 4.0 mm while being at least 1.0 mm thick; install a new brake shoe when necessary. A thorough inspection requires you to grind the shoe lining with chalk on the disc until they reach proper contact. High-temperature grease needs to be applied on the shoe-attached surface of the backing plate prior to shoe and lever installation and C-washer addition. Use a feeler gauge to check the clearance which must be below 0.25 mm; obtain a new shim if the measurements fail to meet criteria. The adjusting bolt and piece should be lubricated before adding the shoe adjusting screw set and tension spring to both shoes followed by installing the pins and 4 cups and 2 shoe hold-down springs. The first step is connecting the parking brake cable to the shoe lever before moving to install the front and rear parking brake shoe followed by the parking brake shoe strut LH and compression spring with return tension springs where the front side spring should be installed first. Regular inspection of all components must verify complete installation together with no residue of oil or grease located on friction surfaces. Temporarily attach hub nuts to adjust the parking brake shoe clearance by removing the hole plug while expanding the shoes until a disc lock occurs then contracting the adjuster to achieve 8 notched smooth rotation of the disc. Check that the brake system is free of drag before placing the hole plug in position. While finishing the installation of the rear disc brake caliper assembly LH, use two bolts to fasten the components with 105 Nm torque then reinstall the rear wheel applying 112 Nm torque to it before adjusting the parking brake pedal travel to proper setting.

Related Toyota 4Runner Parts
 Toyota 4Runner Brake Line
 Toyota 4Runner Wheel Bearing
 Toyota 4Runner Brake Booster Vacuum Hose
 Toyota 4Runner Brake Caliper Bracket
 Toyota 4Runner Brake Caliper Piston
 Toyota 4Runner Brake Drum
 Toyota 4Runner Brake Master Cylinder Reservoir
 Toyota 4Runner Brake Shoe Set
 Toyota 4Runner Master Cylinder Repair Kit
 Toyota 4Runner Parking Brake Cable
 Toyota 4Runner Wheel Cylinder
 Toyota 4Runner Yaw Sensor