×
ToyotaParts- Hello
- Login or Register
- Quick Links
- Live Chat
- Track Order
- Parts Availability
- RMA
- Help Center
- Contact Us
- Shop for
- Toyota Parts
- Scion Parts
My Garage
My Account
Cart
OEM Scion Water Pump
H2O Pump- Select Vehicle by Model
- Select Vehicle by VIN
Select Vehicle by Model
orMake
Model
Year
Select Vehicle by VIN
For the most accurate results, select vehicle by your VIN (Vehicle Identification Number).
11 Water Pumps found


Scion Water Pump Part Number: 16100-28041
$109.60 MSRP: $153.85You Save: $44.25 (29%)Ships in 1-2 Business DaysProduct Specifications- Other Name: Pump Assembly, Water; Engine Water Pump; Water Pump Assembly; Pump Assembly, Engine Water
- Replaces: 16100-28040


Scion Water Pump Part Number: 16100-09515
$117.72 MSRP: $166.65You Save: $48.93 (30%)Ships in 1-3 Business DaysProduct Specifications- Other Name: Pump Assembly, Water; Engine Water Pump; Water Pump Assembly; Pump Assembly, Engine Water


Scion Water Pump Part Number: 16100-29157-83
$55.91 MSRP: $77.83You Save: $21.92 (29%)Ships in 1-3 Business DaysProduct Specifications- Other Name: Pump Assembly, Water; Engine Water Pump
- Replaces: 16100-29156-83, 16100-29156, 16100-29155, 16100-29155-83


Scion Water Pump Part Number: 16100-80011
$91.83 MSRP: $128.89You Save: $37.06 (29%)Ships in 1-3 Business DaysProduct Specifications- Other Name: Pump Assembly, Water; Engine Water Pump; Water Pump Assembly; Pump Assembly, Engine Water


Scion Water Pump Part Number: 16100-39466
$100.00 MSRP: $140.37You Save: $40.37 (29%)Ships in 1-3 Business DaysProduct Specifications- Other Name: Pump Assembly, Water; Engine Water Pump; Pump Assembly, Engine Water
- Manufacturer Note: (J)


Scion Water Pump Part Number: 16100-0H050
$82.82 MSRP: $116.25You Save: $33.43 (29%)Ships in 1-2 Business DaysProduct Specifications- Other Name: Pump Assembly, Water; Engine Water Pump
- Replaces: 16100-0H040


Scion Water Pump Part Number: 16100-09620
$107.11 MSRP: $150.35You Save: $43.24 (29%)Ships in 1-2 Business DaysProduct Specifications- Other Name: Pump Assembly, Water; Engine Water Pump; Pump Assembly, Engine Water
- Manufacturer Note: (L)
- Replaces: 16100-39565


Scion Water Pump Part Number: SU003-00401
$138.78 MSRP: $182.70You Save: $43.92 (25%)Ships in 1-2 Business DaysProduct Specifications- Other Name: Pump Assembly-Water; Engine Water Pump; Pump Assembly, Engine Water

Scion Pump Assembly, Water Part Number: 16100-WB003
$133.02 MSRP: $188.31You Save: $55.29 (30%)Ships in 1-2 Business DaysProduct Specifications- Other Name: PUMP ASSY, WATER

Scion Water Pump Part Number: 16100-39465
Product Specifications- Other Name: Engine Water Pump; Pump Assembly, Engine Water

Scion Water Pump Part Number: 16100-80008
Product Specifications- Other Name: Engine Water Pump; Water Pump Assembly; Pump Assembly, Engine Water
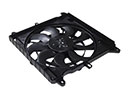
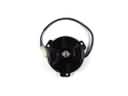
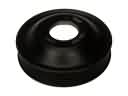
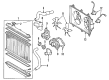
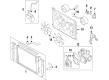
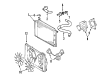
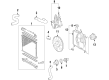
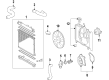
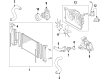
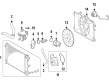
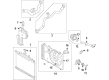
Scion Water Pump
OEM parts deliver unmatched quality you can rely on. They pass extensive quality control inspections. Scion produces them to the official factory specifications. This process helps prevent defects and imperfections. So you can get exceptional lifespan and a flawless fit. Need new OEM Scion Water Pump? You'll love our wide selection of genuine options. Shop in minutes and skip the hunt. Our prices are unbeatable, you'll save time and money. It's easy to shop and find the right piece. Our committed customer service team gives professional help from start to finish. Every part includes a manufacturer's warranty. We ship quickly, your parts will arrive fast at your door.
Scion Water Pump ensures that engine heat does not run out of control and drivers do not experience engine overheating which depletes power. In 2003, the brand entered to entice young drivers with outrageous color schemes, streaming concerts and no-option prices which scrapped the all-options maze in favor of the buyer taking a feel-good ride in a car that was tailor-made to them without any waiting. Scion also omitted the boring showrooms, creating hype via virtual Scion City, street art and surprise car drops and continuing to keep the hype alive by doing numbered Release Series runs whose fresh paint and cabin tweaks disappeared overnight off lots. Scion was Toyota's test-driving laboratory and demonstrated that small-scale production and internet buzz could turn into actual sales and that a small platform combined with direct communication could open the market to first-time buyers who applied to believe that new cars were out of their reach. It is a spirit that exists today in every component that carries the Scion badge such as cooling equipment that protects commuters of the city against heat in stop lights. The Water Pump consists of a lightweight aluminum housing, a fine shaft and a scanned impeller to push coolant through the block and radiator at a great volume and scrub the heat of combustion before it can fry gaskets and sap acceleration on hot summer days. Due to the low-drag bearings, the Water Pump is a power sipper that puts more of the torque on wheels rather than belts, an advantage during the act of merging hard. Electric versions of the Water Pump activate only when sensors demand flow to reduce parasitic loss and maintain the same temp at long lights.
Scion Water Pump Parts and Q&A
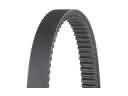
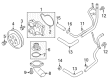
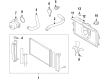
- Q: How to replace the water pump assembly on Scion tC?A:You should begin water pump assembly (2AZ-FE) replacement by disconnecting the battery negative terminal while draining the engine coolant. Start the water pump assembly (2AZ-FE) replacement by using Special Service Tool: 09249-63010 to remove the front fender apron seal RH, engine under cover RH, and the fan and generator V-belt. User Special Service Tool: 09960-10010 (09962-01000, 09963-00700) for bolting removal of the 4 water pump pulley bolts before the generator assembly separation. Detach the clamp of the crankshaft position sensor from the water pump following disconnecting the wire from its clamp bracket while removing the 4 bolts and 2 nuts and clamp bracket. Follow these steps to remove the water pump from the cylinder block by carefully using a thin object between them to avoid damaging the contact surface. Apply a continuous bead of 2.2 to 2.5 mm (0.09 to 0.10 inch) in diameter seal packing material (Part No. 08826-00080 or equivalent) to the contact surface after you remove all old seal packing material remnants from its surface. Install all components within 15 minutes after applying the seal packing because delays longer than 3 minutes require removing the material then reapplying it. Install the water pump using 4 bolts and 2 nuts while torquing it to 9.0 Nm (92 kgf-cm, 80 inch lbs.). Then secure the crankshaft position sensor wire and attach its clamp to the water pump before installing the water pump pulley using Special Service Tool 09960-10010 (09962-01000, 09963-00700) and torquing 4 bolts to 26 Nm (265 kgf-cm, 19 ft. lbs.). Install the water pump pulley with Special Service Tool: 09960-10010 (09962-01000, 09963-00700) by using its 4 bolts while torquing them to a value of 26 Nm (265 kgf-cm, 19 ft. lbs.). The generator assembly and fan together with a generator V-belt are reinstalled using Special Service Tool: 09249-63010 to which engine coolant is added before reconnecting the battery negative terminal and torquing it to 5.4 Nm. The last step involves checking for leakages and then reinstalling both the engine under cover and the front fender apron seal running along the right-hand side.
- Q: How to replace the water pump on Scion xB?A:The water pump replacement procedure starts with draining the engine coolant before removing the engine under cover RH then the fan and generator V belt. The engine mounting insulator sub-assy RH and water pump pulley require Special Service Tool: 09960-10010 (09962-01000, 09963-00600) to remove the 3 bolts at their respective locations. The next step is to detach the water pump assembly by unfastening 3 bolts and 2 nuts then removing the water pump while separating it from the gasket. To install the components first position the new gasket and water pump using the 3 bolts and 2 nuts while implementing a torque of 11 Nm (112 kgf-cm, 8.1 ft. lbs.). Use Special Service Tool: 09960-10010 (09962-01000, 09963-00600) to install the water pump pulley by fastening its 3 bolts with a torque of 15 Nm (153 kgf-cm, 11 ft. lbs.). The next step involves reinstalling the engine mounting insulator sub-assy RH as well as the fan and generator V belt but the V-ribbed belt should be initially placed on each pulley. Adjust the V belt on the fan and generator followed by an examination of drive belt tension and deflection before reinstalling the right-hand engine under cover while tightening the bolt and nut to 5.0 Nm (51 kgf-cm, 44 inch lbs.). To complete the procedure you must add engine coolant before checking for any fluid leakages.