×
ToyotaParts- Hello
- Login or Register
- Quick Links
- Live Chat
- Track Order
- Parts Availability
- RMA
- Help Center
- Contact Us
- Shop for
- Toyota Parts
- Scion Parts
My Garage
My Account
Cart
OEM Scion tC Exhaust Pipe
Exhaust Tail Pipe- Select Vehicle by Model
- Select Vehicle by VIN
Select Vehicle by Model
orMake
Model
Year
Select Vehicle by VIN
For the most accurate results, select vehicle by your VIN (Vehicle Identification Number).
9 Exhaust Pipes found

Scion tC Muffler & Pipe Part Number: 17430-28611
$504.04 MSRP: $676.57You Save: $172.53 (26%)Ships in 1-3 Business Days
Scion tC Exhaust Pipe, Center Part Number: 17420-36210
$902.99 MSRP: $1212.08You Save: $309.09 (26%)Ships in 1-3 Business DaysScion tC Exhaust Pipe, Center Part Number: 17420-36070
$1045.21 MSRP: $1402.97You Save: $357.76 (26%)Ships in 1-3 Business Days
Scion tC Center Pipe Part Number: 17420-28520
$1114.67 MSRP: $1496.21You Save: $381.54 (26%)Ships in 1-3 Business Days
Scion tC Muffler & Pipe Part Number: 17430-36300
$257.69 MSRP: $336.98You Save: $79.29 (24%)Ships in 1-3 Business Days
Scion tC Front Pipe Part Number: 17410-28501
$260.37 MSRP: $340.48You Save: $80.11 (24%)Ships in 1-3 Business DaysScion tC Front Pipe Part Number: 17410-28500
$260.37 MSRP: $340.48You Save: $80.11 (24%)Ships in 1-3 Business DaysScion tC Muffler & Pipe Part Number: 17430-36100
$271.20 MSRP: $354.65You Save: $83.45 (24%)Ships in 1-3 Business Days
Scion tC Front Pipe Part Number: 17410-36160
$159.55 MSRP: $206.88You Save: $47.33 (23%)Ships in 1-3 Business Days
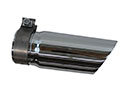
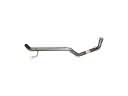
Scion tC Exhaust Pipe
Choose genuine Exhaust Pipe that pass strict quality control tests. You can trust the top quality and lasting durability. Shopping for OEM Exhaust Pipe for your Scion tC? Our website is your one-stop destination. We stock an extensive selection of genuine Scion tC parts. The price is affordable so you can save more. It only takes minutes to browse and find the exact fit. Easily add to cart and check out fast. Our hassle-free return policy will keep you stress-free. We process orders quickly for swift delivery. Your parts will arrive faster, so you can get back on the road sooner.
The Scion tC Exhaust Pipe is a very important part that has durability and efficiency, and its characteristic is that it has a direct impact on the functionality of the Scion tC vehicles. Intended to eliminate undesirable gases such as carbon monoxide from the engine, the exhaust pipe prevents the toxic fumes from penetrating the engine compartment or interior, thus preserving the well-being of people. Designed to fit Scion tC models, the Scion tC Exhaust Pipe integrates to other members of the exhaust system that are responsible for the unleashing of gases from the engine safely and effectively to the muffler and even the catalytic converter. By being mounted on the vehicle in such a way, it is able to improve on its performance apart from minimizing matters that are likely to bring about things like rattling or exhaust leaks which are fatal on vehicles. Today, Scion tC is an affordable car with sporty characteristics, which found a loyal audience among young drivers, due to which it occupies a key position in the automotive industry. Special features of the Scion tC Exhaust Pipe involves the pipe's' design, which might consist of a central or multiple pipes for efficiency. It also increases the efficiency of the vehicle and at the same time enhances the level of excitement one gets while using the car. In total, therefore, the Scion tC Exhaust Pipe can be seen as central to the smooth and efficient running of this Scion tC and its continued suitability for use by its committed fan base and regular drivers.
Scion tC Exhaust Pipe Parts and Q&A
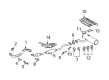
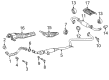
- Q: How to install the exhaust pipe and ensure proper assembly on Scion tC?A:The installation of the exhaust pipe begins with installing five exhaust pipe supports to the body of the vehicle. A vernier caliper should be used to check the compression spring free length and replacement is needed if the measurement falls below 40.5 mm (1.594 in.). Mount a new exhaust gasket in a flush position to the exhaust manifold through wooden block hammering with a plastic-faced hammer while maintaining proper orientation and discarding any repeat use. Fasten the front exhaust pipe by installing two compression springs and two bolts while torquing them to 43 Nm (440 kgf-cm, 32 ft-lbf). The installation procedure for the center exhaust pipe assembly requires a new gasket placement onto the front exhaust pipe followed by connecting the center exhaust pipe to its supports before bolting it with 2 fasteners that should be torqued to 43 Nm (440 kgf-cm, 32 ft-lbf). The tailpipe installation process requires checking the compression spring length; replace it if the measurement shows below 38.5 mm (1.516 in.). Install a fresh gasket next to the exhaust pipe center but position it correctly to prevent recycling. Attach the tailpipe to the 3 supports before installing 2 compression springs along with 2 bolts which must achieve a torque of 43 Nm (440 kgf-cm, 32 ft-lbf). The Bank 1 Sensor 2 heated Oxygen Sensor needs installation followed by cable connection to the negative terminal of the battery while searching for exhaust gas leaks. The front floor panel brace needs four bolts which must be torqued to 29.6 Nm (300 kgf-cm, 22 ft-lbf) while maintaining proper installation orientation. When re-establishing the power connection to the negative battery terminal systems that need initialization must be activated.
- Q: How to remove and replace the exhaust pipe on Scion tC?A:The maintenance process for replacing and removing an exhaust pipe of a 2AZ-FE engine starts with disconnecting the negative battery terminal cable and requires possible system initialization after reconnection. Start the procedure by taking off the heated Oxygen Sensor located at Bank 1 Sensor 2. You can access the front floor panel brace by unfastening its four mounting bolts. The process starts by removing two bolts together with two compression springs while separating the tailpipe from three pipe supports and taking off the gasket on the center exhaust pipe. The process requires unfastening the 2 bolts from the center exhaust pipe assembly until it separates from its 2 pipe supports as well as removing the front exhaust pipe gasket. The process to disassemble the front exhaust pipe requires removing two bolts and the front exhaust pipe together with two compression springs and its gasket from the manifold. In the last step you should eliminate the five exhaust pipe supports from the vehicle body.