×
ToyotaParts- Hello
- Login or Register
- Quick Links
- Live Chat
- Track Order
- Parts Availability
- RMA
- Help Center
- Contact Us
- Shop for
- Toyota Parts
- Scion Parts
My Garage
My Account
Cart
OEM 2007 Scion tC Exhaust Pipe
Exhaust Tail Pipe- Select Vehicle by Model
- Select Vehicle by VIN
Select Vehicle by Model
orMake
Model
Year
Select Vehicle by VIN
For the most accurate results, select vehicle by your VIN (Vehicle Identification Number).
3 Exhaust Pipes found

2007 Scion tC Muffler & Pipe
Part Number: 17430-28611$504.04 MSRP: $676.57You Save: $172.53 (26%)Ships in 1-3 Business DaysProduct Specifications- Other Name: Pipe Assembly, Exhaust Tail; Exhaust Muffler; Direct-Fit Exhaust; Exhaust System Kit; Exhaust Pipe; Tail Pipe; Muffler
- Replaces: 17430-28610
- Condition: New
- SKU: 17430-28611
- Warranty: This genuine part is guaranteed by Toyota's factory warranty.

2007 Scion tC Front Pipe
Part Number: 17410-28501$260.37 MSRP: $340.48You Save: $80.11 (24%)Ships in 1-3 Business DaysProduct Specifications- Other Name: Pipe Assembly, Exhaust; Exhaust Intermediate Pipe; Exhaust Pipe; Pipe Assembly, Exhaust, Front
- Position: Front
- Part Name Code: 17410
- Item Weight: 11.10 Pounds
- Item Dimensions: 48.2 x 18.5 x 9.5 inches
- Condition: New
- Fitment Type: Direct Replacement
- SKU: 17410-28501
- Warranty: This genuine part is guaranteed by Toyota's factory warranty.

2007 Scion tC Center Pipe
Part Number: 17420-28520$1114.67 MSRP: $1496.21You Save: $381.54 (26%)Ships in 1-3 Business DaysProduct Specifications- Other Name: Pipe Assembly, Exhaust; Exhaust Pipe; Pipe Assembly, Exhaust, Center
- Position: Center
- Part Name Code: 17420
- Item Weight: 7.50 Pounds
- Item Dimensions: 34.0 x 3.6 x 17.2 inches
- Condition: New
- Fitment Type: Direct Replacement
- SKU: 17420-28520
- Warranty: This genuine part is guaranteed by Toyota's factory warranty.
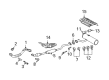
2007 Scion tC Exhaust Pipe
Looking for affordable OEM 2007 Scion tC Exhaust Pipe? Explore our comprehensive catalogue of genuine 2007 Scion tC Exhaust Pipe. All our parts are covered by the manufacturer's warranty. Plus, our straightforward return policy and speedy delivery service ensure an unparalleled shopping experience. We look forward to your visit!
2007 Scion tC Exhaust Pipe Parts Q&A
- Q: How to service and repair the exhaust pipe on 2007 Scion tC?A: The first step for exhaust pipe service and repair includes disconnecting the battery negative terminal cable but waiting at least 90 seconds to stop Air Bag and seat belt pretensioner activation. Begin the repair of the exhaust pipe by first removing the heated oxygen sensor (Bank 1 Sensor 2) and then disconnecting the front floor panel brace by taking out its 4 bolts. Next remove the tailpipe assembly by taking out its 2 bolts and detaching its 2 compression springs. Afterwards separate the tailpipe from its 3 pipe support connections and remove the gasket on the center exhaust pipe. You need to take out 2 bolts to detach the center exhaust pipe from its mount points before getting rid of the gasket at the front exhaust pipe. During the front exhaust pipe assembly disassembly you need to remove 2 bolts and 2 compression springs before taking out the front exhaust pipe while removing the gasket from the manifold. Take out the five exhaust pipe supports which are attached to the body. A plastic-faced hammer should be used to equally tap the tailpipe baffle sub-assembly for disassembly procedures. The baffle requires positioning over the tailpipe protruding section before it is can be tapped into position. Check the compression spring free length measurement on the front exhaust pipe assembly using a vernier caliper until it reaches 40.5 mm (1.594 inch) minimum. Replace the spring if its measurement does not meet the requirement. A new gasket needs surface flattening with the exhaust manifold through wooden block hammering and plastic-faced hammer strikes. The gasket must face the correct direction and remain unused for subsequent installation. Secure the front exhaust pipe through placement of two compression springs with two bolts tightened to 43 Nm (440 kgf-cm, 32 ft. lbs.). Install a new gasket onto the front exhaust pipe before attaching the exhaust pipe center to 2 exhaust pipe supports using 2 bolts that should be torqued to 43 Nm (440 kgf-cm, 32 ft. lbs.). Check the compression spring free length in the tailpipe assembly because replacement is required when it falls below 38.5 mm (1.516 inch). Install a fresh gasket with proper positioning next to the center exhaust pipe while avoiding the use of previously removed gaskets. Fit the tailpipe onto its 3 exhaust pipe supports followed by securing it using 2 compression springs and 2 bolts that should be tightened to 43 Nm (440 kgf-cm, 32 ft. lbs.). Petrol vehicles with the Bank 1 Sensor 2 heated oxygen sensor should have its cable reconnected at the negative terminal before checking for leaks and installing the 4-bolt front floor panel brace with a torque setting of 29.6 Nm (300 kgf-cm, 22 ft. lbs.). A mandatory step is initialization which needs to be performed by systems that require it following battery cable reconnection from the negative terminal.
Related 2007 Scion tC Parts
 2007 Scion tC Catalytic Converter
 2007 Scion tC Muffler
 2007 Scion tC Oxygen Sensor
 2007 Scion tC PCV Valve
 2007 Scion tC Exhaust Heat Shield
 2007 Scion tC Exhaust Manifold
 2007 Scion tC Canister Purge Valve
 2007 Scion tC Exhaust Flange Gasket
 2007 Scion tC Exhaust Hanger
 2007 Scion tC Exhaust Manifold Gasket
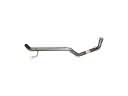 2007 Scion tC Tail Pipe