×
ToyotaParts- Hello
- Login or Register
- Quick Links
- Live Chat
- Track Order
- Parts Availability
- RMA
- Help Center
- Contact Us
- Shop for
- Toyota Parts
- Scion Parts
My Garage
My Account
Cart
OEM 2010 Scion xB Fuel Injector
Gas Injector- Select Vehicle by Model
- Select Vehicle by VIN
Select Vehicle by Model
orMake
Model
Year
Select Vehicle by VIN
For the most accurate results, select vehicle by your VIN (Vehicle Identification Number).
1 Fuel Injector found


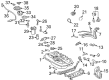
2010 Scion xB Injector
Part Number: 23209-0H030$165.66 MSRP: $234.51You Save: $68.85 (30%)Ships in 1-3 Business DaysProduct Specifications- Other Name: Injector Set, Fuel; Fuel Injector; Injector Assembly, Fuel
- Replaces: 23209-28080, 23209-0H060
- Part Name Code: 23250
- Item Weight: 0.50 Pounds
- Item Dimensions: 3.8 x 2.8 x 1.5 inches
- Condition: New
- Fitment Type: Direct Replacement
- Require Quantity: 4
- SKU: 23209-0H030
- Warranty: This genuine part is guaranteed by Toyota's factory warranty.
2010 Scion xB Fuel Injector
Looking for affordable OEM 2010 Scion xB Fuel Injector? Explore our comprehensive catalogue of genuine 2010 Scion xB Fuel Injector. All our parts are covered by the manufacturer's warranty. Plus, our straightforward return policy and speedy delivery service ensure an unparalleled shopping experience. We look forward to your visit!
2010 Scion xB Fuel Injector Parts Q&A
- Q: How to remove the fuel injectors on 2010 Scion xB?A: The first step for extracting the 2AZ-FE engine fuel injectors requires the discharge of fuel system pressure. The removal procedure begins by taking out both the No. 1 engine cover sub-assembly and the air cleaner cap sub-assembly which includes the hose. Disconnection of the fuel main tube occurs through removing it from its clamp position with the fuel hose and the No. 2 fuel pipe while maintaining a straight line for the tube. Through the use of Special Service Tool: 09268-21010 you should space the retainer inside the connector to the tool's chamfer edge. Apply the fuel tube into the tool along with the connector and position the retainer onto the tool's chamfered section. Sliding the tool and connector together will produce a "click" sound which indicates the correct connection while you drain any residual fuel from the tube. Wrap the separated parts in a plastic bag to protect them. You can start the fuel delivery pipe sub-assembly removal process by disconnecting the No. 2 ventilation hose from the ventilation valve followed by disconnecting four fuel injector connectors and removing the two wire harness clamps. The two bolts need removal to extract the fuel delivery pipe and four fuel injectors while maintaining care to prevent them from falling. Users must also remove the two delivery pipe spacers and four insulators from the cylinder head. To complete the task remove the four fuel injectors from the fuel delivery pipe.
Related 2010 Scion xB Parts
 2010 Scion xB Air Filter Box
 2010 Scion xB Fuel Pump
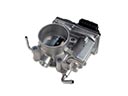 2010 Scion xB Throttle Body
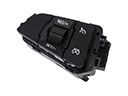 2010 Scion xB Cruise Control Switch
 2010 Scion xB Fuel Filler Neck
 2010 Scion xB Fuel Injector O-Ring
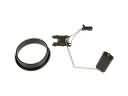 2010 Scion xB Fuel Level Sensor
 2010 Scion xB Fuel Pressure Regulator
 2010 Scion xB Fuel Pump Seal
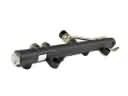 2010 Scion xB Fuel Rail
 2010 Scion xB Fuel Tank
 2010 Scion xB Throttle Body Gasket