×
ToyotaParts- Hello
- Login or Register
- Quick Links
- Live Chat
- Track Order
- Parts Availability
- RMA
- Help Center
- Contact Us
- Shop for
- Toyota Parts
- Scion Parts
My Garage
My Account
Cart
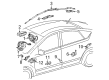
OEM 2009 Toyota Prius Air Bag Sensor
Air Bag Impact Sensor- Select Vehicle by Model
- Select Vehicle by VIN
Select Vehicle by Model
orMake
Model
Year
Select Vehicle by VIN
For the most accurate results, select vehicle by your VIN (Vehicle Identification Number).
5 Air Bag Sensors found

2009 Toyota Prius Front Impact Sensor, Driver Side
Part Number: 89174-49125$107.59 MSRP: $129.72You Save: $22.13 (18%)Ships in 1-3 Business DaysProduct Specifications- Other Name: Sensor, Air Bag, Front; Air Bag Impact Sensor, Front Left; Air Bag Sensor; Front Sensor; Sensor, Air Bag, Front Driver Side
- Position: Front Driver Side
- Part Name Code: 89174A
- Item Weight: 0.70 Pounds
- Item Dimensions: 4.7 x 2.9 x 2.3 inches
- Condition: New
- Fitment Type: Direct Replacement
- SKU: 89174-49125
- Warranty: This genuine part is guaranteed by Toyota's factory warranty.
2009 Toyota Prius Front Impact Sensor, Passenger Side
Part Number: 89173-49315$107.59 MSRP: $129.72You Save: $22.13 (18%)Ships in 1-3 Business DaysProduct Specifications- Other Name: Sensor, Air Bag, Front; Air Bag Impact Sensor, Front Right; Air Bag Sensor; Front Sensor; Sensor, Air Bag, Front Passenger Side
- Position: Front Passenger Side
- Part Name Code: 89173A
- Item Weight: 0.70 Pounds
- Item Dimensions: 4.7 x 2.9 x 2.3 inches
- Condition: New
- Fitment Type: Direct Replacement
- SKU: 89173-49315
- Warranty: This genuine part is guaranteed by Toyota's factory warranty.

2009 Toyota Prius Side Impact Sensor, Front
Part Number: 89860-47040$191.58 MSRP: $234.95You Save: $43.37 (19%)Ships in 1-3 Business DaysProduct Specifications- Other Name: Sensor Assembly, Side Air Bag; Air Bag Impact Sensor, Front; Air Bag Sensor; Side Sensor; Sensor Assembly, Side Air Bag, Passenger Side; Sensor Assembly, Side Air Bag, Driver Side
- Position: Front
- Item Weight: 0.60 Pounds
- Item Dimensions: 4.3 x 2.5 x 2.0 inches
- Condition: New
- Fitment Type: Direct Replacement
- SKU: 89860-47040
- Warranty: This genuine part is guaranteed by Toyota's factory warranty.

2009 Toyota Prius Side Impact Sensor, Rear Driver Side
Part Number: 89834-47020$133.70 MSRP: $189.28You Save: $55.58 (30%)Ships in 1-3 Business DaysProduct Specifications- Other Name: Sensor, Air Bag, Rear; Air Bag Impact Sensor, Rear Left; Air Bag Sensor; Side Sensor; Sensor, Air Bag, Rear Driver Side
- Position: Rear Driver Side
- Part Name Code: 89834
- Item Weight: 0.60 Pounds
- Item Dimensions: 4.3 x 2.6 x 2.0 inches
- Condition: New
- Fitment Type: Direct Replacement
- SKU: 89834-47020
- Warranty: This genuine part is guaranteed by Toyota's factory warranty.
2009 Toyota Prius Side Impact Sensor, Rear Passenger Side
Part Number: 89833-47030$120.66 MSRP: $170.81You Save: $50.15 (30%)Ships in 1-3 Business DaysProduct Specifications- Other Name: Sensor, Air Bag, Rear; Air Bag Impact Sensor, Rear Right; Air Bag Sensor; Side Sensor; Sensor, Air Bag, Rear Passenger Side
- Position: Rear Passenger Side
- Part Name Code: 89833
- Item Weight: 0.60 Pounds
- Item Dimensions: 4.2 x 2.6 x 2.1 inches
- Condition: New
- Fitment Type: Direct Replacement
- SKU: 89833-47030
- Warranty: This genuine part is guaranteed by Toyota's factory warranty.
2009 Toyota Prius Air Bag Sensor
Looking for affordable OEM 2009 Toyota Prius Air Bag Sensor? Explore our comprehensive catalogue of genuine 2009 Toyota Prius Air Bag Sensor. All our parts are covered by the manufacturer's warranty. Plus, our straightforward return policy and speedy delivery service ensure an unparalleled shopping experience. We look forward to your visit!
2009 Toyota Prius Air Bag Sensor Parts Q&A
- Q: How to install the front Air Bag sensor on the left and right sides, and what precautions should be taken on 2009 Toyota Prius?A: The front Air Bag sensor setup on the left side requires two bolts that should be tightened to 17.5 Nm (178 kgf-cm and 13 ft-lbf). Replacement of the Air Bag sensor becomes necessary when the sensor encounters drops or when any signs of case cracks or connector or case defects appear. Verify that SRS wiring remains free from damage and other components while installing the system. Before finalizing the installation procedure inspect every mounting point of the sensor for loose displacement. Connect the sensor connector. The front Air Bag sensor on the right side requires 2 bolts that need a torque level of 9.0 Nm (92 kgf-cm, 80 in-lbf) while observing the same safety measures for preventing damage and protecting the wiring connections. Once both sensors are secured you must install the engine under cover on the left side and right side while reconnecting the battery cable before initiating system initialization that specific systems need after battery reconnect. The SRS warning light checks should be performed to validate system functionality.
Related 2009 Toyota Prius Parts
 2009 Toyota Prius TPMS Sensor
 2009 Toyota Prius Clock Spring
 2009 Toyota Prius Coolant Temperature Sensor
 2009 Toyota Prius Horn
 2009 Toyota Prius Fuse
 2009 Toyota Prius Air Bag
 2009 Toyota Prius Air Bag Control Module
 2009 Toyota Prius Body Control Module
 2009 Toyota Prius Daytime Running Light Relay
 2009 Toyota Prius Door Jamb Switch
 2009 Toyota Prius Headlight Relay
 2009 Toyota Prius Relay