×
ToyotaParts- Hello
- Login or Register
- Quick Links
- Live Chat
- Track Order
- Parts Availability
- RMA
- Help Center
- Contact Us
- Shop for
- Toyota Parts
- Scion Parts
My Garage
My Account
Cart
OEM 2009 Toyota Land Cruiser Coil Springs
Strut Spring- Select Vehicle by Model
- Select Vehicle by VIN
Select Vehicle by Model
orMake
Model
Year
Select Vehicle by VIN
For the most accurate results, select vehicle by your VIN (Vehicle Identification Number).
4 Coil Springs found


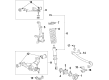
2009 Toyota Land Cruiser Coil Spring, Front
Part Number: 48131-60D21$200.83 MSRP: $286.75You Save: $85.92 (30%)Ships in 1-3 Business DaysProduct Specifications- Other Name: Spring, Coil, Front; Coil Spring, Front Left, Front Right; Coil Springs; Spring; Spring, Front Coil, Passenger Side; Spring, Front Coil, Driver Side
- Manufacturer Note: MEXICO SPEC
- Position: Front
- Replaces: 48131-60D20
- Item Weight: 6.40 Pounds
- Item Dimensions: 16.2 x 7.3 x 5.9 inches
- Condition: New
- Fitment Type: Direct Replacement
- SKU: 48131-60D21
- Warranty: This genuine part is guaranteed by Toyota's factory warranty.


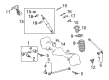
2009 Toyota Land Cruiser Coil Spring, Rear Passenger Side
Part Number: 48231-60F31$170.36 MSRP: $241.17You Save: $70.81 (30%)Ships in 1-3 Business DaysProduct Specifications- Other Name: Spring, Coil, Rear; Coil Spring, Rear Right; Coil Springs; Spring; Spring, Coil, Rear Passenger Side
- Position: Rear Passenger Side
- Replaces: 48231-60F30
- Part Name Code: 48231A
- Item Weight: 12.40 Pounds
- Item Dimensions: 17.8 x 11.2 x 6.0 inches
- Condition: New
- Fitment Type: Direct Replacement
- SKU: 48231-60F31
- Warranty: This genuine part is guaranteed by Toyota's factory warranty.
2009 Toyota Land Cruiser Coil Spring, Driver Side
Part Number: 48131-60C81$161.90 MSRP: $229.19You Save: $67.29 (30%)Ships in 1-3 Business DaysProduct Specifications- Other Name: Spring, Coil, Front; Coil Spring, Front Left; Coil Springs; Spring; Spring, Front Coil, Driver Side
- Manufacturer Note: MEXICO SPEC
- Position: Driver Side
- Replaces: 48131-60C80
- Part Name Code: 48132
- Item Weight: 1.40 Pounds
- Item Dimensions: 16.8 x 7.5 x 6.0 inches
- Condition: New
- Fitment Type: Direct Replacement
- SKU: 48131-60C81
- Warranty: This genuine part is guaranteed by Toyota's factory warranty.


2009 Toyota Land Cruiser Coil Spring, Rear Driver Side
Part Number: 48231-60E21$181.84 MSRP: $259.63You Save: $77.79 (30%)Product Specifications- Other Name: Spring, Coil, Rear; Coil Spring, Rear Left; Coil Springs; Spring; Spring, Coil, Rear Driver Side
- Position: Rear Driver Side
- Part Name Code: 48231B
- Item Weight: 14.00 Pounds
- Item Dimensions: 17.1 x 10.8 x 5.8 inches
- Condition: New
- Fitment Type: Direct Replacement
- SKU: 48231-60E21
- Warranty: This genuine part is guaranteed by Toyota's factory warranty.
2009 Toyota Land Cruiser Coil Springs
Looking for affordable OEM 2009 Toyota Land Cruiser Coil Springs? Explore our comprehensive catalogue of genuine 2009 Toyota Land Cruiser Coil Springs. All our parts are covered by the manufacturer's warranty. Plus, our straightforward return policy and speedy delivery service ensure an unparalleled shopping experience. We look forward to your visit!
2009 Toyota Land Cruiser Coil Springs Parts Q&A
- Q: How to remove and replace the coil springs on 2009 Toyota Land Cruiser?A: Start by installing the front shock absorber with coil spring until the upper side can be secured to the chassis frame through 4 nuts and the lower side must be fastened to the lower suspension arm by bolt and nut. Affix the steering knuckle LH as well as the skid control sensor wire. The front stabilizer link assembly RH needs a bolted installation with a nut that should be torqued to 128 Nm (1305 kgf-cm, 94 ft-lbf). Install temporarily the front stabilizer link assembly LH onto lower arm with one bolt and to stabilizer control arm with bolt and nut while using a jack to elevate its position if needed. Use a specified tightness order to secure 2 bolts each on the front No. 1 stabilizer bracket LH and RH at 87 Nm (887 kgf-cm, 64 ft-lbf). The installation procedure continues with placing the No. 1 engine under cover sub-assembly after which the installation of front fender splash shield sub-assemblies LH and RH takes place. The suspension needs stabilization by tightening front wheels to 131 Nm (1336 kgf-cm, 97 ft-lbf) while lowering the vehicle then performing several compression cycles. For the front shock absorber with coil spring fix the nut to meet 180 Nm torque (1835 kgf-cm) and equally tighten the 4 upper nuts at 45 Nm in opposing pairs until proper torque is reached (459 kgf-cm). You must tighten both the front stabilizer link assembly LH bolt and nut to 135 Nm (1377 kgf-cm, 100 ft-lbf) while all 4 wheels remain on the ground surface. Throughout this operation ensure the front stabilizer link assembly RH bolt must reach 135 Nm (1377 kgf-cm, 100 ft-lbf). The stabilizer control valve protection must be installed after measuring vehicle height while closing the stabilizer control with the accumulator housing shutter valve.
Related 2009 Toyota Land Cruiser Parts
 2009 Toyota Land Cruiser Control Arm
 2009 Toyota Land Cruiser Axle Beam Mount
 2009 Toyota Land Cruiser Bump Stop
 2009 Toyota Land Cruiser Control Arm Bushing
 2009 Toyota Land Cruiser Front Cross-Member
 2009 Toyota Land Cruiser Lateral Link
 2009 Toyota Land Cruiser Shock Absorber
 2009 Toyota Land Cruiser Steering Knuckle
 2009 Toyota Land Cruiser Sway Bar Bracket
 2009 Toyota Land Cruiser Sway Bar Bushing
 2009 Toyota Land Cruiser Sway Bar Kit
 2009 Toyota Land Cruiser Sway Bar Link