×
ToyotaParts- Hello
- Login or Register
- Quick Links
- Live Chat
- Track Order
- Parts Availability
- RMA
- Help Center
- Contact Us
- Shop for
- Toyota Parts
- Scion Parts
My Garage
My Account
Cart
OEM 2009 Toyota Land Cruiser Control Arm
Suspension Arm- Select Vehicle by Model
- Select Vehicle by VIN
Select Vehicle by Model
orMake
Model
Year
Select Vehicle by VIN
For the most accurate results, select vehicle by your VIN (Vehicle Identification Number).
5 Control Arms found


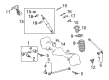
2009 Toyota Land Cruiser Upper Control Arm, Rear Driver Side
Part Number: 48710-60150$138.52 MSRP: $196.09You Save: $57.57 (30%)Ships in 1-3 Business DaysProduct Specifications- Other Name: Arm Assembly, Upper Control; Suspension Control Arm, Rear Left Upper; Arm Assembly, Upper Control, Rear Driver Side; Control Arm
- Position: Rear Driver Side
- Part Name Code: 48790
- Item Weight: 5.60 Pounds
- Item Dimensions: 20.1 x 7.1 x 4.0 inches
- Condition: New
- Fitment Type: Direct Replacement
- SKU: 48710-60150
- Warranty: This genuine part is guaranteed by Toyota's factory warranty.


2009 Toyota Land Cruiser Arm Sub-Assembly, Front Suspension, Lower Driver Side
Part Number: 48069-60030$285.70 MSRP: $407.92You Save: $122.22 (30%)Ships in 1-3 Business DaysProduct Specifications- Other Name: Arm Sub-Assembly, Suspension; Suspension Control Arm; Control Arm
- Position: Lower Driver Side
- Part Name Code: 48069
- Item Weight: 29.10 Pounds
- Item Dimensions: 2.5 x 1.8 x 2.6 inches
- Condition: New
- Fitment Type: Direct Replacement
- SKU: 48069-60030
- Warranty: This genuine part is guaranteed by Toyota's factory warranty.


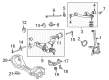
2009 Toyota Land Cruiser Arm Sub-Assembly, Front Suspension, Lower Passenger Side
Part Number: 48068-60030$288.89 MSRP: $412.46You Save: $123.57 (30%)Product Specifications- Other Name: Arm Sub-Assembly, Suspension; Suspension Control Arm; Control Arm
- Position: Passenger Side
- Part Name Code: 48068
- Item Weight: 27.50 Pounds
- Item Dimensions: 2.4 x 1.8 x 2.5 inches
- Condition: New
- Fitment Type: Direct Replacement
- SKU: 48068-60030
- Warranty: This genuine part is guaranteed by Toyota's factory warranty.


2009 Toyota Land Cruiser Upper Control Arm, Driver Side
Part Number: 48630-60030$292.99 MSRP: $418.32You Save: $125.33 (30%)Ships in 1-3 Business DaysProduct Specifications- Other Name: Arm Assembly, Suspension; Suspension Control Arm, Front Left Upper; Control Arm Assembly; Arm Assembly, Front Suspension, Upper Driver Side; Control Arm
- Position: Upper Driver Side
- Part Name Code: 48630
- Item Weight: 7.30 Pounds
- Item Dimensions: 13.1 x 4.0 x 13.1 inches
- Condition: New
- Fitment Type: Direct Replacement
- SKU: 48630-60030
- Warranty: This genuine part is guaranteed by Toyota's factory warranty.

2009 Toyota Land Cruiser Upper Control Arm, Passenger Side
Part Number: 48610-60060$292.99 MSRP: $418.32You Save: $125.33 (30%)Ships in 1-3 Business DaysProduct Specifications- Other Name: Arm Assembly, Suspension; Suspension Control Arm, Front Right Upper; Control Arm Assembly; Arm Assembly, Front Suspension Upper, Passenger Side; Control Arm
- Position: Passenger Side
- Part Name Code: 48610
- Item Weight: 2.60 Pounds
- Item Dimensions: 14.0 x 3.8 x 12.9 inches
- Condition: New
- Fitment Type: Direct Replacement
- SKU: 48610-60060
- Warranty: This genuine part is guaranteed by Toyota's factory warranty.
2009 Toyota Land Cruiser Control Arm
Looking for affordable OEM 2009 Toyota Land Cruiser Control Arm? Explore our comprehensive catalogue of genuine 2009 Toyota Land Cruiser Control Arm. All our parts are covered by the manufacturer's warranty. Plus, our straightforward return policy and speedy delivery service ensure an unparalleled shopping experience. We look forward to your visit!
2009 Toyota Land Cruiser Control Arm Parts Q&A
- Q: How to install the Control Arm for the front suspension on the LH side on 2009 Toyota Land Cruiser?A: Flag down the LH side front suspension upper arm assembly for installation by attaching it with a bolt, two washers, and a nut before nut tightening when suspension stability is achieved. The installation of the new nut requires 110 Nm (1122 kgf-cm, 81 ft-lbf) torque; during misalignment of the cotter pin holes you can increase the nut tightening by up to 60 degrees. For wire installation between the skid control sensor and the steering knuckle and upper arm connect a bolt and nut while torquing it to 13 Nm (133 kgf-cm, 9.6 ft-lbf). To finalize the front suspension repair you must tighten its upper arm assembly nut up to 185 Nm (1886 kgf-cm, 136 ft-lbf). Insert the front fender apron seal rear LH to its place using 4 clips after which the front fender apron seal LH should be installed with 3 clips. Use the height measurement device and activate the shutter valve on the accumulator housing before adding the stabilizer control valve protector. The last steps involve checking the front wheel alignment process while also performing a necessary adjustment on the headlight assembly.
Related 2009 Toyota Land Cruiser Parts
 2009 Toyota Land Cruiser Alignment Bolt
 2009 Toyota Land Cruiser Axle Beam Mount
 2009 Toyota Land Cruiser Axle Shaft
 2009 Toyota Land Cruiser Ball Joint
 2009 Toyota Land Cruiser Bump Stop
 2009 Toyota Land Cruiser Control Arm Bolt
 2009 Toyota Land Cruiser Control Arm Bushing
 2009 Toyota Land Cruiser Front Cross-Member
 2009 Toyota Land Cruiser Lateral Link
 2009 Toyota Land Cruiser Sway Bar Bracket
 2009 Toyota Land Cruiser Sway Bar Bushing
 2009 Toyota Land Cruiser Wheel Seal