×
ToyotaParts- Hello
- Login or Register
- Quick Links
- Live Chat
- Track Order
- Parts Availability
- RMA
- Help Center
- Contact Us
- Shop for
- Toyota Parts
- Scion Parts
My Garage
My Account
Cart
OEM 2009 Toyota Highlander Emblem
Badge- Select Vehicle by Model
- Select Vehicle by VIN
Select Vehicle by Model
orMake
Model
Year
Select Vehicle by VIN
For the most accurate results, select vehicle by your VIN (Vehicle Identification Number).
12 Emblems found


2009 Toyota Highlander Emblem, Silver
Part Number: 75431-02080$28.01 MSRP: $38.99You Save: $10.98 (29%)Ships in 1-3 Business DaysProduct Specifications- Other Name: Emblem, Luggage Complete; Deck Lid Emblem, Rear; Grille Emblem, Front; Hatch Emblem, Rear; Emblem, Radiator Grille (Or Front Panel); Emblem, Luggage Compartment Door; Emblem, Back Door; Emblem, Symbol
- Manufacturer Note: RADIATOR GRILLE-ACCESSORY
- Replaces: 75431-02100, 90975-02071
- Item Weight: 1.40 Pounds
- Condition: New
- Fitment Type: Direct Replacement
- SKU: 75431-02080
- Warranty: This genuine part is guaranteed by Toyota's factory warranty.


2009 Toyota Highlander Emblem
Part Number: 90975-02100$45.16 MSRP: $62.86You Save: $17.70 (29%)Ships in 1-3 Business DaysProduct Specifications- Other Name: Emblem, Symbol; Grille Emblem, Front; Emblem, Radiator Grille (Or Front Panel)
- Part Name Code: 75311
- Item Weight: 0.50 Pounds
- Item Dimensions: 13.7 x 11.3 x 2.1 inches
- Condition: New
- Fitment Type: Direct Replacement
- SKU: 90975-02100
- Warranty: This genuine part is guaranteed by Toyota's factory warranty.


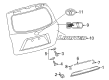
2009 Toyota Highlander Emblem, Rear
Part Number: 75444-21220$24.37 MSRP: $33.92You Save: $9.55 (29%)Ships in 1 Business DayProduct Specifications- Other Name: Plate, Back Door Name; Hatch Emblem, Rear; Door Emblem, Rear; Nameplate; Plate, Rear Body Name
- Manufacturer Note: 4WD
- Position: Rear
- Item Weight: 0.40 Pounds
- Condition: New
- Fitment Type: Direct Replacement
- SKU: 75444-21220
- Warranty: This genuine part is guaranteed by Toyota's factory warranty.


2009 Toyota Highlander Emblem, Rear
Part Number: 90975-02063$21.74 MSRP: $30.25You Save: $8.51 (29%)Ships in 1 Business DayProduct Specifications- Other Name: Emblem, Symbol; Deck Lid Emblem, Rear; Hatch Emblem, Rear
- Position: Rear
- Part Name Code: 75741E
- Item Weight: 0.50 Pounds
- Condition: New
- Fitment Type: Direct Replacement
- SKU: 90975-02063
- Warranty: This genuine part is guaranteed by Toyota's factory warranty.

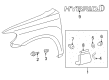
2009 Toyota Highlander Nameplate, Front Passenger Side
Part Number: 75361-48902$39.30 MSRP: $54.71You Save: $15.41 (29%)Ships in 1 Business DayProduct Specifications- Other Name: Plate, Front Fender Name; Fender Emblem, Front Right
- Position: Front Passenger Side
- Replaces: 75361-48060
- Condition: New
- SKU: 75361-48902
- Warranty: This genuine part is guaranteed by Toyota's factory warranty.
2009 Toyota Highlander Nameplate, Front
Part Number: 75361-48901$35.72 MSRP: $49.71You Save: $13.99 (29%)Ships in 1-3 Business DaysProduct Specifications- Other Name: Plate, Front Fender Name; Fender Emblem, Front Left, Front Right
- Position: Front
- Replaces: 75361-48020
- Item Weight: 0.40 Pounds
- Condition: New
- SKU: 75361-48901
- Warranty: This genuine part is guaranteed by Toyota's factory warranty.

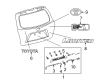
2009 Toyota Highlander Nameplate, Rear
Part Number: 75445-48080$32.73 MSRP: $45.56You Save: $12.83 (29%)Ships in 1-3 Business DaysProduct Specifications- Other Name: Plate, Back Door Name; Hatch Emblem, Rear
- Manufacturer Note: HYBRID SYNERGY DRIVE
- Position: Rear
- Part Name Code: 75445A
- Item Weight: 1.20 Pounds
- Condition: New
- Fitment Type: Direct Replacement
- SKU: 75445-48080
- Warranty: This genuine part is guaranteed by Toyota's factory warranty.

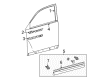
2009 Toyota Highlander Nameplate, Front
Part Number: 75427-48030$39.30 MSRP: $54.71You Save: $15.41 (29%)Ships in 1-3 Business DaysProduct Specifications- Other Name: Plate, Front Door Name; Door Emblem, Front
- Position: Front
- Part Name Code: 75427
- Item Weight: 1.40 Pounds
- Condition: New
- Fitment Type: Direct Replacement
- Require Quantity: 2
- SKU: 75427-48030
- Warranty: This genuine part is guaranteed by Toyota's factory warranty.

2009 Toyota Highlander Nameplate, Rear
Part Number: 75445-48090$29.39 MSRP: $40.90You Save: $11.51 (29%)Ships in 1-3 Business DaysProduct Specifications- Other Name: Plate, Back Door Name; Hatch Emblem, Rear
- Manufacturer Note: LIMITED
- Position: Rear
- Part Name Code: 75441C
- Item Weight: 0.70 Pounds
- Condition: New
- Fitment Type: Direct Replacement
- SKU: 75445-48090
- Warranty: This genuine part is guaranteed by Toyota's factory warranty.

2009 Toyota Highlander Nameplate, Rear
Part Number: 75442-48090$27.83 MSRP: $38.74You Save: $10.91 (29%)Ships in 1 Business DayProduct Specifications- Other Name: Plate, Back Door Name; Hatch Emblem, Rear
- Manufacturer Note: TOYOTA
- Position: Rear
- Part Name Code: 75442A
- Item Weight: 1.40 Pounds
- Item Dimensions: 13.5 x 11.2 x 2.0 inches
- Condition: New
- Fitment Type: Direct Replacement
- SKU: 75442-48090
- Warranty: This genuine part is guaranteed by Toyota's factory warranty.

2009 Toyota Highlander Nameplate, Rear
Part Number: 75444-48090$29.15 MSRP: $40.57You Save: $11.42 (29%)Ships in 1 Business DayProduct Specifications- Other Name: Plate, Back Door Name; Hatch Emblem, Rear
- Manufacturer Note: V6
- Position: Rear
- Part Name Code: 75444A
- Item Weight: 1.10 Pounds
- Condition: New
- Fitment Type: Direct Replacement
- SKU: 75444-48090
- Warranty: This genuine part is guaranteed by Toyota's factory warranty.

2009 Toyota Highlander Nameplate, Chrome, Front
Part Number: 75427-48020$28.67 MSRP: $39.90You Save: $11.23 (29%)Ships in 1 Business DayProduct Specifications- Other Name: Plate, Front Door Name; Door Emblem, Front; Plate, Door Name, Passenger Side; Plate, Door Name, Driver Side
- Position: Front
- Item Weight: 0.40 Pounds
- Condition: New
- Fitment Type: Direct Replacement
- SKU: 75427-48020
- Warranty: This genuine part is guaranteed by Toyota's factory warranty.
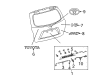
2009 Toyota Highlander Emblem
Looking for affordable OEM 2009 Toyota Highlander Emblem? Explore our comprehensive catalogue of genuine 2009 Toyota Highlander Emblem. All our parts are covered by the manufacturer's warranty. Plus, our straightforward return policy and speedy delivery service ensure an unparalleled shopping experience. We look forward to your visit!
2009 Toyota Highlander Emblem Parts Q&A
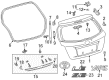
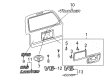
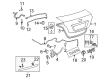
- Q: How to remove the body emblem and name plates without damaging the body on 2009 Toyota Highlander?A: The emblem removal process starts with heating the vehicle body and name plate as well as emblem using a heat light tool while avoiding overheating. First wrap the symbol emblem with protective tape followed by the application of a moulding remover tool to remove the double-sided tape before emblem removal from the vehicle body surface. Protective tape should be applied around the No. 2 back door name plate before using the moulding remover to peel off double-sided tape to remove the name plate with extreme caution for the vehicle body. Carefully separate the No. 4 back door name plate and the back door name plate by following steps with protective tape and moulding remover removal. As the last step use protective tape to wrap the front door name plate followed by using the moulding remover to peel off the double-sided tape and safely removing the plate while maintaining the vehicle body intact.
Related 2009 Toyota Highlander Parts
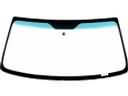 2009 Toyota Highlander Windshield
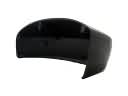 2009 Toyota Highlander Mirror Cover
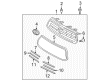
 2009 Toyota Highlander Grille
 2009 Toyota Highlander Bumper Reflector
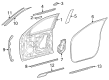
 2009 Toyota Highlander Door Seal
 2009 Toyota Highlander Instrument Cluster
 2009 Toyota Highlander Lift Support
 2009 Toyota Highlander Liftgate Hinge
 2009 Toyota Highlander Liftgate Lift Support
 2009 Toyota Highlander Weather Strip
 2009 Toyota Highlander Windshield Washer Nozzle
 2009 Toyota Highlander Wiper Motor