×
ToyotaParts- Hello
- Login or Register
- Quick Links
- Live Chat
- Track Order
- Parts Availability
- RMA
- Help Center
- Contact Us
- Shop for
- Toyota Parts
- Scion Parts
My Garage
My Account
Cart
OEM 2008 Toyota Highlander Brake Line
Brake Hose- Select Vehicle by Model
- Select Vehicle by VIN
Select Vehicle by Model
orMake
Model
Year
Select Vehicle by VIN
For the most accurate results, select vehicle by your VIN (Vehicle Identification Number).
6 Brake Lines found

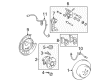
2008 Toyota Highlander Flex Hose, Rear Driver Side
Part Number: 90947-A2049$76.54 MSRP: $107.44You Save: $30.90 (29%)Ships in 1-3 Business DaysProduct Specifications- Other Name: Hose, Flexible; Brake Hydraulic Hose, Rear Left; Brake Hose; Brake Line; Hose, Flexible(For Rear Driver Side); Hydraulic Hose
- Position: Rear Driver Side
- Replaces: 90947-02E97
- Part Name Code: 47319F
- Item Weight: 0.80 Pounds
- Item Dimensions: 7.1 x 6.2 x 1.5 inches
- Condition: New
- Fitment Type: Direct Replacement
- SKU: 90947-A2049
- Warranty: This genuine part is guaranteed by Toyota's factory warranty.
2008 Toyota Highlander Flex Hose, Passenger Side
Part Number: 90947-A2048$76.54 MSRP: $107.44You Save: $30.90 (29%)Ships in 1-3 Business DaysProduct Specifications- Other Name: Hose, Flexible; Brake Hydraulic Hose, Rear Right; Brake Hose; Brake Line; Hose, Flexible(For Rear Passenger Side); Hydraulic Hose
- Position: Passenger Side
- Replaces: 90947-02E96
- Part Name Code: 47318F
- Item Weight: 1.40 Pounds
- Item Dimensions: 7.4 x 6.2 x 1.6 inches
- Condition: New
- Fitment Type: Direct Replacement
- SKU: 90947-A2048
- Warranty: This genuine part is guaranteed by Toyota's factory warranty.

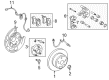
2008 Toyota Highlander Flex Hose, Rear Driver Side
Part Number: 90947-A2047$71.92 MSRP: $100.95You Save: $29.03 (29%)Ships in 1-3 Business DaysProduct Specifications- Other Name: Hose, Flexible; Brake Hydraulic Hose, Rear Left; Brake Hose; Brake Line; Hose, Flexible(For Rear Driver Side); Hydraulic Hose
- Position: Rear Driver Side
- Replaces: 90947-02E99
- Part Name Code: 47319F
- Item Weight: 0.70 Pounds
- Item Dimensions: 7.4 x 6.2 x 1.5 inches
- Condition: New
- Fitment Type: Direct Replacement
- SKU: 90947-A2047
- Warranty: This genuine part is guaranteed by Toyota's factory warranty.
2008 Toyota Highlander Flex Hose, Passenger Side
Part Number: 90947-A2046$71.92 MSRP: $100.95You Save: $29.03 (29%)Ships in 1-3 Business DaysProduct Specifications- Other Name: Hose, Flexible; Brake Hydraulic Hose, Rear Right; Brake Hose; Brake Line; Hose, Flexible(For Rear Passenger Side); Hydraulic Hose
- Position: Passenger Side
- Replaces: 90947-02E98
- Part Name Code: 47318F
- Item Weight: 1.40 Pounds
- Item Dimensions: 7.3 x 6.2 x 1.5 inches
- Condition: New
- Fitment Type: Direct Replacement
- SKU: 90947-A2046
- Warranty: This genuine part is guaranteed by Toyota's factory warranty.

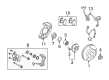
2008 Toyota Highlander Flex Hose, Front
Part Number: 90947-A2034$81.87 MSRP: $114.92You Save: $33.05 (29%)Ships in 1-3 Business DaysProduct Specifications- Other Name: Hose, Flexible; Brake Hydraulic Hose, Front Left, Front Right; Brake Hose; Brake Line; Hose, Flexible(For Front); Hydraulic Hose
- Position: Front
- Part Name Code: 47313J
- Item Weight: 1.40 Pounds
- Item Dimensions: 7.2 x 6.1 x 1.6 inches
- Condition: New
- Fitment Type: Direct Replacement
- SKU: 90947-A2034
- Warranty: This genuine part is guaranteed by Toyota's factory warranty.

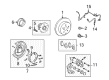
2008 Toyota Highlander Flex Hose, Passenger Side
Part Number: 90947-A2023$71.56 MSRP: $100.45You Save: $28.89 (29%)Ships in 1-3 Business DaysProduct Specifications- Other Name: Hose, Flexible; Brake Hydraulic Hose, Rear Right; Brake Hose; Brake Line; Hose, Flexible(For Rear Passenger Side); Hydraulic Hose
- Manufacturer Note: MEXICO SPEC
- Position: Passenger Side
- Replaces: 90947-02E79
- Part Name Code: 47318F
- Item Weight: 0.70 Pounds
- Item Dimensions: 7.1 x 6.3 x 1.6 inches
- Condition: New
- Fitment Type: Direct Replacement
- SKU: 90947-A2023
- Warranty: This genuine part is guaranteed by Toyota's factory warranty.
2008 Toyota Highlander Brake Line
Looking for affordable OEM 2008 Toyota Highlander Brake Line? Explore our comprehensive catalogue of genuine 2008 Toyota Highlander Brake Line. All our parts are covered by the manufacturer's warranty. Plus, our straightforward return policy and speedy delivery service ensure an unparalleled shopping experience. We look forward to your visit!
2008 Toyota Highlander Brake Line Parts Q&A
- Q: How to install the rear Brake Line on 2008 Toyota Highlander?A: Begin left and right rear brake flexible hose installation by checking the identification marks of disconnected parts from the beginning step. You can reconnect used hoses after examining the retention marks which were present upon hose disconnect. Start by attaching the rear flexible hose to the disc brake cylinder assembly through the union bolt with a new gasket while applying torque of 33 Nm (336 kgf-cm, 24 ft-lbf). Put the rear flexible hose onto its bracket and fasten it with a new clip which should extend all the way to the limit of installation. When connecting the brake line to the front brake flexible hose using a 10 mm union nut wrench while holding the flexible hose with a wrench, the standard torque is 15 Nm (155 kgf-cm, 11 ft-lbf) but if using a union nut wrench, the torque should be set to 14 Nm (143 kgf-cm, 10 ft-lbf). Minimize flexion or alteration of the brake line and eliminate objects from accessing it. You should use a 250 mm (9.84 in.) torque wrench of appropriate length with a parallel alignment to the union nut wrench for precise torque measurements. The absorber bracket receives the rear flexible hose through installation using a bolt that requires a torque of 19 Nm (194 kgf-cm, 14 ft-lbf). Complete brake fluid reservoir filling followed by brake line and actuator bleeding and inspection for fluid leakage and check of the fluid level should be performed. To finish the installation position the rear wheel while tightening it to 103 Nm (1050 kgf-cm, 76 ft-lbf).
Related 2008 Toyota Highlander Parts
 2008 Toyota Highlander Speed Sensor
 2008 Toyota Highlander Brake Caliper Piston
 2008 Toyota Highlander Brake Disc
 2008 Toyota Highlander Brake Fluid Pump
 2008 Toyota Highlander Brake Pad Set
 2008 Toyota Highlander Hydraulic Hose
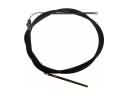 2008 Toyota Highlander Parking Brake Cable
 2008 Toyota Highlander Parking Brake Shoe
 2008 Toyota Highlander Spindle Nut
 2008 Toyota Highlander Wheel Cylinder
 2008 Toyota Highlander Wheel Cylinder Repair Kit
 2008 Toyota Highlander Yaw Sensor