×
ToyotaParts- Hello
- Login or Register
- Quick Links
- Live Chat
- Track Order
- Parts Availability
- RMA
- Help Center
- Contact Us
- Shop for
- Toyota Parts
- Scion Parts
My Garage
My Account
Cart
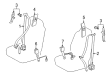
OEM 2008 Toyota Avalon Seat Belt
Seat Safety Belt- Select Vehicle by Model
- Select Vehicle by VIN
Select Vehicle by Model
orMake
Model
Year
Select Vehicle by VIN
For the most accurate results, select vehicle by your VIN (Vehicle Identification Number).
34 Seat Belts found

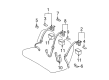
2008 Toyota Avalon Lap & Shoulder Belt, Passenger Side
Part Number: 73210-AC052-B4$251.72 MSRP: $359.40You Save: $107.68 (30%)Ships in 1-3 Business DaysProduct Specifications- Other Name: Belt Assembly, Front Seat; Seat Belt Lap and Shoulder Belt, Front Right; Belt & Retractor; Belt Assembly, Front Seat Outer, Passenger Side
- Position: Passenger Side
- Replaces: 73210-AC051-B4, 73210-AC050-B4
- Part Name Code: 73210
- Item Weight: 2.50 Pounds
- Condition: New
- Fitment Type: Direct Replacement
- SKU: 73210-AC052-B4
- Warranty: This genuine part is guaranteed by Toyota's factory warranty.

2008 Toyota Avalon Lap & Shoulder Belt, Gray, Driver Side
Part Number: 73220-AC032-B2$252.91 MSRP: $361.10You Save: $108.19 (30%)Ships in 1-3 Business DaysProduct Specifications- Other Name: Belt Assembly, Front Seat; Seat Belt Lap and Shoulder Belt, Front Left; Belt & Retractor; Belt Assembly, Front Seat Outer, Driver Side
- Manufacturer Note: GRAY,TRIM17
- Position: Driver Side
- Replaces: 73220-AC031-B2
- Part Name Code: 73220
- Item Weight: 2.40 Pounds
- Item Dimensions: 11.6 x 7.4 x 7.1 inches
- Condition: New
- Fitment Type: Direct Replacement
- SKU: 73220-AC032-B2
- Warranty: This genuine part is guaranteed by Toyota's factory warranty.
2008 Toyota Avalon Lap & Shoulder Belt, Driver Side
Part Number: 73220-AC032-B4$273.06 MSRP: $389.87You Save: $116.81 (30%)Ships in 1-3 Business DaysProduct Specifications- Other Name: Belt Assembly, Front Seat; Seat Belt Lap and Shoulder Belt, Front Left; Belt & Retractor; Belt Assembly, Front Seat Outer, Driver Side
- Position: Driver Side
- Replaces: 73220-AC030-B4, 73220-AC031-B4
- Part Name Code: 73220
- Item Weight: 2.40 Pounds
- Condition: New
- Fitment Type: Direct Replacement
- SKU: 73220-AC032-B4
- Warranty: This genuine part is guaranteed by Toyota's factory warranty.

2008 Toyota Avalon Lap & Shoulder Belt, Gray, Passenger Side
Part Number: 73470-AC022-B2$155.32 MSRP: $219.88You Save: $64.56 (30%)Ships in 1-3 Business DaysProduct Specifications- Other Name: Belt Assembly, Rear Seat I; Seat Belt Lap and Shoulder Belt, Rear Center; Center Seat Belt; Belt Assembly, Rear Seat Inner W/Center, Passenger Side
- Position: Passenger Side
- Replaces: 73470-AC021-B2
- Part Name Code: 73470B
- Item Weight: 2.30 Pounds
- Condition: New
- Fitment Type: Direct Replacement
- SKU: 73470-AC022-B2
- Warranty: This genuine part is guaranteed by Toyota's factory warranty.

2008 Toyota Avalon Lap & Shoulder Belt, Gray, Outer
Part Number: 73360-AC022-B0$167.78 MSRP: $237.51You Save: $69.73 (30%)Ships in 1-3 Business DaysProduct Specifications- Other Name: Belt Assembly, Rear Seat; Seat Belt Lap and Shoulder Belt, Rear Left, Rear Right; Outer Belt Assembly; Belt Assembly, Rear Seat, Outer
- Manufacturer Note: GRAY,TRIM16
- Position: Outer
- Replaces: 73370-AC020-B0, 73360-AC021-B0, 73360-AC020-B0, 73360-AC020-B2, 73370-AC020-B2
- Item Weight: 2.40 Pounds
- Condition: New
- Fitment Type: Direct Replacement
- SKU: 73360-AC022-B0
- Warranty: This genuine part is guaranteed by Toyota's factory warranty.

2008 Toyota Avalon Lap & Shoulder Belt, Outer
Part Number: 73360-AC022-B3$159.32 MSRP: $225.54You Save: $66.22 (30%)Ships in 1-3 Business DaysProduct Specifications- Other Name: Belt Assembly, Rear Seat; Outer Belt Assembly; Belt Assembly, Rear Seat, Outer
- Manufacturer Note: DK. GRAY,TRIM18
- Position: Outer
- Replaces: 73360-AC021-B3, 73360-AC020-B3, 73370-AC020-B3
- Item Weight: 2.40 Pounds
- Condition: New
- Fitment Type: Direct Replacement
- SKU: 73360-AC022-B3
- Warranty: This genuine part is guaranteed by Toyota's factory warranty.

2008 Toyota Avalon Buckle, Passenger Side
Part Number: 73230-07020-B2$26.78 MSRP: $37.28You Save: $10.50 (29%)Ships in 1-3 Business DaysProduct Specifications- Other Name: Belt Assembly, Front Seat; Seat Belt Receptacle, Front Right; Latch; Belt Assembly, Front Seat Inner, Passenger Side
- Manufacturer Note: SEAT LUMBAR SUPPORT-W(DRIVER & PASSENGER SIDE),DK.GRAY,TRIM18
- Position: Passenger Side
- Part Name Code: 73230
- Item Weight: 1.50 Pounds
- Item Dimensions: 13.8 x 11.4 x 2.2 inches
- Condition: New
- Fitment Type: Direct Replacement
- SKU: 73230-07020-B2
- Warranty: This genuine part is guaranteed by Toyota's factory warranty.
2008 Toyota Avalon Buckle, Front Passenger Side
Part Number: 73230-AC110-A0$53.29 MSRP: $74.17You Save: $20.88 (29%)Ships in 1-3 Business DaysProduct Specifications- Other Name: Belt Assembly, Front Seat; Seat Belt Receptacle, Front Right; Latch
- Position: Front Passenger Side
- Replaces: 73230-AC090-A0
- Condition: New
- SKU: 73230-AC110-A0
- Warranty: This genuine part is guaranteed by Toyota's factory warranty.
2008 Toyota Avalon Buckle, Gray, Front Passenger Side
Part Number: 73230-AC110-B0$48.27 MSRP: $67.19You Save: $18.92 (29%)Ships in 1-3 Business DaysProduct Specifications- Other Name: Belt Assembly, Front Seat; Seat Belt Receptacle, Front Right; Latch
- Position: Front Passenger Side
- Replaces: 73230-AC090-B0
- Condition: New
- SKU: 73230-AC110-B0
- Warranty: This genuine part is guaranteed by Toyota's factory warranty.
2008 Toyota Avalon Buckle, Passenger Side
Part Number: 73230-AC080-A0$54.48 MSRP: $75.83You Save: $21.35 (29%)Ships in 1-3 Business DaysProduct Specifications- Other Name: Belt Assembly, Front Seat; Seat Belt Receptacle, Front Right; Belt Assembly, Front Seat Inner, Passenger Side
- Manufacturer Note: IVORY,TRIM0#
- Position: Passenger Side
- Part Name Code: 73230
- Item Weight: 1.50 Pounds
- Item Dimensions: 13.5 x 11.1 x 2.3 inches
- Condition: New
- Fitment Type: Direct Replacement
- SKU: 73230-AC080-A0
- Warranty: This genuine part is guaranteed by Toyota's factory warranty.
2008 Toyota Avalon Buckle, Gray, Front Passenger Side
Part Number: 73230-AC110-B1$54.48 MSRP: $75.83You Save: $21.35 (29%)Ships in 1-3 Business DaysProduct Specifications- Other Name: Belt Assembly, Front Seat; Seat Belt Receptacle, Front Right; Latch
- Position: Front Passenger Side
- Replaces: 73230-AC090-B1
- Condition: New
- SKU: 73230-AC110-B1
- Warranty: This genuine part is guaranteed by Toyota's factory warranty.
2008 Toyota Avalon Lap & Shoulder Belt, Gray, Passenger Side
Part Number: 73470-AC022-B0$176.46 MSRP: $251.95You Save: $75.49 (30%)Ships in 1-3 Business DaysProduct Specifications- Other Name: Belt Assembly, Rear Seat I; Seat Belt Lap and Shoulder Belt, Rear Center; Center Seat Belt; Belt Assembly, Rear Seat Inner W/Center, Passenger Side
- Manufacturer Note: GRAY,TRIM16
- Position: Passenger Side
- Replaces: 73470-AC020-B0, 73470-AC021-B0
- Part Name Code: 73470B
- Item Weight: 1.80 Pounds
- Condition: New
- Fitment Type: Direct Replacement
- SKU: 73470-AC022-B0
- Warranty: This genuine part is guaranteed by Toyota's factory warranty.
2008 Toyota Avalon Lap & Shoulder Belt, Gray, Passenger Side
Part Number: 73210-AC052-B2$254.73 MSRP: $363.70You Save: $108.97 (30%)Ships in 1-3 Business DaysProduct Specifications- Other Name: Belt Assembly, Front Seat; Seat Belt Lap and Shoulder Belt, Front Right; Belt & Retractor; Belt Assembly, Front Seat Outer, Passenger Side
- Manufacturer Note: GRAY,TRIM17
- Position: Passenger Side
- Replaces: 73210-AC051-B2
- Part Name Code: 73210
- Item Weight: 2.50 Pounds
- Condition: New
- Fitment Type: Direct Replacement
- SKU: 73210-AC052-B2
- Warranty: This genuine part is guaranteed by Toyota's factory warranty.
2008 Toyota Avalon Buckle, Front Passenger Side
Part Number: 73230-07050-A0$32.61 MSRP: $45.40You Save: $12.79 (29%)Product Specifications- Other Name: Belt Assembly, Front Seat; Seat Belt Receptacle, Front Right; Latch
- Position: Front Passenger Side
- Replaces: 73230-07020-A0
- Condition: New
- SKU: 73230-07050-A0
- Warranty: This genuine part is guaranteed by Toyota's factory warranty.
2008 Toyota Avalon Buckle, Gray, Front Passenger Side
Part Number: 73230-07050-B0$29.39 MSRP: $40.90You Save: $11.51 (29%)Product Specifications- Other Name: Belt Assembly, Front Seat; Seat Belt Receptacle, Front Right; Latch
- Position: Front Passenger Side
- Replaces: 73230-07020-B0
- Condition: New
- SKU: 73230-07050-B0
- Warranty: This genuine part is guaranteed by Toyota's factory warranty.

2008 Toyota Avalon Buckle, Front Driver Side
Part Number: 73240-AC070-A0$52.21 MSRP: $72.67You Save: $20.46 (29%)Product Specifications- Other Name: Belt Assembly, Front Seat; Seat Belt Receptacle, Front Left; Latch
- Position: Front Driver Side
- Replaces: 73240-AC060-A0
- Condition: New
- SKU: 73240-AC070-A0
- Warranty: This genuine part is guaranteed by Toyota's factory warranty.
2008 Toyota Avalon Buckle, Gray, Front Driver Side
Part Number: 73240-AC070-B0$52.21 MSRP: $72.67You Save: $20.46 (29%)Product Specifications- Other Name: Belt Assembly, Front Seat; Seat Belt Receptacle, Front Left; Latch
- Position: Front Driver Side
- Replaces: 73240-AC060-B0
- Condition: New
- SKU: 73240-AC070-B0
- Warranty: This genuine part is guaranteed by Toyota's factory warranty.
2008 Toyota Avalon Buckle, Gray, Front Driver Side
Part Number: 73240-AC070-B1$55.20 MSRP: $76.84You Save: $21.64 (29%)Product Specifications- Other Name: Belt Assembly, Front Seat; Seat Belt Receptacle, Front Left; Latch
- Position: Front Driver Side
- Replaces: 73240-AC060-B1
- Condition: New
- SKU: 73240-AC070-B1
- Warranty: This genuine part is guaranteed by Toyota's factory warranty.
2008 Toyota Avalon Buckle, Gray, Front Driver Side
Part Number: 73240-AC070-B2$55.20 MSRP: $76.84You Save: $21.64 (29%)Product Specifications- Other Name: Belt Assembly, Front Seat; Seat Belt Receptacle, Front Left; Latch
- Position: Front Driver Side
- Replaces: 73240-AC060-B2
- Condition: New
- SKU: 73240-AC070-B2
- Warranty: This genuine part is guaranteed by Toyota's factory warranty.
2008 Toyota Avalon Lap & Shoulder Belt, Passenger Side
Part Number: 73210-AC052-A0$273.06 MSRP: $389.87You Save: $116.81 (30%)Product Specifications- Other Name: Belt Assembly, Front Seat; Seat Belt Lap and Shoulder Belt, Front Right; Belt & Retractor; Belt Assembly, Front Seat Outer, Passenger Side
- Manufacturer Note: IVORY,TRIM0#
- Position: Passenger Side
- Replaces: 73210-AC051-A0, 73210-AC050-A0
- Part Name Code: 73210
- Item Weight: 4.20 Pounds
- Condition: New
- Fitment Type: Direct Replacement
- SKU: 73210-AC052-A0
- Warranty: This genuine part is guaranteed by Toyota's factory warranty.
| Page 1 of 2 |Next >
1-20 of 34 Results
2008 Toyota Avalon Seat Belt
Looking for affordable OEM 2008 Toyota Avalon Seat Belt? Explore our comprehensive catalogue of genuine 2008 Toyota Avalon Seat Belt. All our parts are covered by the manufacturer's warranty. Plus, our straightforward return policy and speedy delivery service ensure an unparalleled shopping experience. We look forward to your visit!
2008 Toyota Avalon Seat Belt Parts Q&A
- Q: What is the proper procedure for activating and disposing of a front seat outer belt assembly with a seat belt pretensioner during scrapping or after a collision on 2008 Toyota Avalon?A: Vehicles at the scrapping stage should always have their seat belt pretensioners activated before disposal as well as when clearing front seat outer belt assemblies containing pretensioners. Any unusual occurrence during activation requires you to reach out to the Service Department of Toyota Motor Sales USA Inc. To dispose of an activated front seat outer belt assembly from a collision you need to use the required disposal process. Disposal of a front seat outer belt assembly with an inactive pretensioner should never occur because pretensioner activation results in loud sounds therefore operation should be done in a location free from disturbance. You should activate the front seat outer belt pretensioner from at least 10 m (33 ft) distance while wearing gloves and safety glasses. Wash your hands with water after disposal operations and prevent applying water to pretensioners that have activated. Carry out all operations outside of electrical interference by using Special Service Tool: 09082-00700 when conducting activations. Before discarding the front seat outer belt assembly LH you must ensure the Special Service Tool 09082-00700 functions properly by connecting the red clip to the positive terminal and black clip to the negative terminal of a battery unit which activates the LED of the activation switch. After disconnecting the pretensioner connector, the installation of the front seat outer belt assembly floor anchor should be done with a torque of 42 Nm (428 kgf-cm, 31 ft-lbf). Then connect the Special Service Tool to the seat belt pretensioner. Move the tool to a position at least 10 m (33 ft) away from the vehicle before closing all doors and windows while making an opening through one window for the wire harness. Start the seat belt pretensioner activation process after confirming the vehicle area and a zone within 10 m (33 ft) radius are empty then properly dispose of the outer strap. To dispose of the front seat outer assembly LH you must first remove the assembly by winding the seat belt with the retractor then cutting it 100 mm (3.93 in.) from the retractor. Special Service Tool: 09082-00700 requires checking for function then you need to connect it and place the outer belt on top of a tire-covered floor before moving the tool beyond 10 m (33 ft) from the wheel. To activate the pretensioner avoid placing anyone within a 10 m (33 ft) distance because you should handle the belt only after activation and a minimum thirty-minute period has passed. After wrapping the outer belt within a plastic bag you should tightly tie it for disposal alongside general parts into the waste container.
Related 2008 Toyota Avalon Parts
 2008 Toyota Avalon Ignition Coil
 2008 Toyota Avalon Oxygen Sensor
 2008 Toyota Avalon Ignition Switch
 2008 Toyota Avalon Antenna
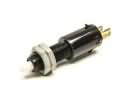 2008 Toyota Avalon Brake Light Switch
 2008 Toyota Avalon Coolant Temperature Sensor
 2008 Toyota Avalon Daytime Running Light Relay
 2008 Toyota Avalon Dimmer Switch
 2008 Toyota Avalon Engine Control Module
 2008 Toyota Avalon Mirror Switch
 2008 Toyota Avalon Relay
 2008 Toyota Avalon Relay Block