×
ToyotaParts- Hello
- Login or Register
- Quick Links
- Live Chat
- Track Order
- Parts Availability
- RMA
- Help Center
- Contact Us
- Shop for
- Toyota Parts
- Scion Parts
My Garage
My Account
Cart
OEM 2008 Scion xD Water Pump
H2O Pump- Select Vehicle by Model
- Select Vehicle by VIN
Select Vehicle by Model
orMake
Model
Year
Select Vehicle by VIN
For the most accurate results, select vehicle by your VIN (Vehicle Identification Number).
1 Water Pump found


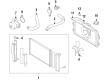 Product Specifications
- Other Name: Engine Water Pump; Pump Assembly, Engine Water
- Part Name Code: 16100
- Item Weight: 2.80 Pounds
- Item Dimensions: 9.4 x 6.0 x 5.5 inches
- Condition: New
- Fitment Type: Direct Replacement
- SKU: 16100-39465
- Warranty: This genuine part is guaranteed by Toyota's factory warranty.
2008 Scion xD Water Pump
Looking for affordable OEM 2008 Scion xD Water Pump? Explore our comprehensive catalogue of genuine 2008 Scion xD Water Pump. All our parts are covered by the manufacturer's warranty. Plus, our straightforward return policy and speedy delivery service ensure an unparalleled shopping experience. We look forward to your visit!
2008 Scion xD Water Pump Parts Q&A
- Q: How to install the water pump assembly and complete the associated procedures on 2008 Scion xD?A: The water pump installation starts with placing a new gasket onto the timing chain cover but only after cleaning both surfaces. You should install the water pump assembly by securing it with 5 bolts that require 26 Nm (260 kgf-cm, 19 ft-lbf) torque while also reaching 24 Nm (240 kgf-cm, 17 ft-lbf). The front suspension crossmember sub-assembly should be installed first followed by the engine assembly with its transaxle. The front axle assembly needs installation simultaneously for left and right sides where both procedures remain identical. The installation process continues with front lower suspension arm sub-assemblies for both sides and the front stabilizer link assemblies as well as tie rod end sub-assemblies where the same installation procedures apply to both sides. Contractors must perform the installation of front speed sensors alongside front axle shaft nuts and front exhaust pipe assembly. The subsequent steps should include fitting the front floor brace center, front console box, rear console box assembly, console box carpet, console box rear cover followed by the installation of console panel upper, shift lever knob sub-assembly (for manual transaxle), No. 1 steering column hole cover sub-assembly, steering sliding yoke sub-assembly and column hole cover silencer sheet. Begin with manual transaxle vehicles by installing the clutch release cylinder assembly followed by attaching the fuel tube sub-assembly, heater water inlet hose A, heater water outlet hose A (from heater unit) as well as the engine wire. During the installation step both automatic and manual transaxle vehicles need their transmission control cable assemblies and No. 1 fuel vapor feed hose along with union to check valve hose. The installation sequence includes pulley compressor assembly followed by radiator assembly while using upper radiator support sub-assembly and upper radiator support absorber before adding No. 1 cooler cover and hood lock assembly. Finally, connect the No. 2 oil cooler inlet hose and No. 1 oil cooler outlet hose (for automatic transaxle). Complete the installation by placing the front bumper cover along with attaching the No. 1 radiator hose and the installation of the No. 2 radiator hose. If needed adjust the fan and generator V belt then install it and complete necessary inspections. The technician installs the No. 2 cylinder head cover followed by the battery carrier, air cleaner bracket, air cleaner assembly and outer cowl top panel before fitting the front air shutter seal on the right side and front wiper motor with link. He then adds the cowl top ventilator louver section on the left side and the hood to cowl top seal along with the front wiper arm assemblies for both sides including the front wiper arm head caps. The technician should first install the battery tray along with the battery before adding engine coolant. A leak check for fuel, exhaust gas, and engine coolant is then necessary. You must install the engine under covers for both sides and the front wheels then check ignition timing and engine idling speed followed by measuring CO/HC levels while performing a front wheel alignment and inspecting the ABS sensor signal (with ABS) and VSC sensor signal (with VSC).
Related 2008 Scion xD Parts
 2008 Scion xD Radiator
 2008 Scion xD Cooling Fan Assembly
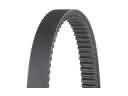 2008 Scion xD Drive Belt
 2008 Scion xD Fan Blade
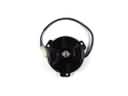 2008 Scion xD Fan Motor
 2008 Scion xD Fan Shroud
 2008 Scion xD Radiator Cap
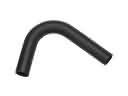 2008 Scion xD Radiator Hose
 2008 Scion xD Thermostat
 2008 Scion xD Thermostat Gasket
 2008 Scion xD Thermostat Housing
 2008 Scion xD Water Pump Gasket