×
ToyotaParts- Hello
- Login or Register
- Quick Links
- Live Chat
- Track Order
- Parts Availability
- RMA
- Help Center
- Contact Us
- Shop for
- Toyota Parts
- Scion Parts
My Garage
My Account
Cart
OEM 2008 Scion xD Camshaft
Cam- Select Vehicle by Model
- Select Vehicle by VIN
Select Vehicle by Model
orMake
Model
Year
Select Vehicle by VIN
For the most accurate results, select vehicle by your VIN (Vehicle Identification Number).
2 Camshafts found

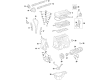
2008 Scion xD Exhaust Camshaft
Part Number: 13502-37050$289.02 MSRP: $412.66You Save: $123.64 (30%)Ships in 1-2 Business DaysProduct Specifications- Other Name: Camshaft Sub-Assembly; Camshaft
- Condition: New
- SKU: 13502-37050
- Warranty: This genuine part is guaranteed by Toyota's factory warranty.
2008 Scion xD Intake Camshaft
Part Number: 13501-37040$273.18 MSRP: $390.04You Save: $116.86 (30%)Ships in 1-2 Business DaysProduct Specifications- Other Name: Camshaft Sub-Assembly; Camshaft
- Condition: New
- SKU: 13501-37040
- Warranty: This genuine part is guaranteed by Toyota's factory warranty.
2008 Scion xD Camshaft
Looking for affordable OEM 2008 Scion xD Camshaft? Explore our comprehensive catalogue of genuine 2008 Scion xD Camshaft. All our parts are covered by the manufacturer's warranty. Plus, our straightforward return policy and speedy delivery service ensure an unparalleled shopping experience. We look forward to your visit!
2008 Scion xD Camshaft Parts Q&A
- Q: How is the Camshaft Installed on 2008 Scion xD?A: The procedure for camshaft installation in a 2ZR-FE engine starts with running the manual transaxle shift lever knob sub-assembly then adding the No. 1 steering column hole cover sub-assembly and steering sliding yoke sub-assembly followed by column hole cover silencer sheet installation. The manual transaxle requires installation of the clutch release cylinder assembly before attaching the fuel tube sub-assembly and heating water inlet and outlet hoses A to the heater unit. Connect the engine wire then attach the No. 1 fuel vapor feed hose and union with check valve hose. The automatic transaxle requires the transmission control cable assembly installation and the manual transaxle needs a repeat transmission control cable assembly installation. First install the pulley compressor assembly and afterward add the radiator assembly followed by the upper radiator support sub-assembly and finally add the upper radiator support absorber and No. 1 cooler cover and hood lock assembly. The installation process requires attachment of the No. 2 oil cooler inlet hose to the automatic transaxle and the front bumper cover installation after it. Supplement the installation process with the No. 1 radiator hose connection then add the No. 2 radiator hose. After installing the fan and generator V belt the technician must perform an adjustment followed by an inspection check. The assembly process includes installing the No. 2 cylinder head cover alongside the battery carrier followed by the air cleaner bracket and assembly unit before proceeding with the outer cowl top panel and front air shutter seal RH unit followed by the front wiper motor and link assembly and cowl top ventilator louver LH and sub-assembly before implementing the hood to cowl top seal and front wiper arm unit with its blade assembly and head cap for both LH and RH sides. The technician should install the battery tray followed by the battery while adding engine coolant and engine oil. The technician needs to inspect for leaks of fuel, engine oil, exhaust gas, and engine coolant. The last stage includes usage of engine under covers until both right and left sides are installed as well as inspecting ignition timing along with engine idling speed and CO/HC levels and front wheel alignment with ABS sensor signals and VSC warnings.
Related 2008 Scion xD Parts
 2008 Scion xD Oil Filter
 2008 Scion xD Camshaft Bearing
 2008 Scion xD Crankshaft Seal
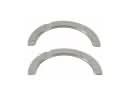 2008 Scion xD Crankshaft Thrust Washer Set
 2008 Scion xD Cylinder Head Gasket
 2008 Scion xD Engine Mount
 2008 Scion xD Exhaust Valve
 2008 Scion xD Oil Pan
 2008 Scion xD Piston
 2008 Scion xD Rocker Arm
 2008 Scion xD Rod Bearing
 2008 Scion xD Valve Cover Gasket