×
ToyotaParts- Hello
- Login or Register
- Quick Links
- Live Chat
- Track Order
- Parts Availability
- RMA
- Help Center
- Contact Us
- Shop for
- Toyota Parts
- Scion Parts
My Garage
My Account
Cart
OEM 2007 Toyota Tacoma Crankshaft Seal
- Select Vehicle by Model
- Select Vehicle by VIN
Select Vehicle by Model
orMake
Model
Year
Select Vehicle by VIN
For the most accurate results, select vehicle by your VIN (Vehicle Identification Number).
4 Crankshaft Seals found


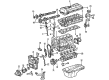
2007 Toyota Tacoma Rear Main Seal
Part Number: 90311-88006$39.78 MSRP: $55.37You Save: $15.59 (29%)Ships in 1-2 Business DaysProduct Specifications- Other Name: Seal, Type T Oil; Engine Crankshaft Seal, Rear; Seal, Engine Rear Oil; Engine Crankshaft Seal; Crankshaft Seal
- Position: Rear
- Replaces: 90311-88004, 90311-88005, 90311-T0058
- Part Name Code: 11381A
- Item Weight: 0.50 Pounds
- Item Dimensions: 5.2 x 5.2 x 0.4 inches
- Condition: New
- Fitment Type: Direct Replacement
- SKU: 90311-88006
- Warranty: This genuine part is guaranteed by Toyota's factory warranty.


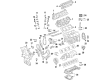
2007 Toyota Tacoma Rear Main Seal
Part Number: 90311-A0006$53.88 MSRP: $75.00You Save: $21.12 (29%)Ships in 1-2 Business DaysProduct Specifications- Other Name: Seal, Type T Oil; Engine Crankshaft Seal, Rear; Engine Crankshaft Seal Kit; Crankshaft Seal Kit; Oil Seal Set; Crankshaft Seal; Rear Seal; Seal, Engine Rear Oil; Seal
- Manufacturer Note: (L)
- Replaces: 90311-99010
- Part Name Code: 11381A
- Item Weight: 0.70 Pounds
- Item Dimensions: 5.2 x 5.1 x 0.4 inches
- Condition: New
- Fitment Type: Direct Replacement
- SKU: 90311-A0006
- Warranty: This genuine part is guaranteed by Toyota's factory warranty.


2007 Toyota Tacoma Oil Seal, Front
Part Number: 90311-A0005$19.11 MSRP: $26.60You Save: $7.49 (29%)Ships in 1-3 Business DaysProduct Specifications- Other Name: Seal, Type T Oil; Engine Crankshaft Seal, Front; Timing Cover Gasket; Multi-Purpose Seal; Timing Cover Seal; Crankshaft Seal; Front Seal; Timing Cover Oil Seal; Engine Crankshaft Seal
- Position: Front
- Replaces: 90311-42019, 90311-42007, 90311-42037, 90311-42036
- Part Name Code: 11301C
- Item Weight: 0.50 Pounds
- Item Dimensions: 5.3 x 4.8 x 1.0 inches
- Condition: New
- Fitment Type: Direct Replacement
- SKU: 90311-A0005
- Warranty: This genuine part is guaranteed by Toyota's factory warranty.


2007 Toyota Tacoma Crankshaft Seal, Front
Part Number: 90311-48020$14.21 MSRP: $19.78You Save: $5.57 (29%)Ships in 1-2 Business DaysProduct Specifications- Other Name: Seal, Type T Oil; Engine Crankshaft Seal, Front; Front Crank Seal; Seal, Oil(For Timing Gear Case Or Timing Chain Case); Engine Crankshaft Seal
- Manufacturer Note: NOK
- Position: Front
- Replaces: 90311-48021
- Part Name Code: 11301C
- Item Weight: 0.50 Pounds
- Item Dimensions: 2.4 x 2.3 x 0.4 inches
- Condition: New
- Fitment Type: Direct Replacement
- SKU: 90311-48020
- Warranty: This genuine part is guaranteed by Toyota's factory warranty.
2007 Toyota Tacoma Crankshaft Seal
Looking for affordable OEM 2007 Toyota Tacoma Crankshaft Seal? Explore our comprehensive catalogue of genuine 2007 Toyota Tacoma Crankshaft Seal. All our parts are covered by the manufacturer's warranty. Plus, our straightforward return policy and speedy delivery service ensure an unparalleled shopping experience. We look forward to your visit!
2007 Toyota Tacoma Crankshaft Seal Parts Q&A
- Q: How to Service and Repair the Crankshaft Seal on 2007 Toyota Tacoma?A: A technician should start front engine oil seal servicing by taking out the four bolts which secure the Engine Under Cover Sub-Assembly No.1 on vehicles with Pre Runner and 4WD types. First drain the engine coolant before removing the radiator support to frame seal LH followed by the fan shroud. Start the crankshaft pulley removal procedure by unbolting it first before splitting the air conditioning bracket when this equipment exists. The crankshaft pulley bolt becomes loose using Special Service Tool 09213-54015 (91651-60855), 09330-00021 until there remain two or three bolt threads visible. The crankshaft pulley and bolt can be removed using Special Service Tool: 09950-50013 (series 09951-05010, 09952-05010, 09953-05010, 09954-05021). You need Special Service Tool: 09213-54015 (91651-60855) to access the timing gear case or timing chain case oil seal. Use a cutter knife to cut off the lip of the old seal and then use this tool to gently pry it out. Examine the crankshaft for damage after removal and smooth rough spots by sanding with 400-grit sandpaper. The new oil seal installation requires culprit use of MP grease on its lip alongside a smooth application with Special Service Tool: 09223-50010 that should be used to tap the new seal until it reaches the timing chain cover edge while maintaining straight alignment and removing all grease residue from the crankshaft. At first install the new crankshaft pulley bolt as a temporary step during alignment of the set key with the key groove. Afterward install Special Service Tool: 09213-54015 (91651-60855), 09330-00021 to hold the pulley while torquing the crankshaft pulley bolt to 260 Nm (2,651 kgf-cm, 192 ft. lbs.) without using the same pulley bolt twice. Users can install the bracket along with bolt if the system includes air conditioning while firmly tightening its fastener to 7.5 Nm (76 kgf-cm, 66 inch lbs.). Place the fan shroud in position afterward install the radiator support to frame seal on the left side then add engine coolant followed by inspections for fluid leakage. Reattach the No. 1 engine under cover sub-assembly for Pre Runner and 4WD types by securing it using 4 bolts with 30 Nm (306 kgf-cm, 22 ft. lbs.) torque.
Related 2007 Toyota Tacoma Parts
 2007 Toyota Tacoma Oil Filter
 2007 Toyota Tacoma Timing Chain
 2007 Toyota Tacoma Oil Filler Cap
 2007 Toyota Tacoma Valve Cover Gasket
 2007 Toyota Tacoma Balance Shaft Gear
 2007 Toyota Tacoma Cam Gear
 2007 Toyota Tacoma Camshaft Bearing
 2007 Toyota Tacoma Crankshaft Gear
 2007 Toyota Tacoma Cylinder Head Gasket
 2007 Toyota Tacoma Harmonic Balancer
 2007 Toyota Tacoma Rocker Arm
 2007 Toyota Tacoma Valve Stem Seal