×
ToyotaParts- Hello
- Login or Register
- Quick Links
- Live Chat
- Track Order
- Parts Availability
- RMA
- Help Center
- Contact Us
- Shop for
- Toyota Parts
- Scion Parts
My Garage
My Account
Cart
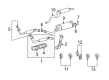
OEM 2007 Toyota Land Cruiser Exhaust Pipe
Exhaust Tail Pipe- Select Vehicle by Model
- Select Vehicle by VIN
Select Vehicle by Model
orMake
Model
Year
Select Vehicle by VIN
For the most accurate results, select vehicle by your VIN (Vehicle Identification Number).
5 Exhaust Pipes found


2007 Toyota Land Cruiser Intermediate Pipe, Front
Part Number: 17450-50070$229.03 MSRP: $299.50You Save: $70.47 (24%)Ships in 1-2 Business DaysProduct Specifications- Other Name: Pipe Assembly, Exhaust Front; Catalytic Converter; Direct-Fit Exhaust; Exhaust System Kit; Exhaust Pipe; Second Converter; Front Pipe; Center Pipe; Pipe Assembly, Exhaust, Front
- Position: Front
- Replaces: 17450-50050
- Part Name Code: 17450B
- Item Weight: 5.30 Pounds
- Item Dimensions: 42.0 x 14.3 x 8.7 inches
- Condition: New
- Fitment Type: Direct Replacement
- SKU: 17450-50070
- Warranty: This genuine part is guaranteed by Toyota's factory warranty.


2007 Toyota Land Cruiser Muffler & Pipe Assembly, Center
Part Number: 17403-50151$642.63 MSRP: $862.59You Save: $219.96 (26%)Ships in 1-3 Business DaysProduct Specifications- Other Name: Pipe Sub-Assembly, Exhaust Muffler; Direct-Fit Exhaust; Exhaust System Kit; Tail Pipe; Muffler & Pipe; Muffler; Pipe Assembly, Exhaust, Center
- Position: Center
- Part Name Code: 17420
- Item Weight: 16.90 Pounds
- Item Dimensions: 52.9 x 19.9 x 9.7 inches
- Condition: New
- Fitment Type: Direct Replacement
- SKU: 17403-50151
- Warranty: This genuine part is guaranteed by Toyota's factory warranty.

2007 Toyota Land Cruiser Front Pipe, Driver Side
Part Number: 17401-50240$1736.54 MSRP: $2330.94You Save: $594.40 (26%)Ships in 1-3 Business DaysProduct Specifications- Other Name: Pipe Sub-Assembly, Exhaust; Catalytic Converter, Left; Exhaust Pipe; Converter & Pipe; Pipe Assembly, Exhaust, Front; Catalytic Converter
- Manufacturer Note: LH
- Position: Front Driver Side
- Part Name Code: 17410
- Item Weight: 11.10 Pounds
- Item Dimensions: 48.6 x 19.0 x 9.4 inches
- Condition: New
- Fitment Type: Direct Replacement
- SKU: 17401-50240
- Warranty: This genuine part is guaranteed by Toyota's factory warranty.
2007 Toyota Land Cruiser Pipe Assembly, Exhaust, Front, Passenger Side
Part Number: 17401-50230$1687.62 MSRP: $2265.27You Save: $577.65 (26%)Ships in 1-3 Business DaysProduct Specifications- Other Name: Pipe Sub-Assembly, Exhaust; Catalytic Converter; Exhaust Pipe
- Manufacturer Note: RH
- Position: Front Passenger Side
- Part Name Code: 17410
- Item Weight: 11.40 Pounds
- Item Dimensions: 51.6 x 18.5 x 9.4 inches
- Condition: New
- Fitment Type: Direct Replacement
- SKU: 17401-50230
- Warranty: This genuine part is guaranteed by Toyota's factory warranty.

2007 Toyota Land Cruiser Resonator & Pipe
Part Number: 17405-50040$451.49 MSRP: $606.03You Save: $154.54 (26%)Ships in 1-3 Business DaysProduct Specifications- Other Name: Pipe Sub-Assembly, Exhaust; Exhaust Tail Pipe; Exhaust Pipe; Muffler; Resonator; Tailpipe; Pipe Assembly, Exhaust, Tail; Tail Pipe
- Part Name Code: 17430
- Item Weight: 10.70 Pounds
- Item Dimensions: 45.3 x 13.3 x 9.3 inches
- Condition: New
- Fitment Type: Direct Replacement
- SKU: 17405-50040
- Warranty: This genuine part is guaranteed by Toyota's factory warranty.
2007 Toyota Land Cruiser Exhaust Pipe
Looking for affordable OEM 2007 Toyota Land Cruiser Exhaust Pipe? Explore our comprehensive catalogue of genuine 2007 Toyota Land Cruiser Exhaust Pipe. All our parts are covered by the manufacturer's warranty. Plus, our straightforward return policy and speedy delivery service ensure an unparalleled shopping experience. We look forward to your visit!
2007 Toyota Land Cruiser Exhaust Pipe Parts Q&A
- Q: How to service and repair the exhaust pipe on 2007 Toyota Land Cruiser?A: Start the exhaust pipe repair by detaching the Bank 2 Sensor 2 heated oxygen sensor using tool number 09224-00010 together with a sensor connector removal. Perform this procedure again for the heated oxygen sensor located on Bank 1 Sensor 2. The first step in tailpipe removal involves cutting off the clamp and dislodging two rings while unscrewing the gasket before unjoining the pipe from its center exhaust partner. Start the removal process of the center exhaust pipe by first extracting 4 bolts and 4 nuts then 3 rings followed by removing the exhaust pipe and afterward taking off the last 2 gaskets. The procedure to detach the front No. 2 exhaust pipe consists of removing 2 bolts along with 2 nuts and the gasket before disconnecting it from the front exhaust pipe LH. Detach the front exhaust pipe RH by removing 3 nuts followed by its gasket and front exhaust pipe from the exhaust manifold and repeat the steps for the front exhaust pipe LH. The installation process begins with the front exhaust pipe RH by first applying a new gasket and then fastening it to the exhaust manifold using 3 new nuts that require a torque of 62 N m (632 kgf cm, 46 ft. lbf). Secure the front exhaust pipe LH using the same process from its beginning. You must mount the front No. 2 exhaust pipe to the body bracket through the ring installation of a new gasket before connecting it to the front exhaust pipe LH through 2 bolts and 2 new nuts which require 40 N m (408 kgf cm, 30 ft. lbf). After attaching the slot ring on the body bracket to the center exhaust pipe you must fit 2 new gaskets before connecting it to the front exhaust pipe RH and front No. 2 exhaust pipe using 4 bolts fastened with 4 new nuts that require a torque of 40 N m (408 kgf cm, 30 ft. lbf). The tailpipe installation requires 2 rings and a new gasket and new bolted clamp while also excluding the replacement of existing components and tightening the bolt to 35 N m (357 kgf cm, 26 ft. lbf). Use Special Service Tool: 09224-00010 to install the Bank 2 Sensor 2 heated oxygen sensor with a proper torque force of 44 N m (449 kgf cm, 32 ft. lbf). The tool usage requires a force of 40 N m (408 kgf cm, 30 ft. lbf). Connect the sensor connector after installation. Repetition of this procedure should occur when installing the heated oxygen sensor for Bank 1 Sensor 2. The repair process includes a leak test for exhaust gas followed by fixation or replacement of problematic parts when necessary.
Related 2007 Toyota Land Cruiser Parts
 2007 Toyota Land Cruiser Catalytic Converter
 2007 Toyota Land Cruiser Exhaust Manifold
 2007 Toyota Land Cruiser Muffler
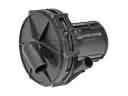 2007 Toyota Land Cruiser Air Injection Pump
 2007 Toyota Land Cruiser Canister Purge Valve
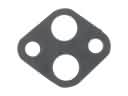 2007 Toyota Land Cruiser EGR Valve Gasket
 2007 Toyota Land Cruiser Exhaust Flange Gasket
 2007 Toyota Land Cruiser Exhaust Hanger
 2007 Toyota Land Cruiser Exhaust Heat Shield
 2007 Toyota Land Cruiser Exhaust Manifold Gasket
 2007 Toyota Land Cruiser PCV Valve
 2007 Toyota Land Cruiser Vapor Canister