×
ToyotaParts- Hello
- Login or Register
- Quick Links
- Live Chat
- Track Order
- Parts Availability
- RMA
- Help Center
- Contact Us
- Shop for
- Toyota Parts
- Scion Parts
My Garage
My Account
Cart
OEM 2006 Toyota Tacoma Bumper
Bumper Fascia- Select Vehicle by Model
- Select Vehicle by VIN
Select Vehicle by Model
orMake
Model
Year
Select Vehicle by VIN
For the most accurate results, select vehicle by your VIN (Vehicle Identification Number).
4 Bumpers found


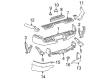
2006 Toyota Tacoma Cover, Rear
Part Number: 52159-04020$64.33 MSRP: $90.30You Save: $25.97 (29%)Ships in 1-3 Business DaysProduct Specifications- Other Name: Cover, Rear Bumper; Bumper Step Pad, Rear Upper
- Manufacturer Note: NO PAINT REQ.
- Position: Rear
- Part Name Code: 52159
- Item Weight: 10.70 Pounds
- Item Dimensions: 56.7 x 15.3 x 26.0 inches
- Condition: New
- Fitment Type: Direct Replacement
- SKU: 52159-04020
- Warranty: This genuine part is guaranteed by Toyota's factory warranty.


2006 Toyota Tacoma Bumper Cover, Front Driver Side
Part Number: 52119-04904$207.36 MSRP: $296.06You Save: $88.70 (30%)Ships in 1 Business DayProduct Specifications- Other Name: Cover, Front Bumper, L/; Bumper Cover, Front; Cover, Front Bumper
- Manufacturer Note: PAINT REQ.
- Position: Front Driver Side
- Part Name Code: 52119A
- Item Weight: 27.00 Pounds
- Item Dimensions: 66.3 x 24.7 x 12.6 inches
- Condition: New
- Fitment Type: Direct Replacement
- SKU: 52119-04904
- Warranty: This genuine part is guaranteed by Toyota's factory warranty.


2006 Toyota Tacoma Bumper Cover, Front
Part Number: 52119-04040$215.51 MSRP: $307.70You Save: $92.19 (30%)Ships in 1-3 Business DaysProduct Specifications- Other Name: Cover, Front Bumper; Bumper Cover, Front
- Position: Front
- Part Name Code: 52119A
- Item Weight: 27.00 Pounds
- Item Dimensions: 68.3 x 25.2 x 12.5 inches
- Condition: New
- Fitment Type: Direct Replacement
- SKU: 52119-04040
- Warranty: This genuine part is guaranteed by Toyota's factory warranty.
2006 Toyota Tacoma Bumper Cover, Front
Part Number: 52119-04010$215.51 MSRP: $307.70You Save: $92.19 (30%)Ships in 1-3 Business DaysProduct Specifications- Other Name: Cover, Front Bumper; Bumper Cover, Front
- Position: Front
- Part Name Code: 52119A
- Item Weight: 1.40 Pounds
- Item Dimensions: 72.4 x 16.3 x 24.7 inches
- Condition: New
- Fitment Type: Direct Replacement
- SKU: 52119-04010
- Warranty: This genuine part is guaranteed by Toyota's factory warranty.
2006 Toyota Tacoma Bumper
Looking for affordable OEM 2006 Toyota Tacoma Bumper? Explore our comprehensive catalogue of genuine 2006 Toyota Tacoma Bumper. All our parts are covered by the manufacturer's warranty. Plus, our straightforward return policy and speedy delivery service ensure an unparalleled shopping experience. We look forward to your visit!
2006 Toyota Tacoma Bumper Parts Q&A
- Q: How to replace the front bumper cover on 2006 Toyota Tacoma?A: The battery cable needs disconnection from its terminal before beginning front bumper cover replacement work. A clip remover enables the disengagement of two clips at the grille while you also remove its two screws to take the component out. Anchoring tape should secure the outer edge of the front bumper cover before removing its six screws and dissociating seven clips along with two additional clips. The front bumper cover removal requires turning off any fog lamp connectors when present alongside unfastening and gently removing 2 claws before extracting the front bumper cover sequentially followed by detaching 6 clips. The clip remover tool should be used to detach three clips followed by removing seven retainers in order to detach the front spoiler cover LH (X-Runner type). The detachment of front spoiler cover RH (X-Runner type) requires a clip remover to remove 1 clip along with 6 retainers. For Pre Runner and 4WD models disassemble the front bumper extension LH by eliminating 5 retainers whereas X-Runner models require 4 retainers for removal. The procedure must be replicated for the RH side. The procedure includes disconnecting two claws to remove the front spoiler cover center (X-Runner type) and the front bumper hole covers LH and RH (without fog lamp). The fog lamp assemblies require you to detach 2 claws for removal of the LH assembly and proceed with the same steps for the RH assembly. A screw pull and a single claw release allows you to remove the front bumper side support on the right-hand side. You must remove a clip through the use of a clip remover and disengage two claws before pulling out the filler from the LH front bumper position. Then you should carry out this same process on the RH front bumper area. Proceed to remove the LH headlamp assembly after which you should use the same steps for the RH assembly. The center front bumper retainer needs four nuts removal before performing separator removal of the extension reinforcement followed by identical work on the opposite side. Use a soft mouth to remove the front bumper arm mounting bracket LH when all 2 bolts have been extracted and repeat the process on the RH side. First remove the front bumper reinforcement sub-assembly using 6 nuts before taking out the front bumper extension sub-assembly No. 2 LH through its 3 nuts. Repeat this procedure on the other side. Reduce the torque on the front bumper extension sub-assembly No. 2 LH with 3 nuts to 58 N.m (590 kgf.cm, 43 ft.lbf) before installing it to the equivalent assembly on the opposite side. Use 6 nuts to install the front bumper reinforcement sub-assembly before torquing to 58 N.m (590 kgf.cm, 43 ft.lbf). After that install the front bumper arm mounting bracket LH with 2 bolts torqued to 13 N.m (135 kgf.cm, 10 ft.lbf). Do the same for installing the opposite bracket. Fasten the front bumper reinforcement extension to the appropriate side with 2 nuts while torquing them to 13 N.m (135 kgf.cm, 10 ft.lbf) followed by the same installation steps on the other side. The front bumper retainer upper center needs 4 nuts installed while torque reaches 13 N.m (135 kgf.cm, 10 ft.lbf). First mount the LH and RH headlamp assemblies before installing the front bumper filler LH through the engagement of 2 claws with a clip attachment. Repeat the same installation for the RH side. Apply a claw to the front bumper side support RH while tightening its screw before installing it on the opposite side. The LH and RH front bumper hole covers without fog lamp need installation through two claw engagement. The installation of fog lamp assemblies requires two claws for the left-hand side assembly followed by the same procedure for the right-hand side. Place the front spoiler cover exclusively on the X-Runner type while using 5 retainers of Pre Runner or 4WD or 4 retainers for X-Runner to install the front bumper extension LH before repeating the process on the RH side. To finish the rear installation, fasten the front spoiler cover LH (X-Runner type) with its combination of seven retainers and three clips. You can finish the installation by adding 6 clips then hooking 2 claws followed by connecting the fog lamp wires if necessary before placing 9 clips and tighting 6 screws. The radiator grille should be installed through engagement of two clips while torqueing two screws before reestablishing the cable connection to the negative battery terminal with a torque setting of 3.9 N.m (40 kgf.cm, 35 in. lbf).
Related 2006 Toyota Tacoma Parts
 2006 Toyota Tacoma Grille
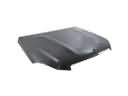 2006 Toyota Tacoma Hood
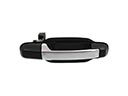 2006 Toyota Tacoma Door Handle
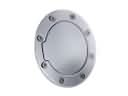 2006 Toyota Tacoma Fuel Door
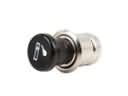 2006 Toyota Tacoma Cigarette Lighter
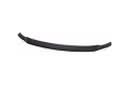 2006 Toyota Tacoma Spoiler
 2006 Toyota Tacoma Windshield Washer Nozzle
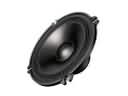 2006 Toyota Tacoma Car Speakers
 2006 Toyota Tacoma Door Hinge
 2006 Toyota Tacoma Front Cross-Member
 2006 Toyota Tacoma Lift Support
 2006 Toyota Tacoma Window Run