×
ToyotaParts- Hello
- Login or Register
- Quick Links
- Live Chat
- Track Order
- Parts Availability
- RMA
- Help Center
- Contact Us
- Shop for
- Toyota Parts
- Scion Parts
My Garage
My Account
Cart
OEM 2006 Toyota Tacoma Axle Shaft
Car Axle Shaft- Select Vehicle by Model
- Select Vehicle by VIN
Select Vehicle by Model
orMake
Model
Year
Select Vehicle by VIN
For the most accurate results, select vehicle by your VIN (Vehicle Identification Number).
3 Axle Shafts found


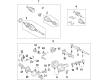
2006 Toyota Tacoma Axle Assembly, Front
Part Number: 43430-04071$329.10 MSRP: $469.88You Save: $140.78 (30%)Product Specifications- Other Name: Shaft Assembly, Front Drive; CV Axle Assembly, Front, Front Left, Front Right; GSP Cv Axle; Axle Shaft; Shaft Assembly, Front Drive, Passenger Side; Shaft Assembly, Front Drive, Driver Side; CV Axle Assembly
- Position: Front
- Replaces: 43430-04070
- Condition: New
- Fitment Type: Direct Replacement
- SKU: 43430-04071
- Warranty: This genuine part is guaranteed by Toyota's factory warranty.


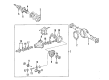
2006 Toyota Tacoma Axle Shaft, Rear
Part Number: 42311-04082$384.87 MSRP: $564.03You Save: $179.16 (32%)Product Specifications- Other Name: Shaft, Rear Axle; Drive Axle Shaft, Rear; Axle Shafts; Shaft, Rear Axle, Passenger Side; Shaft, Rear Axle, Driver Side
- Position: Rear
- Replaces: 42311-04080, 42311-04081
- Item Weight: 15.20 Pounds
- Item Dimensions: 40.3 x 6.2 x 6.1 inches
- Condition: New
- Fitment Type: Direct Replacement
- SKU: 42311-04082
- Warranty: This genuine part is guaranteed by Toyota's factory warranty.

2006 Toyota Tacoma Axle Shaft, Rear
Part Number: 42311-04071$401.67 MSRP: $588.65You Save: $186.98 (32%)Product Specifications- Other Name: Shaft, Rear Axle; Drive Axle Shaft, Rear; Axle Shafts; Shaft, Rear Axle, Passenger Side; Shaft, Rear Axle, Driver Side
- Position: Rear
- Replaces: 42311-04070
- Item Weight: 16.10 Pounds
- Item Dimensions: 27.6 x 8.4 x 7.6 inches
- Condition: New
- Fitment Type: Direct Replacement
- SKU: 42311-04071
- Warranty: This genuine part is guaranteed by Toyota's factory warranty.
2006 Toyota Tacoma Axle Shaft
Looking for affordable OEM 2006 Toyota Tacoma Axle Shaft? Explore our comprehensive catalogue of genuine 2006 Toyota Tacoma Axle Shaft. All our parts are covered by the manufacturer's warranty. Plus, our straightforward return policy and speedy delivery service ensure an unparalleled shopping experience. We look forward to your visit!
2006 Toyota Tacoma Axle Shaft Parts Q&A
- Q: How to service and repair the rear axle shaft assembly on 2006 Toyota Tacoma?A: The process for fixing the rear axle shaft begins by untethering the negative battery cable then removing the wheel followed by draining and removing the brake components in order of rear brake drum sub-assembly, front brake shoe, rear brake shoe, and rear speed sensor. To properly separate the parking brake cable assembly No. 3, remove the 2 bolts before disconnecting it from the backing plate while using Special Service Tool: 09023-00101 to capture the flowing brake fluid from the rear brake tube No. 8. First remove the rear axle shaft with backing plate through the elimination of the four retaining nuts and the O-ring before using Special Service Tool: 09308-00010 to extract the rear axle shaft oil seal. To start disassembling the system you must use a snap ring expander before employing Special Service Tool: 09521-25011 and 09521-25021 with a press to eliminate the rear axle shaft. Start by separating the rear axle bearing retainer inner and the rear axle shaft washer before removing the rear axle hub and bearing assembly through 4 nuts applied to rear axle housing bolts while using a hammer as the removal method. Use Service Tool 09650-17011 to remove 5 hub bolts for 2WD models while the tool removes 6 hub bolts for 4WD and Pre-Runner vehicles. Following bolt removals assist in taking off the deflector and deflector gasket from the rear axle shaft. Perform manual grinding on the rear axle bearing inner race and create space through chiseling before you remove the rear axle shaft oil seal. Verify the rear axle shaft runouts using a dial indicator because excessive measures of 1.5 mm for the shaft and 0.05 mm for the flange warrant replacement of damaged or worn parts. Towards assembly first install a new rear axle shaft deflector gasket with deflector before fastening hub bolts with washer plate while tightening the hub nut for all 2WD and 4WD/Pre-Runner models. The first step is to position the backing plate against the rear axle bearing before installing the parking brake plates and putting on the rear axle shaft washer followed by a new rear axle bearing retainer inner. Rephrase this step using Special Service Tool: 09521-25011 and a press to install the rear axle shaft which requires a snap ring installation using a snap ring expander. The installation procedure requires Special Service Tools: 09950-60020 (09951-00770), 09950-70010 (09951-07150) and a hammer for a new oil seal application which must be followed by O-ring installation and rear axle shaft with backing plate assembly using 4 nuts torqued to 36 Nm. Insert the rear brake tubing number 8 using Special Service Tool: 09023-00101 before torquing to 15 Nm while mounting the parking brake cable assembly number 3 with two bolts torqued to 8.0 Nm. The next procedure requires fitting the rear speed sensor and applying temperature-resistant grease before installing new brake shoes on both rear and front sections. Then inspection of the rear drum brake components leads to the installation of the rear brake drum assembly. Finish by adjusting the rear drum brake shoe clearance before installing the rear wheel and torquing it to 113 Nm. After reconnection of the negative battery terminal tighten it to 3.9 Nm. The brake fluid must be added to the reservoir during this maintenance while performing necessary bleeds of the master cylinder and brake lines followed by checking fluid levels and inspecting for leaks before adjusting the parking brake pedal and lever travel while verifying VSC and ABS sensor signals.
Related 2006 Toyota Tacoma Parts
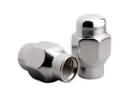 2006 Toyota Tacoma Lug Nuts
 2006 Toyota Tacoma Sway Bar Link
 2006 Toyota Tacoma CV Boot
 2006 Toyota Tacoma Coil Springs
 2006 Toyota Tacoma Alignment Bolt
 2006 Toyota Tacoma Axle Beam Mount
 2006 Toyota Tacoma CV Joint
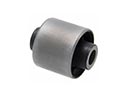 2006 Toyota Tacoma Differential Mount
 2006 Toyota Tacoma Leaf Spring Shackle
 2006 Toyota Tacoma Shock Absorber
 2006 Toyota Tacoma Sway Bar Bracket
 2006 Toyota Tacoma Wheel Seal