×
ToyotaParts- Hello
- Login or Register
- Quick Links
- Live Chat
- Track Order
- Parts Availability
- RMA
- Help Center
- Contact Us
- Shop for
- Toyota Parts
- Scion Parts
My Garage
My Account
Cart
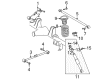
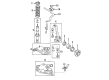
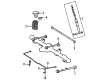
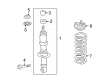
OEM 2006 Toyota Sequoia Coil Springs
Strut Spring- Select Vehicle by Model
- Select Vehicle by VIN
Select Vehicle by Model
orMake
Model
Year
Select Vehicle by VIN
For the most accurate results, select vehicle by your VIN (Vehicle Identification Number).
19 Coil Springs found


2006 Toyota Sequoia Coil Spring, Rear
Part Number: 48231-AF060$181.96 MSRP: $259.80You Save: $77.84 (30%)Ships in 1-3 Business DaysProduct Specifications- Other Name: Spring, Coil, Rear; Coil Spring, Rear; Coil Springs; Spring; Spring, Coil, Rear Passenger Side; Spring, Coil, Rear Driver Side
- Position: Rear
- Item Weight: 4.30 Pounds
- Item Dimensions: 17.3 x 10.7 x 5.7 inches
- Condition: New
- Fitment Type: Direct Replacement
- SKU: 48231-AF060
- Warranty: This genuine part is guaranteed by Toyota's factory warranty.

2006 Toyota Sequoia Coil Spring, Rear
Part Number: 48231-AF030$163.90 MSRP: $232.02You Save: $68.12 (30%)Product Specifications- Other Name: Spring, Coil, Rear; Coil Spring, Rear; Coil Springs; Spring; Spring, Coil, Rear Passenger Side; Spring, Coil, Rear Driver Side
- Position: Rear
- Item Weight: 10.50 Pounds
- Item Dimensions: 17.2 x 10.7 x 5.6 inches
- Condition: New
- Fitment Type: Direct Replacement
- SKU: 48231-AF030
- Warranty: This genuine part is guaranteed by Toyota's factory warranty.

2006 Toyota Sequoia Coil Spring, Rear
Part Number: 48231-AF140$171.30 MSRP: $242.50You Save: $71.20 (30%)Ships in 1-3 Business DaysProduct Specifications- Other Name: Spring, Coil, Rear; Coil Spring, Rear; Coil Springs; Spring; Spring, Coil, Rear Passenger Side; Spring, Coil, Rear Driver Side
- Manufacturer Note: W(TOWING HITCH)
- Position: Rear
- Item Weight: 10.20 Pounds
- Item Dimensions: 17.3 x 8.1 x 8.5 inches
- Condition: New
- Fitment Type: Direct Replacement
- SKU: 48231-AF140
- Warranty: This genuine part is guaranteed by Toyota's factory warranty.

2006 Toyota Sequoia Coil Spring, Rear
Part Number: 48231-AF120$157.79 MSRP: $223.37You Save: $65.58 (30%)Ships in 1-3 Business DaysProduct Specifications- Other Name: Spring, Coil, Rear; Coil Spring, Rear; Coil Springs; Spring; Spring, Coil, Rear Passenger Side; Spring, Coil, Rear Driver Side
- Manufacturer Note: W(TOWING HITCH)
- Position: Rear
- Item Weight: 3.10 Pounds
- Item Dimensions: 16.8 x 10.8 x 5.7 inches
- Condition: New
- Fitment Type: Direct Replacement
- SKU: 48231-AF120
- Warranty: This genuine part is guaranteed by Toyota's factory warranty.


2006 Toyota Sequoia Coil Spring, Driver Side
Part Number: 48131-AF380$228.68 MSRP: $326.50You Save: $97.82 (30%)Product Specifications- Other Name: Spring, Coil, Front; Coil Spring, Front Left; Coil Springs; Spring; Spring, Front Coil, Driver Side
- Position: Driver Side
- Part Name Code: 48132
- Item Weight: 6.40 Pounds
- Item Dimensions: 15.8 x 7.1 x 6.0 inches
- Condition: New
- Fitment Type: Direct Replacement
- SKU: 48131-AF380
- Warranty: This genuine part is guaranteed by Toyota's factory warranty.

2006 Toyota Sequoia Coil Spring, Passenger Side
Part Number: 48131-AF370$228.68 MSRP: $326.50You Save: $97.82 (30%)Product Specifications- Other Name: Spring, Coil, Front; Coil Spring, Front Right; Coil Springs; Spring; Spring, Front Coil, Passenger Side
- Position: Passenger Side
- Part Name Code: 48131
- Item Weight: 6.10 Pounds
- Item Dimensions: 16.1 x 7.1 x 5.8 inches
- Condition: New
- Fitment Type: Direct Replacement
- SKU: 48131-AF370
- Warranty: This genuine part is guaranteed by Toyota's factory warranty.
2006 Toyota Sequoia Coil Spring, Rear
Part Number: 48231-AF130$166.37 MSRP: $235.51You Save: $69.14 (30%)Ships in 1-3 Business DaysProduct Specifications- Other Name: Spring, Coil, Rear; Coil Spring, Rear; Coil Springs; Spring; Spring, Coil, Rear Passenger Side; Spring, Coil, Rear Driver Side
- Position: Rear
- Item Weight: 4.40 Pounds
- Item Dimensions: 17.0 x 10.8 x 5.7 inches
- Condition: New
- Fitment Type: Direct Replacement
- SKU: 48231-AF130
- Warranty: This genuine part is guaranteed by Toyota's factory warranty.

2006 Toyota Sequoia Coil Spring, Passenger Side
Part Number: 48131-AF330$161.55 MSRP: $228.69You Save: $67.14 (30%)Ships in 1-3 Business DaysProduct Specifications- Other Name: Spring, Coil, Front; Coil Spring, Front Right; Coil Springs; Spring, Front Coil, Passenger Side
- Position: Passenger Side
- Part Name Code: 48131
- Item Weight: 6.90 Pounds
- Item Dimensions: 16.2 x 6.8 x 5.8 inches
- Condition: New
- Fitment Type: Direct Replacement
- SKU: 48131-AF330
- Warranty: This genuine part is guaranteed by Toyota's factory warranty.
2006 Toyota Sequoia Coil Spring, Rear
Part Number: 48231-AF180$144.16 MSRP: $204.07You Save: $59.91 (30%)Ships in 1-3 Business DaysProduct Specifications- Other Name: Spring, Coil, Rear; Coil Spring, Rear; Spring, Coil, Rear Passenger Side; Spring, Coil, Rear Driver Side
- Manufacturer Note: W(TOWING HICH & AUTO LEVELER)
- Position: Rear
- Item Weight: 4.20 Pounds
- Item Dimensions: 17.3 x 10.7 x 5.7 inches
- Condition: New
- Fitment Type: Direct Replacement
- SKU: 48231-AF180
- Warranty: This genuine part is guaranteed by Toyota's factory warranty.
2006 Toyota Sequoia Coil Spring, Rear
Part Number: 48231-AF170$126.39 MSRP: $178.93You Save: $52.54 (30%)Ships in 1-3 Business DaysProduct Specifications- Other Name: Spring, Coil, Rear; Coil Spring, Rear; Coil Springs; Spring; Spring, Coil, Rear Passenger Side; Spring, Coil, Rear Driver Side
- Manufacturer Note: W(AUTO LEVELER)
- Position: Rear
- Item Weight: 4.20 Pounds
- Item Dimensions: 16.8 x 10.7 x 5.7 inches
- Condition: New
- Fitment Type: Direct Replacement
- SKU: 48231-AF170
- Warranty: This genuine part is guaranteed by Toyota's factory warranty.
2006 Toyota Sequoia Coil Spring, Rear
Part Number: 48231-AF150$120.36 MSRP: $170.38You Save: $50.02 (30%)Ships in 1-3 Business DaysProduct Specifications- Other Name: Spring, Coil, Rear; Coil Spring, Rear; Coil Springs; Spring; Spring, Coil, Rear Passenger Side; Spring, Coil, Rear Driver Side
- Manufacturer Note: W(AUTO LEVELER)
- Position: Rear
- Item Weight: 4.20 Pounds
- Item Dimensions: 16.8 x 10.7 x 5.7 inches
- Condition: New
- Fitment Type: Direct Replacement
- SKU: 48231-AF150
- Warranty: This genuine part is guaranteed by Toyota's factory warranty.


 Product Specifications
- Other Name: Spring, Coil, Rear; Coil Spring, Rear; Coil Springs; Spring; Spring, Coil, Rear Passenger Side; Spring, Coil, Rear Driver Side
- Manufacturer Note: W(THIRD SEAT 5:5 SPLIT) OR W(TOWING HICH)
- Position: Rear
- Item Weight: 4.40 Pounds
- Item Dimensions: 17.3 x 11.1 x 5.7 inches
- Condition: New
- Fitment Type: Direct Replacement
- SKU: 48231-AF050
- Warranty: This genuine part is guaranteed by Toyota's factory warranty.
 Product Specifications
- Other Name: Spring, Coil, Rear; Coil Spring, Rear; Coil Springs; Spring; Spring, Coil, Rear Passenger Side; Spring, Coil, Rear Driver Side
- Manufacturer Note: W(THIRD SEAT 5:5 SPLIT) OR W(TOWING HICH)
- Position: Rear
- Item Weight: 4.40 Pounds
- Item Dimensions: 17.3 x 11.0 x 5.6 inches
- Condition: New
- Fitment Type: Direct Replacement
- SKU: 48231-AF020
- Warranty: This genuine part is guaranteed by Toyota's factory warranty.
- Product Specifications
- Other Name: Spring, Coil, Rear Right-Hand; Coil Spring, Rear; Coil Springs; Spring; Spring, Coil, Rear Passenger Side; Spring, Coil, Rear Driver Side
- Position: Rear Passenger Side
- Item Weight: 4.20 Pounds
- Item Dimensions: 17.0 x 10.7 x 5.6 inches
- Condition: New
- Fitment Type: Direct Replacement
- SKU: 48231-AF040
- Warranty: This genuine part is guaranteed by Toyota's factory warranty.

 Product Specifications
- Other Name: Spring, Coil, Front; Coil Spring, Front Right; Coil Springs; Spring, Front Coil, Passenger Side
- Manufacturer Note: W(AIR SUSPENSION)
- Position: Passenger Side
- Part Name Code: 48131
- Item Weight: 6.10 Pounds
- Item Dimensions: 16.2 x 7.1 x 5.7 inches
- Condition: New
- Fitment Type: Direct Replacement
- SKU: 48131-AF350
- Warranty: This genuine part is guaranteed by Toyota's factory warranty.
- Product Specifications
- Other Name: Spring, Coil, Front; Coil Spring, Front Left; Coil Springs; Spring, Front Coil, Driver Side
- Manufacturer Note: W(AIR SUSPENSION)
- Position: Driver Side
- Part Name Code: 48132
- Item Weight: 6.20 Pounds
- Item Dimensions: 15.5 x 6.9 x 5.8 inches
- Condition: New
- Fitment Type: Direct Replacement
- SKU: 48131-AF360
- Warranty: This genuine part is guaranteed by Toyota's factory warranty.
- Product Specifications
- Other Name: Spring, Coil, Front; Coil Spring, Front Left; Coil Springs; Spring, Front Coil, Driver Side
- Position: Driver Side
- Part Name Code: 48132
- Item Weight: 6.70 Pounds
- Item Dimensions: 16.1 x 6.9 x 5.9 inches
- Condition: New
- Fitment Type: Direct Replacement
- SKU: 48131-AF340
- Warranty: This genuine part is guaranteed by Toyota's factory warranty.
- Product Specifications
- Other Name: Spring, Coil, Rear; Coil Spring, Rear; Coil Springs; Spring; Spring, Coil, Rear Passenger Side; Spring, Coil, Rear Driver Side
- Position: Rear
- Item Weight: 6.30 Pounds
- Item Dimensions: 16.8 x 10.9 x 5.6 inches
- Condition: New
- Fitment Type: Direct Replacement
- SKU: 48231-AF110
- Warranty: This genuine part is guaranteed by Toyota's factory warranty.
- Product Specifications
- Other Name: Spring, Coil, Rear; Coil Spring, Rear; Spring, Coil, Rear Passenger Side; Spring, Coil, Rear Driver Side
- Manufacturer Note: W(TOWING HICH & AUTO LEVELER)
- Position: Rear
- Item Weight: 4.40 Pounds
- Item Dimensions: 16.8 x 11.0 x 5.6 inches
- Condition: New
- Fitment Type: Direct Replacement
- SKU: 48231-AF160
- Warranty: This genuine part is guaranteed by Toyota's factory warranty.
2006 Toyota Sequoia Coil Springs
Looking for affordable OEM 2006 Toyota Sequoia Coil Springs? Explore our comprehensive catalogue of genuine 2006 Toyota Sequoia Coil Springs. All our parts are covered by the manufacturer's warranty. Plus, our straightforward return policy and speedy delivery service ensure an unparalleled shopping experience. We look forward to your visit!
2006 Toyota Sequoia Coil Springs Parts Q&A
- Q: How to service and repair the front shock absorber and coil springs on 2006 Toyota Sequoia?A: You should start the front shock absorber with coil spring service and repair job by removing the front wheel and then the assembly of shock absorber through lower side nut and washer removal without disturbing the bolt followed by prying the lower suspension arm to detach the shock absorber. Succeeding the front wheel removal begin with elimination of the front shock absorber and coil spring using three nuts removal. A spring compressor with a minimum compressive force capacity of 1,300 kgf (2,860 lbs) or 12,740 N will be necessary to decompress the coil spring for front shock absorber service. Keep the coil spring properly supported during decompression and never allow it to extend past necessary lengths while avoiding standing directly above the shock absorber. The center nut of the suspension support must be removed to extract the two retainers, cushion, suspension support and coil spring. When inspecting the front shock absorber you must check the shock absorber rod working range for abnormally high resistance or strange noises which requires immediate replacement of any damaged parts. Replace the front shock absorber bushing using Special Service Tool: 09710-30031 (09710-03161, 09710-03171) together with a press tool without applying grease or oil to the bushing. Install the shock absorber by fitting its bottom end into the spring seat gap while using the spring compressor to compress the coil spring again, proceed with installing the cushion and two retainers and the suspension support to the piston rod followed by temporary nut torque of the new suspension support center to 25 Nm (250 kgf-cm, 18 ft. lbs.) before correctly positioning the suspension support before torquing it. The upper shock absorber attachment to the chassis frame requires three nuts tightened to 64 Nm (650 kgf-cm, 47 ft. lbs.) while connecting the lower side to the suspension arm through bolt, washer, and torqued to 135 Nm (1,400 kgf-cm, 100 ft. lbs.) followed by suitable wheel installation that demands torquing to 110 Nm (1,150 kgf-cm, 83 ft. lbs.). Drilling a hole into the cylinder requires full extension of the front shock absorber rod followed by gas discharge while caring for any flying debris during the drilling process.
Related 2006 Toyota Sequoia Parts
 2006 Toyota Sequoia Control Arm
 2006 Toyota Sequoia Axle Beam Mount
 2006 Toyota Sequoia Ball Joint
 2006 Toyota Sequoia Bump Stop
 2006 Toyota Sequoia Control Arm Bushing
 2006 Toyota Sequoia Front Cross-Member
 2006 Toyota Sequoia Shock And Strut Mount
 2006 Toyota Sequoia Steering Knuckle
 2006 Toyota Sequoia Sway Bar Bracket
 2006 Toyota Sequoia Sway Bar Bushing
 2006 Toyota Sequoia Sway Bar Kit
 2006 Toyota Sequoia Sway Bar Link