×
ToyotaParts- Hello
- Login or Register
- Quick Links
- Live Chat
- Track Order
- Parts Availability
- RMA
- Help Center
- Contact Us
- Shop for
- Toyota Parts
- Scion Parts
My Garage
My Account
Cart
OEM 2006 Toyota RAV4 Brake Master Cylinder
- Select Vehicle by Model
- Select Vehicle by VIN
Select Vehicle by Model
orMake
Model
Year
Select Vehicle by VIN
For the most accurate results, select vehicle by your VIN (Vehicle Identification Number).
2 Brake Master Cylinders found


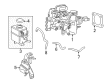
2006 Toyota RAV4 Master Cylinder
Part Number: 47201-0R082$184.87 MSRP: $263.96You Save: $79.09 (30%)Ships in 1-3 Business DaysProduct Specifications- Other Name: Cylinder Sub-Assembly, Brake Stroke Simulator; Brake Master Cylinder; Brake Mster Cylinder; Brake Reservoir; Cylinder Sub-Assembly, Brake Master W/Plate; Cylinder Sub-Assembly, Brake Master
- Replaces: 47201-0R080
- Item Weight: 2.40 Pounds
- Item Dimensions: 9.8 x 7.7 x 5.4 inches
- Condition: New
- Fitment Type: Direct Replacement
- SKU: 47201-0R082
- Warranty: This genuine part is guaranteed by Toyota's factory warranty.
2006 Toyota RAV4 Master Cylinder
Part Number: 47201-0R070$203.28 MSRP: $290.24You Save: $86.96 (30%)Ships in 1-3 Business DaysProduct Specifications- Other Name: Cylinder Sub-Assembly, Brake Stroke Simulator; Brake Master Cylinder; Brake Reservoir; Cylinder Sub-Assembly, Brake Master W/Plate; Cylinder Sub-Assembly, Brake Master
- Item Weight: 2.40 Pounds
- Item Dimensions: 12.2 x 6.7 x 4.9 inches
- Condition: New
- Fitment Type: Direct Replacement
- SKU: 47201-0R070
- Warranty: This genuine part is guaranteed by Toyota's factory warranty.
2006 Toyota RAV4 Brake Master Cylinder
Looking for affordable OEM 2006 Toyota RAV4 Brake Master Cylinder? Explore our comprehensive catalogue of genuine 2006 Toyota RAV4 Brake Master Cylinder. All our parts are covered by the manufacturer's warranty. Plus, our straightforward return policy and speedy delivery service ensure an unparalleled shopping experience. We look forward to your visit!
2006 Toyota RAV4 Brake Master Cylinder Parts Q&A
- Q: How to service and repair the Brake Master Cylinder on 2006 Toyota RAV4?A: Service and repair operations for the Brake Master Cylinder require proper handling of the master cylinder with downward-facing tip to prevent piston fall-out and protecting its piston through cleaning with a cloth and application of lithium soap base glycol grease on its outer edge. Start the service by removing the air cleaner case sub-assembly followed by draining the brake fluid while washing off all liquid that touches painted surfaces. To disconnect the brake lines labeled B from the master cylinder use Special Service Tool 09023-00101 followed by removing two nuts before pulling the master cylinder out of the brake booster when the engine stops and brake pedal is depressed several times. The release of vacuum pressure in the brake booster should be completed by removing the connector labeled A for the brake fluid level warning switch. The O-ring step should be followed by master cylinder disassembly where you must remove the brake master cylinder ring pin and reservoir sub-assembly, reservoir grommet, filler cap assembly, strainer, while maintaining the piston secure and keeping it clean across all steps. The installation process begins with applying lithium soap base glycol grease to two new grommets before placing the brake master cylinder reservoir strainer followed by the filler cap assembly then finally the grommet. Next install the reservoir sub-assembly and ring pin. The procedure requires installing a new master cylinder O-ring before securing the master cylinder to the booster with two nuts reaching 12.5 Nm (127 kgf-cm, 9 ft. lbs.) tightening. Next, reconnect the two brake lines named B, which need torque of 15.2 Nm (155 kgf-cm, 11 ft. lbs.) through normal methods or 14 Nm (144 kgf-cm, 10 ft. lbs.) with the special tool based on a 30 cm (11.81 inches) torque wrench fulcrum length. Reconnect the warning switch (labelled A) followed by fluid charging the reservoir while bleeding the brake components including the cylinder, brake lines and ABS and traction mechanism respectively before assessing fluid level and inspecting for any leaks prior to air cleaner case reinstallation.
Related 2006 Toyota RAV4 Parts
 2006 Toyota RAV4 Brake Caliper
 2006 Toyota RAV4 Wheel Hub
 2006 Toyota RAV4 ABS Pump And Motor Assembly
 2006 Toyota RAV4 Brake Booster
 2006 Toyota RAV4 Brake Line
 2006 Toyota RAV4 Brake Master Cylinder Reservoir
 2006 Toyota RAV4 Brake Pad Set
 2006 Toyota RAV4 Hydraulic Hose
 2006 Toyota RAV4 Master Cylinder Repair Kit
 2006 Toyota RAV4 Spindle Nut
 2006 Toyota RAV4 Wheel Cylinder Repair Kit
 2006 Toyota RAV4 Yaw Sensor