×
ToyotaParts- Hello
- Login or Register
- Quick Links
- Live Chat
- Track Order
- Parts Availability
- RMA
- Help Center
- Contact Us
- Shop for
- Toyota Parts
- Scion Parts
My Garage
My Account
Cart
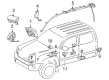
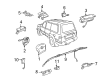
OEM 2006 Toyota Land Cruiser Air Bag Sensor
Air Bag Impact Sensor- Select Vehicle by Model
- Select Vehicle by VIN
Select Vehicle by Model
orMake
Model
Year
Select Vehicle by VIN
For the most accurate results, select vehicle by your VIN (Vehicle Identification Number).
8 Air Bag Sensors found


2006 Toyota Land Cruiser Position Sensor, Passenger Side
Part Number: 89178-06020$79.26 MSRP: $111.27You Save: $32.01 (29%)Ships in 1-2 Business DaysProduct Specifications- Other Name: Sensor, Seat Position; Seat Track Position Sensor, Left, Right; Air Bag Sensor; Occupant Sensor; Seat; Sensor, Seat Position Air Bag
- Position: Passenger Side
- Part Name Code: 89178A
- Item Weight: 0.50 Pounds
- Item Dimensions: 2.1 x 1.6 x 1.3 inches
- Condition: New
- Fitment Type: Direct Replacement
- SKU: 89178-06020
- Warranty: This genuine part is guaranteed by Toyota's factory warranty.

2006 Toyota Land Cruiser Diagnostic Unit
Part Number: 89170-60282$180.51 MSRP: $221.37You Save: $40.86 (19%)Ships in 1-3 Business DaysProduct Specifications- Other Name: Sensor Assembly, Air Bag; Air Bag Control Module; Air Bag Sensor; Center Sensor
- Replaces: 89170-60280
- Item Weight: 1.30 Pounds
- Condition: New
- SKU: 89170-60282
- Warranty: This genuine part is guaranteed by Toyota's factory warranty.
2006 Toyota Land Cruiser Diagnostic Unit
Part Number: 89170-60261$1076.99 MSRP: $1355.72You Save: $278.73 (21%)Ships in 1-3 Business DaysProduct Specifications- Other Name: Sensor Assembly, Air Bag; Air Bag Control Module; Air Bag Sensor; Center Sensor
- Replaces: 89170-60260
- Item Weight: 1.60 Pounds
- Item Dimensions: 8.0 x 6.7 x 4.1 inches
- Condition: New
- SKU: 89170-60261
- Warranty: This genuine part is guaranteed by Toyota's factory warranty.

2006 Toyota Land Cruiser Sensor, Air Bag, Front Driver Side
Part Number: 89174-69105$97.25 MSRP: $117.25You Save: $20.00 (18%)Ships in 1-3 Business DaysProduct Specifications- Other Name: Sensor, Air Bag, Front; Air Bag Sensor
- Position: Front Driver Side
- Part Name Code: 89174A
- Item Weight: 0.70 Pounds
- Item Dimensions: 4.9 x 3.0 x 2.3 inches
- Condition: New
- Fitment Type: Direct Replacement
- SKU: 89174-69105
- Warranty: This genuine part is guaranteed by Toyota's factory warranty.

2006 Toyota Land Cruiser Front Sensor, Passenger Side
Part Number: 89173-69105$107.82 MSRP: $130.00You Save: $22.18 (18%)Ships in 1-3 Business DaysProduct Specifications- Other Name: Sensor, Air Bag, Front; Air Bag Impact Sensor, Front Right; Air Bag Sensor; Sensor, Air Bag, Front Passenger Side
- Position: Front Passenger Side
- Part Name Code: 89173A
- Item Weight: 0.70 Pounds
- Item Dimensions: 4.8 x 3.0 x 2.4 inches
- Condition: New
- Fitment Type: Direct Replacement
- SKU: 89173-69105
- Warranty: This genuine part is guaranteed by Toyota's factory warranty.

2006 Toyota Land Cruiser Rear Sensor, Driver Side
Part Number: 89834-60010$131.82 MSRP: $186.61You Save: $54.79 (30%)Ships in 1-3 Business DaysProduct Specifications- Other Name: Sensor, Air Bag, Rear; Air Bag Impact Sensor, Rear Left; Air Bag Sensor; Impact Sensor; Side Sensor; Sensor, Air Bag, Rear Driver Side
- Position: Rear Driver Side
- Part Name Code: 89834
- Item Weight: 0.60 Pounds
- Item Dimensions: 4.3 x 2.7 x 2.1 inches
- Condition: New
- Fitment Type: Direct Replacement
- SKU: 89834-60010
- Warranty: This genuine part is guaranteed by Toyota's factory warranty.
2006 Toyota Land Cruiser Sensor, Air Bag, Rear Passenger Side
Part Number: 89833-60030$131.82 MSRP: $186.61You Save: $54.79 (30%)Ships in 1-3 Business DaysProduct Specifications- Other Name: Sensor, Air Bag, Rear; Air Bag Sensor
- Position: Rear Passenger Side
- Part Name Code: 89833
- Item Weight: 0.60 Pounds
- Item Dimensions: 4.6 x 2.6 x 2.1 inches
- Condition: New
- Fitment Type: Direct Replacement
- SKU: 89833-60030
- Warranty: This genuine part is guaranteed by Toyota's factory warranty.
2006 Toyota Land Cruiser Position Sensor, Driver Side
Part Number: 89178-0W010$79.26 MSRP: $111.27You Save: $32.01 (29%)Ships in 1-3 Business DaysProduct Specifications- Other Name: Sensor, Seat Position; Seat Track Position Sensor, Left; Air Bag Sensor; Seat; Sensor, Seat Position Air Bag
- Position: Driver Side
- Part Name Code: 89178A
- Item Weight: 0.50 Pounds
- Item Dimensions: 2.1 x 1.6 x 1.4 inches
- Condition: New
- Fitment Type: Direct Replacement
- SKU: 89178-0W010
- Warranty: This genuine part is guaranteed by Toyota's factory warranty.
2006 Toyota Land Cruiser Air Bag Sensor
Looking for affordable OEM 2006 Toyota Land Cruiser Air Bag Sensor? Explore our comprehensive catalogue of genuine 2006 Toyota Land Cruiser Air Bag Sensor. All our parts are covered by the manufacturer's warranty. Plus, our straightforward return policy and speedy delivery service ensure an unparalleled shopping experience. We look forward to your visit!
2006 Toyota Land Cruiser Air Bag Sensor Parts Q&A
- Q: How to service the Center Air Bag Sensor Assembly on 2006 Toyota Land Cruiser?A: The service process for the Center Air Bag Sensor Assembly must begin by disconnecting the negative battery cable while waiting 90 seconds to avoid Air Bag or seat belt pretensioner activation. The service requires removal of the front seat assemblies from both sides along with the transfer shift lever and all three sub-assemblies of upper console panel and rear console box and front console box and instrument cluster finish panel center lower. The procedure begins by removing the central Air Bag sensor assembly which requires disconnecting electrical connectors and unbolting it with three connectors using a 10mm hex socket. Whenever installing the Air Bag sensor use three bolts with 17.5 N.m torque (178 kgf.cm or 13 ft.lbf) and discard the sensor when it encounters damage or after dropping it. The SRS wiring needs to be positioned away from other components during assembly. The installation process requires reattaching the Air Bag sensor connectors following the installation sequence for instrument cluster finish panel center lower, front console box, rear console box sub-assembly, upper console panel sub-assembly and transfer shift lever. Both front seat assemblies must be installed before reconnecting the negative battery cable and system initialization follows before checking the SRS warning light.
Related 2006 Toyota Land Cruiser Parts
 2006 Toyota Land Cruiser Ignition Switch
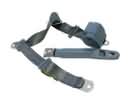 2006 Toyota Land Cruiser Seat Belt
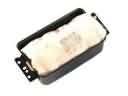 2006 Toyota Land Cruiser Air Bag
 2006 Toyota Land Cruiser Air Bag Control Module
 2006 Toyota Land Cruiser Antenna
 2006 Toyota Land Cruiser Car Key
 2006 Toyota Land Cruiser Clock Spring
 2006 Toyota Land Cruiser Coolant Temperature Sensor
 2006 Toyota Land Cruiser Daytime Running Light Relay
 2006 Toyota Land Cruiser Headlight Relay
 2006 Toyota Land Cruiser Ride Height Sensor
 2006 Toyota Land Cruiser Transmitter