×
ToyotaParts- Hello
- Login or Register
- Quick Links
- Live Chat
- Track Order
- Parts Availability
- RMA
- Help Center
- Contact Us
- Shop for
- Toyota Parts
- Scion Parts
My Garage
My Account
Cart
OEM 2005 Scion xA Heater Core
HVAC Heater Core- Select Vehicle by Model
- Select Vehicle by VIN
Select Vehicle by Model
orMake
Model
Year
Select Vehicle by VIN
For the most accurate results, select vehicle by your VIN (Vehicle Identification Number).
1 Heater Core found

 Product Specifications
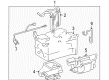
- Other Name: Unit Sub-Assembly, Radiator; HVAC Heater Core
- Replaces: 87107-52030
- Item Weight: 1.60 Pounds
- Item Dimensions: 13.8 x 11.6 x 8.3 inches
- Condition: New
- SKU: 87107-52031
- Warranty: This genuine part is guaranteed by Toyota's factory warranty.
2005 Scion xA Heater Core
Looking for affordable OEM 2005 Scion xA Heater Core? Explore our comprehensive catalogue of genuine 2005 Scion xA Heater Core. All our parts are covered by the manufacturer's warranty. Plus, our straightforward return policy and speedy delivery service ensure an unparalleled shopping experience. We look forward to your visit!
2005 Scion xA Heater Core Parts Q&A
- Q: How to service and repair the heater core on 2005 Scion xA?A: The first step when servicing the heater core is to perform refrigerant discharge from the refrigeration system via Special Service Tool: 09870-00015 07110-58060 (07117-58080, 07117-58090, 07117-78050, 07117-88060, 07117-88070, 07117-88080). You must remove the suction hose sub assembly and liquid tube sub assembly A by using Service Tool 09870-00025. First detach the heater water inlet hose A using pliers on its clip and then proceed to disconnect the heater water outlet hose A through the same method. Start by disassembling the instrument panel sub assembly with passenger Air Bag assembly before proceeding to take off the instrument panel sub assembly lower with heater duct. Unfasten the clip then disconnect the claws to remove the ECM as well as the air conditioning blower assembly, air conditioning amplifier assembly, and defroster nozzle assembly. The instrument panel brace sub assembly No.1 requires disconnecting the wire harness before removing bolts and an untightened nut. Detach the defroster damper control cable sub assembly and airmix damper control cable sub assembly by unhooking their external and internal wiring. The procedure for disconnecting air duct rear No.1 is comparable to air duct rear No.2. To remove the heater radiator assembly begin by disconnecting its connectors followed by removing the bolt together with the PTC heater earth bolt then unfasten the nuts. Disassemble the air duct assembly by unfastening its claws then remove the heater cover through claw separation followed by claw and screw disassembly. Use the claw connector to dismount the thermistor assembly after unclamping it then eliminate the heater radiator unit sub assembly by unthreading screws and the cooler wiring No.2 using a screw and bracket before disconnecting the connection. Trim the defroster damper control cable sub assembly by placing the arm in FACE position then install both inner and outer cables correctly before checking the system functions properly. The MAX.COOL position must be selected for installing the airmix damper control cable sub assembly. The service technician should reinstall the ECM as well as the instrument panel sub assembly lower with heater duct and the instrument panel sub assembly with passenger Air Bag assembly. Use Special Service Tool: 07110-58060 and its variants (07117-58060, 07117-58070, 07117-58080, 07117-58090, 07117-78050, 07117-88060, 07117-88070, 07117-88080) to add 460 plus or minus 30 g (16.2 plus or minus 1.1 oz.) refrigerant before installing the suction hose sub assembly along with liquid tube sub assembly A. The work concludes with engine engine-warming followed by a thorough inspection of engine coolant and refrigerant system components.
Related 2005 Scion xA Parts
 2005 Scion xA A/C Accumulator
 2005 Scion xA A/C Compressor
 2005 Scion xA A/C Condenser
 2005 Scion xA A/C Expansion Valve
 2005 Scion xA A/C Hose
 2005 Scion xA A/C Switch
 2005 Scion xA Ambient Temperature Sensor
 2005 Scion xA Blend Door Actuator
 2005 Scion xA Blower Control Switches
 2005 Scion xA Blower Motor
 2005 Scion xA Blower Motor Resistor
 2005 Scion xA Evaporator