×
ToyotaParts- Hello
- Login or Register
- Quick Links
- Live Chat
- Track Order
- Parts Availability
- RMA
- Help Center
- Contact Us
- Shop for
- Toyota Parts
- Scion Parts
My Garage
My Account
Cart
OEM 2004 Scion xB Shock Absorber
Suspension Shock Absorber- Select Vehicle by Model
- Select Vehicle by VIN
Select Vehicle by Model
orMake
Model
Year
Select Vehicle by VIN
For the most accurate results, select vehicle by your VIN (Vehicle Identification Number).
1 Shock Absorber found


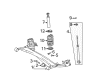
2004 Scion xB Shock Absorber
Part Number: 48530-59815$58.90 MSRP: $81.99You Save: $23.09 (29%)Ships in 1-3 Business DaysProduct Specifications- Other Name: Absorber Assembly, Shock; Rear Suspension Kit; Strut Assembly; Shock Set; Complete Strut; Shock Absorber Assembly, Rear Passenger Side & Driver Side; Suspension Shock Absorber
- Manufacturer Note: MARK 48530-52630
- Item Weight: 4.20 Pounds
- Item Dimensions: 26.9 x 6.7 x 5.8 inches
- Condition: New
- Fitment Type: Direct Replacement
- SKU: 48530-59815
- Warranty: This genuine part is guaranteed by Toyota's factory warranty.
2004 Scion xB Shock Absorber
Looking for affordable OEM 2004 Scion xB Shock Absorber? Explore our comprehensive catalogue of genuine 2004 Scion xB Shock Absorber. All our parts are covered by the manufacturer's warranty. Plus, our straightforward return policy and speedy delivery service ensure an unparalleled shopping experience. We look forward to your visit!
2004 Scion xB Shock Absorber Parts Q&A
- Q: How to overhaul the front shock absorber with coil spring on 2004 Scion xB?A: The overhaul procedure for front shock absorber with coil spring requires steps to begin with windshield wiper arm cover then left and right front wiper arms removal followed by hood to cowl top seal detachment and separation of both cowl top ventilator louvers. To begin the process remove the windshield wiper link assembly while also disconnecting the hose and wire harness and then unfastening 8 bolts from the cowl top panel outer. First remove the front wheel and then disconnect the flexible hose by using a wrench on the bolt as well as releasing the wire harness clamp from the shock absorber bracket. Front shock absorber removal requires 2 nuts and 2 bolts for unfastening from the steering knuckle and then requires using 3 nuts to remove the shock absorber with coil spring together with suspension support No.2. Place the front shock absorber with coil spring into a vise followed by attaching two nuts and a bolt to the bracket of the absorber. Then compress the coil spring using Special Service Tool: 09727-30021 (09727-00010, 09727-00021, 09727-00031) while avoiding damage from impact wrenches. Use 2 nuts with a screwdriver to remove the left-hand nut from the front support to front shock absorber while paying attention to avoid damaging suspension support stud bolts. After removing the front suspension support dust cover, secure the front shock absorber hold with the screwdriver while the suspension support dust cover remains attached. The next steps in the operation involve the removal of the front suspension support left-hand assembly together with the dust seal and coil spring seat upper as well as its corresponding insulator upper and coil spring component and spring bumper. The shock absorber requires inspection by pressing and releasing the rod to detect any irregular resistance or noises. A replacement should occur if such anomalies are discovered. Reinstall the front spring bumper followed by the shock absorber assembly front left and repeat the special service tool compression process to fit the lower end of the coil spring correctly into its adjacent spring lower seat. The front coil spring insulator upper should receive installation with the "a" mark directed toward the outside while the front coil spring seat upper features the "OUT" mark placed outward. Fit the front suspension support left-hand dust seal together with its subassembly while securing it to the front shock absorber left-hand nut with a new torqued center nut at 33 Nm (340 kgf-cm, 25 ft. lbs.). Maintain careful attention to avoid damaging the suspension support stud bolts. After removing the special service tool you should apply MP grease to the suspension support area before putting on the front suspension support dust cover. Complete installation of the front shock absorber with coil spring includes fitting suspension support No.2 then torquing its 3 nuts to 39 Nm (400 kgf-cm, 29 ft. lbs.) while connecting it to the steering knuckle before installing two bolts and a nut which requires the bolt to stay fixed during the nut torquing process to 132 Nm (1,350 kgf-cm, 97 ft. lbs.). The procedure requires installation of the flexible hose which gets torqued to 29 Nm (300 kgf-cm) before torquing the front wheel to 103 Nm (1,050 kgf-cm) and cowl top panel outer 8 bolts to 5.0 Nm (51 kgf-cm) and reconnection of the hose and wire harness. The windshield wiper link assembly together with both cowl top ventilator louvers and hood to cowl top seal and left and right front wiper arms will be installed afterwards front wheel alignment inspection and adjustment will be performed. To dispose of the front left shock absorber assembly you must first extend the shock absorber rod before drilling a hole into the cylinder to release gas while following safety measures because metal shards may occur and keeping in mind the gas has no color and odor nor poison effects.
Related 2004 Scion xB Parts
 2004 Scion xB Wheel Hub
 2004 Scion xB Alignment Bolt
 2004 Scion xB Axle Beam Mount
 2004 Scion xB Coil Spring Insulator
 2004 Scion xB Coil Springs
 2004 Scion xB Control Arm
 2004 Scion xB Control Arm Bolt
 2004 Scion xB Control Arm Bushing
 2004 Scion xB Shock and Strut Boot
 2004 Scion xB Steering Knuckle
 2004 Scion xB Sway Bar Kit
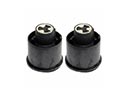 2004 Scion xB Trailing Arm Bushing