×
ToyotaParts- Hello
- Login or Register
- Quick Links
- Live Chat
- Track Order
- Parts Availability
- RMA
- Help Center
- Contact Us
- Shop for
- Toyota Parts
- Scion Parts
My Garage
My Account
Cart
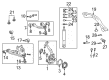
OEM 2003 Toyota Land Cruiser Control Arm
Suspension Arm- Select Vehicle by Model
- Select Vehicle by VIN
Select Vehicle by Model
orMake
Model
Year
Select Vehicle by VIN
For the most accurate results, select vehicle by your VIN (Vehicle Identification Number).
3 Control Arms found


2003 Toyota Land Cruiser Arm Assembly, Front Suspension, Upper Driver Side
Part Number: 48630-60010$344.01 MSRP: $504.15You Save: $160.14 (32%)Ships in 1-3 Business DaysProduct Specifications- Other Name: Arm Assembly, Suspension; Control Arm
- Position: Upper Driver Side
- Part Name Code: 48630
- Item Weight: 7.30 Pounds
- Item Dimensions: 12.6 x 7.0 x 15.3 inches
- Condition: New
- Fitment Type: Direct Replacement
- SKU: 48630-60010
- Warranty: This genuine part is guaranteed by Toyota's factory warranty.


2003 Toyota Land Cruiser Upper Control Arm, Passenger Side
Part Number: 48610-60030$344.01 MSRP: $504.15You Save: $160.14 (32%)Ships in 1-3 Business DaysProduct Specifications- Other Name: Arm Assembly, Suspension; Suspension Control Arm, Front Right Upper; Control Arm Assembly; Arm Assembly, Front Suspension Upper, Passenger Side; Suspension Control Arm; Control Arm
- Position: Passenger Side
- Part Name Code: 48610
- Item Weight: 7.30 Pounds
- Item Dimensions: 11.7 x 7.0 x 15.4 inches
- Condition: New
- Fitment Type: Direct Replacement
- SKU: 48610-60030
- Warranty: This genuine part is guaranteed by Toyota's factory warranty.


2003 Toyota Land Cruiser Lower Control Arm, Passenger Side
Part Number: 48620-60010$322.51 MSRP: $460.47You Save: $137.96 (30%)Ships in 1-3 Business DaysProduct Specifications- Other Name: Arm Assembly, Suspension; Suspension Control Arm, Front Right Lower; Control Arm Assembly; Arm Assembly, Front Suspension, Lower Passenger Side; Suspension Control Arm; Control Arm
- Position: Lower Passenger Side
- Part Name Code: 48620
- Item Weight: 25.50 Pounds
- Item Dimensions: 19.2 x 2.4 x 8.6 inches
- Condition: New
- Fitment Type: Direct Replacement
- SKU: 48620-60010
- Warranty: This genuine part is guaranteed by Toyota's factory warranty.
2003 Toyota Land Cruiser Control Arm
Looking for affordable OEM 2003 Toyota Land Cruiser Control Arm? Explore our comprehensive catalogue of genuine 2003 Toyota Land Cruiser Control Arm. All our parts are covered by the manufacturer's warranty. Plus, our straightforward return policy and speedy delivery service ensure an unparalleled shopping experience. We look forward to your visit!
2003 Toyota Land Cruiser Control Arm Parts Q&A
- Q: How to service and repair the lower control arm on 2003 Toyota Land Cruiser?A: The starting point for lower control arm servicing and repair requires removal of the front wheel followed by tightening it to 131 Nm (1,340 kgf-cm, 97 ft. lbs.). The service process starts by deleting the engine under cover and front torsion bar spring. The lower suspension arm stabilizer bar link needs disconnection by removing its bolt through application of 52 Nm (530 kgf-cm, 38 ft. lbs.) torque. The shock absorber can be detached from the lower suspension arm by unfastening its nut and bolt sequence under 135 Nm (1,400 kgf-cm, 100 ft. lbs.). The steering knuckle disconnection from the lower suspension arm begins with removing the cotter pin and nut at 159 Nm (1,625 kgf-cm, 117 ft. lbs.) while using Special Service Tool: 09628-62011 for effective separation. Before you uninstall the lower suspension arm first remove two nuts and three bolts which need to be tightened to 230 Nm (2,350 kgf-cm, 170 ft. lbs.). You should examine the ball joint stud rotation condition through a five-stroke backward-and-forward motion before installing the nut while using a torque wrench to spin the nut at a steady pace one turn every 3-5 seconds to measure torque at the 5th turn within a range of 0.29 - 2.94 Nm (3 - 30 kgf-cm, 2.6 - 26 inch lbs.). Begin with bushing number one by lifting the flange with a chisel and hammer followed by using Special Service Tool: 09710-30021 (09710-03101), 09950-00020, 09950-00030, 09950-40011 (09957-04010) to remove it and put a new one in with Special Service Tool: 09726-36010 through press usage. Precision tool sequence 09710-22021 (09710-01071) and 09726-35011 (09726-05021) and 09830-36010 helps in removing the No. 2 bushing while tool sequence 09631-32020 and 09830-36010 installs a new one. Successively apply boot kit grease on the ball joint before installing a fresh dust cover and wire. Follow the stepwise removal procedure in reverse order to perform the installation process which must be followed by wheel alignment testing after completion.
Related 2003 Toyota Land Cruiser Parts
 2003 Toyota Land Cruiser Alignment Bolt
 2003 Toyota Land Cruiser Axle Beam Mount
 2003 Toyota Land Cruiser Axle Shaft
 2003 Toyota Land Cruiser Bump Stop
 2003 Toyota Land Cruiser Coil Spring Insulator
 2003 Toyota Land Cruiser Control Arm Bushing
 2003 Toyota Land Cruiser Front Cross-Member
 2003 Toyota Land Cruiser Lateral Link
 2003 Toyota Land Cruiser Shock Absorber
 2003 Toyota Land Cruiser Sway Bar Bracket
 2003 Toyota Land Cruiser Sway Bar Bushing
 2003 Toyota Land Cruiser Wheel Seal