×
ToyotaParts- Hello
- Login or Register
- Quick Links
- Live Chat
- Track Order
- Parts Availability
- RMA
- Help Center
- Contact Us
- Shop for
- Toyota Parts
- Scion Parts
My Garage
My Account
Cart
OEM 2001 Toyota 4Runner Shock Absorber
Suspension Shock Absorber- Select Vehicle by Model
- Select Vehicle by VIN
Select Vehicle by Model
orMake
Model
Year
Select Vehicle by VIN
For the most accurate results, select vehicle by your VIN (Vehicle Identification Number).
3 Shock Absorbers found


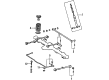
2001 Toyota 4Runner Shock Absorber, Rear
Part Number: 48531-80701$62.08 MSRP: $87.15You Save: $25.07 (29%)Ships in 1-3 Business DaysProduct Specifications- Other Name: Absorber, Shock, Rear; Suspension Kit; Strut Assembly; Shock Set; Complete Strut; Absorber Assembly, Shock, Rear Passenger Side; Absorber Assembly, Shock, Rear Driver Side; Shock
- Manufacturer Note: MARK 48531-3D130
- Position: Rear
- Item Weight: 3.90 Pounds
- Item Dimensions: 25.6 x 6.7 x 5.8 inches
- Condition: New
- Fitment Type: Direct Replacement
- SKU: 48531-80701
- Warranty: This genuine part is guaranteed by Toyota's factory warranty.


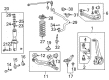
2001 Toyota 4Runner Shock Absorber
Part Number: 48510-39585$181.73 MSRP: $259.47You Save: $77.74 (30%)Ships in 1 Business DayProduct Specifications- Other Name: Absorber Assembly, Shock; Suspension Kit; Strut Assembly; Shock Set; Strut Kit; Complete Strut; Strut; Absorber Assembly, Shock, Front Passenger Side; Absorber Assembly, Shock, Front Driver Side; Shock
- Item Weight: 6.20 Pounds
- Item Dimensions: 27.4 x 8.3 x 7.6 inches
- Condition: New
- Fitment Type: Direct Replacement
- SKU: 48510-39585
- Warranty: This genuine part is guaranteed by Toyota's factory warranty.

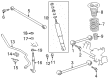
2001 Toyota 4Runner Shock Absorber, Rear
Part Number: 48531-80692$62.91 MSRP: $88.31You Save: $25.40 (29%)Product Specifications- Other Name: Absorber, Shock, Rear; Suspension Kit; Strut Assembly; Shock Set; Complete Strut; Shock; Absorber Assembly, Shock, Rear Passenger Side; Absorber Assembly, Shock, Rear Driver Side
- Position: Rear
- Replaces: 48531-80559
- Item Weight: 4.30 Pounds
- Item Dimensions: 26.4 x 6.7 x 5.8 inches
- Condition: New
- Fitment Type: Direct Replacement
- SKU: 48531-80692
- Warranty: This genuine part is guaranteed by Toyota's factory warranty.
2001 Toyota 4Runner Shock Absorber
Looking for affordable OEM 2001 Toyota 4Runner Shock Absorber? Explore our comprehensive catalogue of genuine 2001 Toyota 4Runner Shock Absorber. All our parts are covered by the manufacturer's warranty. Plus, our straightforward return policy and speedy delivery service ensure an unparalleled shopping experience. We look forward to your visit!
2001 Toyota 4Runner Shock Absorber Parts Q&A
- Q: How to service and repair the front shock absorber with coil spring on 2001 Toyota 4Runner?A: The first step to repair the front shock absorber with coil spring begins with removing the front wheel and tightening it to 110 Nm (1,150 kgf-cm, 83 ft. lbs.). The shock absorber's connection to the lower suspension arm needs both bolt loosening and lower nut and washer removal with 135 Nm torque (1,400 kgf-cm, 101 ft. lbs.). After this disconnect both components so the suspension arm can be lowered. The procedure for removing the shock absorber with coil spring includes disassembly of three nuts which require a torque setting at 64 Nm (650 kgf-cm, 47 ft. lbs.). Special Service Tools 09727-00060 and 09727-30021 should be used to compress the coil spring until adequate clearance exists on both sides while maintaining proper arm positioning and avoiding tool damage through avoiding spring over-compression. Unfasten the two retainers along with the suspension support center nut and coil spring and cushion from the assembly. Check your shock absorber for any abnormal resistance or sounds while compressing and extending its rod. Replace the unit in case you detect any issues. To discard the shock absorber completely extend its rod then drill a hole into the cylinder panel with caution toward escaping debris. The replacement procedure requires the bushing removal by tools Special Service Tool: 09506-35010 and 09632-36010 through a press and new bushing installation without grease or oil. Reassembling requires the same special service tools to compress the coil spring then place the coil spring onto the shock absorber with the lower end set to enter the spring seat gap properly. After inserting the suspension support and cushion onto the rod the technician should first tighten the newly installed suspension center nut then adjust the suspension support toward the shock absorber lower bushing before releasing the special service tools to confirm the suspension support alignment before torquing the suspension center nut to 25 Nm (250 kgf-cm, 18 ft lbs). The last step of installation follows the exact reverse procedure of disassembly.
Related 2001 Toyota 4Runner Parts
 2001 Toyota 4Runner Ball Joint
 2001 Toyota 4Runner CV Boot
 2001 Toyota 4Runner Coil Springs
 2001 Toyota 4Runner Steering Knuckle
 2001 Toyota 4Runner Sway Bar Link
 2001 Toyota 4Runner Alignment Bolt
 2001 Toyota 4Runner Axle Shaft
 2001 Toyota 4Runner Bump Stop
 2001 Toyota 4Runner Control Arm Bushing
 2001 Toyota 4Runner Lateral Link
 2001 Toyota 4Runner Shock And Strut Mount
 2001 Toyota 4Runner Sway Bar Bushing