×
ToyotaParts- Hello
- Login or Register
- Quick Links
- Live Chat
- Track Order
- Parts Availability
- RMA
- Help Center
- Contact Us
- Shop for
- Toyota Parts
- Scion Parts
My Garage
My Account
Cart
OEM Toyota FJ Cruiser Differential
Front Differential- Select Vehicle by Model
- Select Vehicle by VIN
Select Vehicle by Model
orMake
Model
Year
Select Vehicle by VIN
For the most accurate results, select vehicle by your VIN (Vehicle Identification Number).
21 Differentials found


Toyota FJ Cruiser Differential Case Part Number: 41301-35200
$603.13 MSRP: $883.90You Save: $280.77 (32%)Ships in 1-3 Business Days

Toyota FJ Cruiser Differential Case Part Number: 41311-71020
$347.86 MSRP: $496.67You Save: $148.81 (30%)Ships in 1-3 Business DaysToyota FJ Cruiser Differential Case Part Number: 41311-35120
$343.78 MSRP: $503.81You Save: $160.03 (32%)Ships in 1-3 Business Days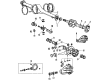
Toyota FJ Cruiser Case Sub-Assembly, Differential Part Number: 41302-26010
$348.89 MSRP: $511.30You Save: $162.41 (32%)Ships in 1-3 Business Days

Toyota FJ Cruiser Carrier Case, Rear Part Number: 41101-35151
$416.42 MSRP: $610.27You Save: $193.85 (32%)Ships in 1-3 Business DaysToyota FJ Cruiser Differential Case, Black Part Number: 41301-35180
$613.34 MSRP: $898.86You Save: $285.52 (32%)Ships in 1-3 Business DaysToyota FJ Cruiser Differential Case, Rear Part Number: 41301-60061
$762.60 MSRP: $1117.59You Save: $354.99 (32%)Ships in 1-3 Business Days
Toyota FJ Cruiser Differential Carrier, Rear Part Number: 41110-35C80
$1535.19 MSRP: $2249.84You Save: $714.65 (32%)Ships in 1-3 Business Days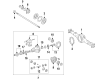
Toyota FJ Cruiser Differential Carrier, Rear Part Number: 41110-35B51
$1768.89 MSRP: $2592.32You Save: $823.43 (32%)Ships in 1-3 Business Days
Toyota FJ Cruiser Carrier Assembly, Differential Part Number: 41110-3D551
$1892.94 MSRP: $2774.13You Save: $881.19 (32%)Ships in 1-3 Business Days
Toyota FJ Cruiser Differential Carrier, Front Part Number: 41110-35A11
$1900.21 MSRP: $2784.77You Save: $884.56 (32%)Ships in 1-3 Business DaysToyota FJ Cruiser Differential Carrier, Rear Part Number: 41110-35B10
$1913.44 MSRP: $2804.18You Save: $890.74 (32%)Ships in 1-3 Business DaysToyota FJ Cruiser Differential Carrier, Rear Part Number: 41110-35D40
$1966.60 MSRP: $2882.08You Save: $915.48 (32%)Ships in 1-3 Business DaysToyota FJ Cruiser Differential Carrier, Rear Part Number: 41110-35D30
$2119.15 MSRP: $3105.64You Save: $986.49 (32%)Ships in 1-3 Business DaysToyota FJ Cruiser Carrier Assembly Part Number: 41110-60A01
$2535.81 MSRP: $3716.26You Save: $1180.45 (32%)Ships in 1-3 Business DaysToyota FJ Cruiser Differential Carrier, Rear Part Number: 41110-35B61
$2611.96 MSRP: $3827.86You Save: $1215.90 (32%)Ships in 1-3 Business DaysToyota FJ Cruiser Differential Carrier, Rear Part Number: 41110-35C90
$1535.19 MSRP: $2249.84You Save: $714.65 (32%)Toyota FJ Cruiser Differential Case Part Number: 41311-71010
$347.86 MSRP: $496.67You Save: $148.81 (30%)
Toyota FJ Cruiser Differential Carrier, Front Part Number: 41110-71191
$1328.85 MSRP: $1947.44You Save: $618.59 (32%)Toyota FJ Cruiser Differential Carrier, Rear Part Number: 41110-35B31
$2674.62 MSRP: $3919.68You Save: $1245.06 (32%)
| Page 1 of 2 |Next >
1-20 of 21 Results
Toyota FJ Cruiser Differential
Choose genuine Differential that pass strict quality control tests. You can trust the top quality and lasting durability. Shopping for OEM Differential for your Toyota FJ Cruiser? Our website is your one-stop destination. We stock an extensive selection of genuine Toyota FJ Cruiser parts. The price is affordable so you can save more. It only takes minutes to browse and find the exact fit. Easily add to cart and check out fast. Our hassle-free return policy will keep you stress-free. We process orders quickly for swift delivery. Your parts will arrive faster, so you can get back on the road sooner.
The Toyota FJ Cruiser Differential is one of the key components of the vehicle that is extensively utilized for the purpose of transmitting power and completing the vehicle's drivetrain. This most vital part enables the drive wheels of the Toyota FJ Cruiser to rotate at different speeds and in accord with the vehicle's movement, direction and speed to supply optimal tractions during cornering. The FJ Cruiser mostly comes with open differentials, distributing traction equally, and LSD differentials to improve traction by varying torque on wheel grip. This is a major strength of the Toyota FJ Cruiser especially when driving on difficult terrains where control of the vehicle can greatly determine on whether the journey will be successful or not. More sophisticated types might also integrate such features as active differentials, enhancing torque distribution even more and boosting efficiency. Taking care of the differential is very important in order to extend its life and avoid major damage, which is relevant to the Toyota FJ Cruiser's lineup's ruggedness. The FJ Cruiser has a 4.0-liter V6 engine with a five-speed transmission which puts the car among the premier when it comes to power and performing stunts on the off roads. The current design is made up of the famous "Toyota" emblem and utility aspects, which differentiates it from others in the automobile industry. This automobile comes in many models such as the TRD Special Edition and Trail Team Special Edition that make it appealing to many people. Lastly, the element of the Toyota FJ Cruiser Differential contributes to improved efficiency and safety to make the FJ Cruiser as a versatile car on the multiple terrains.
Toyota FJ Cruiser Differential Parts and Q&A
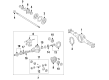
- Q: How to remove the front differential carrier assembly on Toyota FJ Cruiser?A:The first step to separate the front differential carrier assembly involves disconnecting the negative battery terminal cable then removing the front wheel with both the engine cover sub-assembly and the engine under cover assembly. Extract differential oil before disassembling the front propeller shaft assembly. Follow the identical process to separate both front Speed Sensors located on the left and right sides of the vehicle. Moving to the second step you should remove the front axle hub grease caps from both sides through the same method that worked on the right side. Proceed to disconnect both left and right tie rod end sub-assemblies then separate the front lower ball joint attachments on the same order. After performing the right side hub nut removal following the previous steps, both front Drive Shaft assemblies get extracted. The last step of removing the front differential carrier assembly requires disconnecting the differential breather tube bracket while using a jack to support the differential and then unfastening the No. 1 differential mounting nut along with two mounting bolts and two nuts. Use the jack to lower the front differential from the suspension while you detach the three bolts securing the front No. 1 differential support and then the two bolts of the front No. 2 differential support followed by the two bolts securing the front No. 3 differential support.
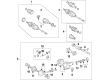
- Q: How to install the rear differential carrier assembly with differential lock on Toyota FJ Cruiser?A:The first step to install the rear differential carrier assembly with differential lock entails cleaning both the differential carrier assembly and axle housing contact surfaces from dust and oil before applying liquid gasket to the new gasket on both sides while avoiding the stud bolt area. The new gasket and differential carrier assembly need to be assembled with 11 nuts and 11 washers before torquing to 25 Nm (255 kgf-cm, 18 ft-lbf). Safely connect the differential actuator connector with the rear differential actuator breather hose to the differential actuator assembly. First install the rear Axle Shaft LH oil seal and then complete the installation of the rear axle shaft RH oil seal through the same process. Follow the same installation approach to place rear axle shafts on both left-hand and right-hand sides. Before sensor installation you should check the bearings of both rear axle shafts which must be followed by installing the rear Speed Sensors on each side using the same sequence. Rephrase the Parking Brake Cables for both LH and RH sides following the same method while applying high-temperature grease before installing the parking brake shoes with their accompanying strut and return tension spring. After the parking brake installation you should install the rear disc while adjusting the parking brake shoe clearance. The installation process for rear disc brake calipers must be repeated for both left-hand and right-hand sides. Both 2WD and 4WD configuration receives the same rear propeller shaft assembly for installation. The installation of the rear wheel requires a torque of 112 Nm (1,137 kgf-cm, 82 ft-lbf) followed by attaching the cable to the negative battery terminal while tightening it to 3.9 Nm (40 kgf-cm, 35 in-lbf). Differential oil inspection reveals any leaks before adding brake fluid to the reservoir while executing a Brake Line bleed followed by reservoir fluid check and then inspecting the brake fluid system. The inspection of parking brake lever movement should be followed by required adjustments and the VSC sensor signal needs verification.


Related Toyota FJ Cruiser Parts
 Toyota FJ Cruiser CV Joint Companion Flange
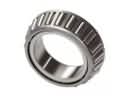 Toyota FJ Cruiser Differential Bearing
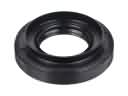 Toyota FJ Cruiser Differential Seal
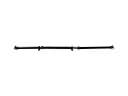 Toyota FJ Cruiser Drive Shaft
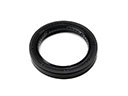 Toyota FJ Cruiser Output Shaft Seal
 Toyota FJ Cruiser Pinion Bearing
 Toyota FJ Cruiser Transfer Case Bearing
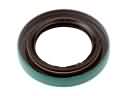 Toyota FJ Cruiser Transfer Case Seal
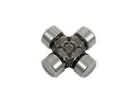 Toyota FJ Cruiser Universal Joint
Browse Toyota FJ Cruiser Differential by Years
2014
2013
2012
2011
2010
2009
2008
2007