×
ToyotaParts- Hello
- Login or Register
- Quick Links
- Live Chat
- Track Order
- Parts Availability
- RMA
- Help Center
- Contact Us
- Shop for
- Toyota Parts
- Scion Parts
My Garage
My Account
Cart
OEM 2009 Toyota FJ Cruiser Differential
Front Differential- Select Vehicle by Model
- Select Vehicle by VIN
Select Vehicle by Model
orMake
Model
Year
Select Vehicle by VIN
For the most accurate results, select vehicle by your VIN (Vehicle Identification Number).
11 Differentials found


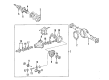
2009 Toyota FJ Cruiser Differential Case
Part Number: 41311-71020$347.86 MSRP: $496.67You Save: $148.81 (30%)Ships in 1-3 Business DaysProduct Specifications- Other Name: Case, Differential; Case, Front Differential; Differential
- Part Name Code: 41311
- Item Weight: 5.80 Pounds
- Item Dimensions: 7.1 x 7.0 x 6.3 inches
- Condition: New
- Fitment Type: Direct Replacement
- SKU: 41311-71020
- Warranty: This genuine part is guaranteed by Toyota's factory warranty.

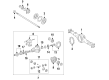
2009 Toyota FJ Cruiser Differential Carrier, Rear
Part Number: 41110-35B61$2535.81 MSRP: $3716.26You Save: $1180.45 (32%)Ships in 1-3 Business DaysProduct Specifications- Other Name: Carrier Assembly, Differential; Differential Carrier Assembly, Rear; Differential; Carrier Assembly
- Position: Rear
- Replaces: 41110-35B60
- Item Weight: 57.20 Pounds
- Item Dimensions: 17.9 x 12.6 x 12.2 inches
- Condition: New
- SKU: 41110-35B61
- Warranty: This genuine part is guaranteed by Toyota's factory warranty.
2009 Toyota FJ Cruiser Differential Carrier, Rear
Part Number: 41110-35B51$1768.89 MSRP: $2592.32You Save: $823.43 (32%)Ships in 1-3 Business DaysProduct Specifications- Other Name: Carrier Assembly, Differential; Differential Carrier Assembly, Rear; Differential; Carrier Assembly
- Position: Rear
- Replaces: 41110-35B50
- Condition: New
- SKU: 41110-35B51
- Warranty: This genuine part is guaranteed by Toyota's factory warranty.

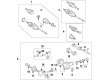
2009 Toyota FJ Cruiser Differential Carrier, Front
Part Number: 41110-35A11$1844.82 MSRP: $2703.60You Save: $858.78 (32%)Ships in 1-3 Business DaysProduct Specifications- Other Name: Carrier Assembly, Differential; Differential, Front; Axle Shaft; Axle Assembly; Carrier; Carrier Assembly, Differential, Front; Differential
- Manufacturer Note: *FGR=41:11=3.727,PNC 41101A=TYPE A
- Position: Front
- Replaces: 41110-35A10
- Part Name Code: 41110F
- Item Weight: 58.90 Pounds
- Item Dimensions: 24.2 x 15.8 x 13.5 inches
- Condition: New
- Fitment Type: Direct Replacement
- SKU: 41110-35A11
- Warranty: This genuine part is guaranteed by Toyota's factory warranty.

2009 Toyota FJ Cruiser Differential Case, Rear
Part Number: 41301-60061$762.60 MSRP: $1117.59You Save: $354.99 (32%)Ships in 1-3 Business DaysProduct Specifications- Other Name: Case Sub-Assembly, Differential; Differential Carrier, Rear; Differential; Case
- Position: Rear
- Replaces: 41301-60060
- Condition: New
- SKU: 41301-60061
- Warranty: This genuine part is guaranteed by Toyota's factory warranty.

2009 Toyota FJ Cruiser Carrier Case, Rear
Part Number: 41101-35151$416.42 MSRP: $610.27You Save: $193.85 (32%)Ships in 1-3 Business DaysProduct Specifications- Other Name: Carrier Sub-Assembly, Differential; Differential Carrier Housing, Rear; Differential Housing, Rear; Differential; Carrier Housing; Carrier
- Position: Rear
- Replaces: 41101-35150
- Condition: New
- SKU: 41101-35151
- Warranty: This genuine part is guaranteed by Toyota's factory warranty.
2009 Toyota FJ Cruiser Case Sub-Assembly, Differential
Part Number: 41302-26010$348.89 MSRP: $511.30You Save: $162.41 (32%)Ships in 1-3 Business DaysProduct Specifications- Other Name: CASE SUB-ASSY, DIFFE; Differential
- Position: Rear
- Replaces: 41302-35020
- Condition: New
- SKU: 41302-26010
- Warranty: This genuine part is guaranteed by Toyota's factory warranty.
2009 Toyota FJ Cruiser Differential Carrier, Rear
Part Number: 41110-35B10$1913.44 MSRP: $2804.18You Save: $890.74 (32%)Ships in 1-3 Business DaysProduct Specifications- Other Name: Carrier Assembly, Differential; Differential Carrier Assembly, Rear; Carrier Assembly; Carrier Assembly, Differential, Rear; Differential
- Manufacturer Note: *FGR=43:11=3.909
- Position: Rear
- Part Name Code: 41110
- Item Weight: 78.00 Pounds
- Item Dimensions: 29.6 x 26.1 x 18.0 inches
- Condition: New
- Fitment Type: Direct Replacement
- SKU: 41110-35B10
- Warranty: This genuine part is guaranteed by Toyota's factory warranty.
2009 Toyota FJ Cruiser Differential Carrier, Rear
Part Number: 41110-35B31$2596.64 MSRP: $3805.41You Save: $1208.77 (32%)Product Specifications- Other Name: Carrier Assembly, Differential; Differential Carrier Assembly, Rear; Differential; Carrier Assembly
- Position: Rear
- Replaces: 41110-35B30
- Condition: New
- SKU: 41110-35B31
- Warranty: This genuine part is guaranteed by Toyota's factory warranty.
2009 Toyota FJ Cruiser Differential Case
Part Number: 41311-71010$347.86 MSRP: $496.67You Save: $148.81 (30%)Product Specifications- Other Name: Case, Differential; Case, Front Differential; Differential
- Manufacturer Note: PNC 41101A=TYPE A
- Part Name Code: 41311
- Item Weight: 6.00 Pounds
- Item Dimensions: 6.9 x 6.8 x 6.4 inches
- Condition: New
- Fitment Type: Direct Replacement
- SKU: 41311-71010
- Warranty: This genuine part is guaranteed by Toyota's factory warranty.
 Product Specifications
- Other Name: Differential, Front; Axle Shaft; Axle Assembly; Carrier Assembly, Differential, Front; Differential
- Manufacturer Note: *FGR=43:11=3.909
- Position: Front
- Part Name Code: 41110F
- Item Weight: 43.10 Pounds
- Item Dimensions: 26.3 x 16.8 x 14.1 inches
- Condition: New
- Fitment Type: Direct Replacement
- SKU: 41110-71160
- Warranty: This genuine part is guaranteed by Toyota's factory warranty.
2009 Toyota FJ Cruiser Differential
Looking for affordable OEM 2009 Toyota FJ Cruiser Differential? Explore our comprehensive catalogue of genuine 2009 Toyota FJ Cruiser Differential. All our parts are covered by the manufacturer's warranty. Plus, our straightforward return policy and speedy delivery service ensure an unparalleled shopping experience. We look forward to your visit!
2009 Toyota FJ Cruiser Differential Parts Q&A
- Q: How to install the rear differential carrier assembly on 2009 Toyota FJ Cruiser?A: The installation of the rear differential carrier assembly requires users to wipe away dust and oil from both components before applying liquid gasket to a new gasket's sides while preserving the stud bolts from contact with gasket material. Place the new gasket and differential carrier assembly while using 10 nuts and 10 washers and torquing them to 25 Nm (255 kgf-cm, 18 ft-lbf). Proceed with installing the rear axle shaft LH oil seal before moving onto the right-hand axle shaft oil seal by using the same installation method as for the LH side. The installation process for rear axle shafts must be conducted identically in both LH and RH sides. Check the rear axle shaft bearing then perform the same installation sequence with the rear speed sensors for both lateral and right sides. Both LH and RH sides require installation of parking brake cables with high-temperature grease application. After positioning the brake shoe components and strut along with installing the return tension spring you should verify the parking brake function. The new rear disk piece requires installation after adjusting the parking brake shoe gap correctly. Follow the same installation procedures to install the rear disc brake calipers of both left-hand and right-hand sides. The process of fitting the rear propeller shaft assembly applies to 2WD operations but they should be accompanied by similar actions for 4WD systems. Thread the rear wheel into place before torquing it to 112 Nm then lead the cable to the negative battery terminal while torquing it to 3.9 Nm. The inspection of differential oil should include leakage testing followed by brake fluid addition into the reservoir and brake line bleeding procedures. Observe either the fluid level inside the reservoir or verify the brake fluid leaked on the system. The parking brake lever travel must be inspected before performing necessary adjustments before checking the VSC sensor signal.
Related 2009 Toyota FJ Cruiser Parts
 2009 Toyota FJ Cruiser CV Joint Companion Flange
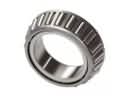 2009 Toyota FJ Cruiser Differential Bearing
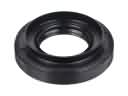 2009 Toyota FJ Cruiser Differential Seal
 2009 Toyota FJ Cruiser Drive Shaft
 2009 Toyota FJ Cruiser Transfer Case Bearing
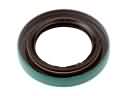 2009 Toyota FJ Cruiser Transfer Case Seal
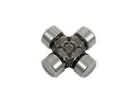 2009 Toyota FJ Cruiser Universal Joint