×
ToyotaParts- Hello
- Login or Register
- Quick Links
- Live Chat
- Track Order
- Parts Availability
- RMA
- Help Center
- Contact Us
- Shop for
- Toyota Parts
- Scion Parts
My Garage
My Account
Cart
OEM Toyota Echo Timing Chain
Engine Timing Chain- Select Vehicle by Model
- Select Vehicle by VIN
Select Vehicle by Model
orMake
Model
Year
Select Vehicle by VIN
For the most accurate results, select vehicle by your VIN (Vehicle Identification Number).
1 Timing Chain found

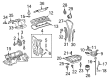
Toyota Echo Timing Chain Part Number: 13506-21050
$209.11 MSRP: $298.55You Save: $89.44 (30%)Ships in 1-3 Business Days
Toyota Echo Timing Chain
Choose genuine Timing Chain that pass strict quality control tests. You can trust the top quality and lasting durability. Shopping for OEM Timing Chain for your Toyota Echo? Our website is your one-stop destination. We stock an extensive selection of genuine Toyota Echo parts. The price is affordable so you can save more. It only takes minutes to browse and find the exact fit. Easily add to cart and check out fast. Our hassle-free return policy will keep you stress-free. We process orders quickly for swift delivery. Your parts will arrive faster, so you can get back on the road sooner.
Toyota Echo cars also feature a Timing Chain whose main role is to ensure that the camshaft and the crankshaft rotate at the right time so that the correct amount of fuel will reach the engine at the right time. This is a metal chain located at the front of the engine and to function without jamming, it needs application of oil and is considered better than the rubber timing belt because of these characteristics. Despite the fact that Echo invested in a metal timing chain layout on their Echo models, these engines are not immune to oil leptage and wahreas or problems with the tensioner and chain guides leading several models to rattle. The design of the timing chain system in the Echo adopts features of new technology in the design of engines hence meeting the necessary specifications in ensuring a right and proper synchronization in the functioning of the engine.
Toyota Echo Timing Chain Parts and Q&A
- Q: How to service and repair the timing chain on Toyota Echo?A:You must start timing chain service by removing several components including engine coolant drain and the RH front wheel along with the RH engine under cover and Drive Belt and generator. The service on the PS pump requires disconnection from the engine followed by removing the RH engine mounting insulator through a jack placement process with a wooden block. If the vehicle has A/C the bolt for the liquid tube next to the 5 bolts and insulator and nut must be removed first. Start by removing the cylinder head cover after you detach its 4 nuts, Ignition Coils, 2 PCV hoses and 7 bolts, 2 seal washers and gasket. Set the No.1 cylinder to TDC/compression alignment by rotating the crankshaft pulley to match the timing mark "0" while both camshaft timing sprocket and valve timing controller assembly have correct reference points. You can remove the crankshaft pulley through the use of Special Service Tools: 09213-70010, 09330-00021 followed by optional tool 09950-50013 (09951-05010, 09952-05010, 09953-05020, 09954-05021, if needed. To access the components within the timing chain cover area requiring removal start by removing 13 bolts and a nut while using a torx wrench socket (E8) for the stud bolt and carefully prying off the cover to prevent damage. Disassemble the cylinder block and oil pan No. 1 by removing their two O-rings and extract the chain tensioner and its components including the chain tensioner slipper and chain vibration damper. To properly inspect the timing assembly components you should measure the chain elongation compared to 123.2 mm (4.850 inch) and confirm that both sprocket sizes exceed 96.2 mm (3.787 inch) for the camshaft while the crankshaft sprocket must reach at least 50.5 mm (1.988 inch). Determine the wear on the chain tensioner slipper as well as the vibration damper while confirming that these parts measure no more than 1.0 mm (0.039 inch). Also test for smooth plunger function in the chain tensioner. Special Service Tool 09612-22011 must be used to tap in a new crankshaft front oil seal until it reaches the timing chain cover edge during its installation. Installation of the timing components requires the crankshaft positioning at ATDC 40 - 140 degrees followed by timing sprocket alignment at ATDC 20 degrees. Then instal Start by installing the chain vibration damper with a torque of 9.0 Nm (92 kgf-cm, 80 inch lbs.), afterwards placing the chain tensioner slipper, and finally completing with the chain tensioner while ensuring both proper tension and torque at 9.0 Nm (92 kgf-cm, 80 inch lbs.). Use Part No. 08826-00100 or equivalent seal packing to cover the timing chain housing and combine it with the new Water Pump and O-rings and tighten every bolt to its specified torque value. The RH mounting bracket needs to be installed with seal packing (Part No. 08826-00080 or equivalent) then torque at 55 Nm (561 kgf-cm, 41 ft. lbs.). Next, install the Crankshaft Position Sensor followed by the oil control valve then crankshaft pulley using correct torque values. To complete the installation process the technician should fit the cylinder head cover along with the RH engine mounting insulator and the PS pump and generator and drive belt and RH engine under cover and RH front wheel. After engine refilling with coolant the technician can start the engine for leak inspection.

Related Toyota Echo Parts
 Toyota Echo Engine Mount
 Toyota Echo Valve Cover Gasket
 Toyota Echo Camshaft
 Toyota Echo Dipstick
 Toyota Echo Exhaust Valve
 Toyota Echo Intake Valve
 Toyota Echo Oil Drain Plug Gasket
 Toyota Echo Oil Filler Cap
 Toyota Echo Oil Pump
 Toyota Echo Oil Pump Gasket
 Toyota Echo Piston Ring Set
 Toyota Echo Rod Bearing