×
ToyotaParts- Hello
- Login or Register
- Quick Links
- Live Chat
- Track Order
- Parts Availability
- RMA
- Help Center
- Contact Us
- Shop for
- Toyota Parts
- Scion Parts
My Garage
My Account
Cart
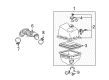
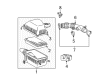
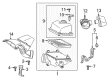
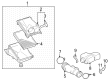
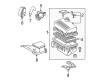
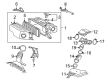
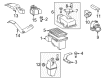
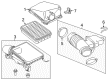
OEM Toyota Air Filter Box
Air Filter Housing- Select Vehicle by Model
- Select Vehicle by VIN
Select Vehicle by Model
orMake
Model
Year
Select Vehicle by VIN
For the most accurate results, select vehicle by your VIN (Vehicle Identification Number).
414 Air Filter Boxs found


Toyota Upper Cover Part Number: 17705-F0010
$89.93 MSRP: $126.24You Save: $36.31 (29%)Ships in 1-2 Business DaysProduct Specifications- Other Name: Cap Sub-Assembly, Air Cleaner; Air Filter Housing, Upper; Air Cleaner Cover; Cover; Air Filter Housing
- Manufacturer Note: MARK = HC
- Position: Upper
- Replaces: 17705-25040


Toyota Lower Cover Part Number: 17701-0P140
$193.84 MSRP: $276.77You Save: $82.93 (30%)Ships in 1-3 Business DaysProduct Specifications- Other Name: Case Sub-Assembly, Air Cleaner; Air Filter Housing, Lower; Air Filter Housing
- Position: Lower


Toyota Lower Cover Part Number: 17701-0T040
$108.30 MSRP: $152.01You Save: $43.71 (29%)Ships in 1-2 Business DaysProduct Specifications- Other Name: Case Sub-Assembly, Air Cleaner; Air Filter Housing, Lower; Air Filter Housing
- Position: Lower


Toyota Cover Assembly Part Number: 17705-AD016
$152.27 MSRP: $215.55You Save: $63.28 (30%)Ships in 1-3 Business DaysProduct Specifications- Other Name: Cap Sub-Assembly, Air Cleaner; Air Cleaner Cover; Air Filter Housing
- Replaces: 17705-AD012, 17705-AD013, 17705-AD014, 17705-AD015, 17705-AD010


Toyota Air Cleaner Assembly Part Number: 17700-07060
$461.37 MSRP: $676.14You Save: $214.77 (32%)Ships in 1-2 Business DaysProduct Specifications- Other Name: Cleaner Assembly, Air W/; Air Filter and Housing Assembly; Air Filter Housing; Cleaner Assembly, Air


Toyota Air Cleaner Assembly Part Number: 17700-37340
$502.11 MSRP: $735.86You Save: $233.75 (32%)Ships in 1-3 Business DaysProduct Specifications- Other Name: Cleaner Assembly, Air W/; Air Filter and Housing Assembly; Air Filter Housing; Cleaner Assembly, Air


Toyota Upper Cover Part Number: 17705-0P220
$393.04 MSRP: $576.01You Save: $182.97 (32%)Ships in 1-3 Business DaysProduct Specifications- Other Name: Cap Sub-Assembly, Air Cleaner; Air Filter Housing, Upper; Air Filter Housing
- Position: Upper


Toyota Cover Part Number: 17705-0P010
$74.88 MSRP: $105.11You Save: $30.23 (29%)Ships in 1-3 Business DaysProduct Specifications- Other Name: Cap Sub-Assembly, Air Cleaner; Air Filter Housing; Air Cleaner Cover
- Replaces: 17705-31090


Toyota Air Cleaner Assembly Part Number: 17700-0F031
$361.67 MSRP: $530.02You Save: $168.35 (32%)Ships in 1-3 Business DaysProduct Specifications- Other Name: Cleaner Assembly, Air W/; Air Filter and Housing Assembly; Air Filter Housing; Cleaner Assembly, Air
- Replaces: 17700-0F011, 17700-0F010


Toyota Air Cleaner Assembly Part Number: 17700-28130
$390.97 MSRP: $572.98You Save: $182.01 (32%)Ships in 1-3 Business DaysProduct Specifications- Other Name: Cleaner Assembly, Air W/; Air Filter and Housing Assembly; Air Filter Housing; Cleaner Assembly, Air


Toyota Air Cleaner Assembly Part Number: 17700-07070
$403.75 MSRP: $591.71You Save: $187.96 (32%)Ships in 1-3 Business DaysProduct Specifications- Other Name: Cleaner Assembly, Air W/; Air Filter and Housing Assembly; Air Filter Housing; Cleaner Assembly, Air


Toyota Air Cleaner Assembly Part Number: 17700-0T260
$495.64 MSRP: $726.37You Save: $230.73 (32%)Ships in 1-3 Business DaysProduct Specifications- Other Name: Cleaner Assembly, Air W/; Air Filter and Housing Assembly; Air Filter Housing; Cleaner Assembly, Air
- Replaces: 17700-37360


Toyota Cleaner Assembly, Air Part Number: 17700-0P240
$541.27 MSRP: $793.24You Save: $251.97 (32%)Ships in 1-3 Business DaysProduct Specifications- Other Name: Cleaner Assembly, Air W/; Air Filter Housing


Toyota Air Cleaner Assembly Part Number: 17700-31861
$596.54 MSRP: $874.24You Save: $277.70 (32%)Ships in 1-3 Business DaysProduct Specifications- Other Name: Cleaner Assembly, Air W/; Air Filter and Housing Assembly; Air Filter Housing; Cleaner Assembly, Air
- Replaces: 17700-31860


Toyota Air Cleaner Assembly Part Number: 17700-0P013
$613.23 MSRP: $898.69You Save: $285.46 (32%)Ships in 1-3 Business DaysProduct Specifications- Other Name: Cleaner Assembly, Air W/; Air Filter and Housing Assembly; Air Filter Housing; Cleaner Assembly, Air
- Replaces: 17700-31530, 17700-0P010, 17700-0P011, 17700-0P012


Toyota Air Cleaner Assembly Part Number: 17700-28272
$648.98 MSRP: $951.09You Save: $302.11 (32%)Ships in 1-3 Business DaysProduct Specifications- Other Name: Cleaner Assembly, Air; Air Filter and Housing Assembly; Air Filter Housing
- Replaces: 17700-28270, 17700-28271


Toyota Cleaner Assembly, Air Part Number: 17700-20220
$731.04 MSRP: $1071.35You Save: $340.31 (32%)Ships in 1-3 Business DaysProduct Specifications- Other Name: Cleaner Assembly, Air W/; Air Filter Housing


Toyota Air Cleaner Body Part Number: 17701-0A100
$157.20 MSRP: $222.54You Save: $65.34 (30%)Ships in 1-3 Business DaysProduct Specifications- Other Name: Case Sub-Assembly, Air Cleaner; Air Filter Housing


Toyota Air Cleaner Body Part Number: 17701-0S030
$167.43 MSRP: $237.01You Save: $69.58 (30%)Ships in 1-3 Business DaysProduct Specifications- Other Name: Case Sub-Assembly, Air Cleaner; Air Filter Housing; Case


Toyota Upper Cover Part Number: 17705-0S030
$166.84 MSRP: $236.18You Save: $69.34 (30%)Ships in 1-2 Business DaysProduct Specifications- Other Name: Cap Sub-Assembly, Air Cleaner; Air Cleaner Cover, Upper; Air Filter Housing; Cover
- Position: Upper
| Page 1 of 21 |Next >
1-20 of 414 Results
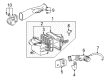
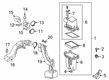
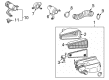
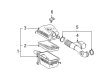
Toyota Air Filter Box
OEM parts deliver unmatched quality you can rely on. They pass extensive quality control inspections. Toyota produces them to the official factory specifications. This process helps prevent defects and imperfections. So you can get exceptional lifespan and a flawless fit. Need new OEM Toyota Air Filter Box? You'll love our wide selection of genuine options. Shop in minutes and skip the hunt. Our prices are unbeatable, you'll save time and money. It's easy to shop and find the right piece. Our committed customer service team gives professional help from start to finish. Every part includes a manufacturer's warranty. We ship quickly, your parts will arrive fast at your door.
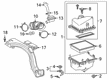
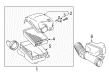
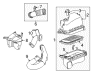
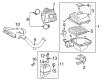
The Toyota Air Filter Box ensures the clean air is channeled into the throat allowing the driver to maintain combustion without any rattle, which reflects the same production logic Toyota has pushed forward since starting in 1937. Toyota was born in Japan and shook the global market with lean production, waste cutting and the Hybrid Synergy Drive that first trickled into the 2022 models and the 2024 RAV4 Plug-in Hybrid managing 42 electric miles. The TNGA platform improves handling across millions of cars, and this engineering spirit percolates into the Air Filter Box to ensure the seal stays tight. The Air Filter Box is a sealed plastic shell located under the hood, is designed to guide the air, maintain the seal, minimize grit, and shield the sensors against vibration. This box is swapped after the Toyota clips are loosened and the intake hose is pried from the inlet. Yank the old box off the mount and wipe out the grime from the tray using a clean rag. Install the new Air Filter Box, align the gasket and secure the screws tight until the Air Filter Box is kept square. Snap the sensors, start the Toyota, and hear a quiet breath, which means you have succeeded.
Toyota Air Filter Box Parts and Q&A
- Q: How to Install the Intake Air Resonator, Air Filter Box, Battery, and Cool Air Intake Duct Seal on Toyota Highlander?A:Both installation steps related to the intake air resonator require tightening the bolt. Fasten the bolt by positioning the tab from the air filter box cap inside the No. 1 air filter box hose groove. The No. 3 intake control valve assembly can be installed using the 2 attached claws. Insert the 3 bolts on the air filter box sub-assembly with a torque setting of 5.0 Nm (51 kgf-cm, 44 in-lbf). Then link the hose and connector. When installing the air filter box cap sub-assembly you should place the air filter element in position then position the air filter box hose groove on top of the throttle body alignment tab before securing the clamp. The installation of the air filter box cap requires 2 bolts with clips tightened to 5.0 Nm (51 kgf-cm, 44 in-lbf) alongside connector attachment of 3 vacuum hoses and the mass air flow meter connector and No. 2 ventilation hose and fuel vapor feed hose assembly. Competently install the No. 1 air filter box inlet with 2 bolts while using 7.0 Nm (71 kgf-cm, 62 in-lbf) and 5.0 Nm (51 kgf-cm, 44 in-lbf) torque settings and finally connect the 2 vacuum hoses. Fasten the N.2 air filter box inlet through two bolts measuring 7.0 Nm (71 kgf-cm, 62 in-lbf) torque before setting both vacuum hoses and harness clamps. Before reattaching the battery cable users must initialize specific systems according to the installation guidelines. The battery tray installation should be followed by the battery placement then secure both the clamp with bolts and nuts applying 5.4 Nm (55 kgf-cm, 47 in-lbf). Begin by connecting the positive battery terminal followed by tightening the nut to 6.4 Nm and proceeding with the negative terminal and matching nut torque. In the final step you must install the cool air intake duct seal by utilizing 11 clips.

Related Toyota Parts
 Toyota Air Filter
 Toyota Gas Cap
 Toyota Mass Air Flow Sensor
 Toyota Fuel Pump
 Toyota Fuel Filter
 Toyota Fuel Pressure Regulator
 Toyota Fuel Tank
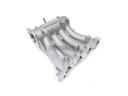 Toyota Intake Manifold
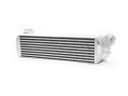 Toyota Intercooler
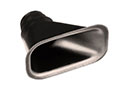 Toyota Air Duct
 Toyota Fuel Line Clamps
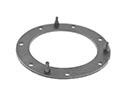 Toyota Fuel Pump Gasket
Browse Toyota Air Filter Box by Models
Tacoma 4Runner Camry Tundra Corolla RAV4 Highlander Prius Sienna Land Cruiser Pickup FJ Cruiser 86 Sequoia T100 Avalon Celica Supra Yaris Matrix MR2 Solara Venza GR86 Echo C-HR Cressida Grand Highlander Paseo Previa Prius C Prius Prime Corolla Cross Corolla iM Crown Crown Signia GR Corolla Mirai MR2 Spyder Prius V Tercel Van Yaris iA Prius Plug-In GR Supra Prius AWD-e RAV4 Prime