×
ToyotaParts- Hello
- Login or Register
- Quick Links
- Live Chat
- Track Order
- Parts Availability
- RMA
- Help Center
- Contact Us
- Shop for
- Toyota Parts
- Scion Parts
My Garage
My Account
Cart
OEM Scion xA Power Steering Pump
Power Steering Pump Unit- Select Vehicle by Model
- Select Vehicle by VIN
Select Vehicle by Model
orMake
Model
Year
Select Vehicle by VIN
For the most accurate results, select vehicle by your VIN (Vehicle Identification Number).
1 Power Steering Pump found

Scion xA Power Steering Pump Part Number: 44310-52050
$352.41 MSRP: $516.46You Save: $164.05 (32%)Ships in 1-3 Business Days
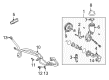
Scion xA Power Steering Pump
Choose genuine Power Steering Pump that pass strict quality control tests. You can trust the top quality and lasting durability. Shopping for OEM Power Steering Pump for your Scion xA? Our website is your one-stop destination. We stock an extensive selection of genuine Scion xA parts. The price is affordable so you can save more. It only takes minutes to browse and find the exact fit. Easily add to cart and check out fast. Our hassle-free return policy will keep you stress-free. We process orders quickly for swift delivery. Your parts will arrive faster, so you can get back on the road sooner.
The Scion xA Power Steering Pump is a part that plays a critical role in the easiness with which one can steer the car through applying energy from the engine to turn the wheels when the car is moving slowly or even stationary. Regarded as one of the optimal Scion xA power steering pump producers in the market, this part produces fluid pressure that allows drivers to easily steer their vehicles safely and smoothly on the roads. Applicable to most Scion xA models, this Power Steering Pump helps to keep the mechanical connection, involving the steering wheel, the wheels, and the tires, smooth, which plays a significant role in the manoeuvrability and stability of the designed automobile model. Another important aspect of the Scion xA Power Steering Pump is that it is over-built in design, so that things like leaks and noise are reduced, thus increasing its durability and reliability. In the Scion xA Power Steering Pump, an incorporation of advanced engineering is that the power assist is constant that permits drivers tight corner and parking situations with confidence. Furthermore, the Scion xA boasted the fuel economy ratings of 27 mpg in city drive and 34 mpg in highway drive; therefore, the output of the Power Steering Pump is quite efficient for the car model. In summary, the Scion xA Power Steering Pump is more than just luxury; it increases the performance of the car and is also an imperative part of protection and comfort of the drive.
Scion xA Power Steering Pump Parts and Q&A
- Q: How to service and repair the power steering pump on Scion xA?A:From the accessibility standpoint the power steering pump requires serviceable workers to first separate front wiper arms (LH and RH), hood to cowl top seal, cowl top ventilator louvers (LH and RH), windshield wiper link assembly, cowl panel sub-assembly, and vane pump oil reservoir cover. The service and repair of the power steering pump requires draining power steering fluid followed by front wheel (RH) removal and engine under cover (RH) removal and the pressure feed tube assembly disconnection through Special Service Tool: 09023-12701. Maintenance should remove the clip and disconnect the return hose without power steering fluid contact to the V belt and separate the oil pressure sensor connector. The first step requires removal of the rear vane pump stay by undoing its bolt and stay and heat insulator before continuing with vane pump assembly removal that includes the extraction of bolts B and C together with the adjusting strut and sufficient loosening of bolt A. Secure the vane pump assembly in a vise using Special Service Tool: 09630-00014 (09631-00132), then remove the vane pump oil reservoir cap subassembly, oil reservoir assembly (removing 3 bolts and the O-ring), front pump bracket (removing 2 bolts), flow control valve (removing the pressure port union and O-ring), power steering oil pressure sensor, rear vane pump housing (removing 4 bolts and O-ring), shaft sub-assembly with pulley (removing the snap ring and shaft), vane pump rotor (removing 10 plates), vane pump cam ring, front vane pump side plate (removing O-rings), and housing oil seal (taking care not to damage the housing front). The inspection of the front vane pump shaft and bush in their housing should show 0.07 mm maximum oil clearance while checking plates and vane rotor thickness against standards 1.405 to 1.411 mm. The flow control valve needs leak-free operation without restrictions. Inspect the valve compression spring (minimum length 29.2 mm) and watch for damage to the pressure port union. Reassembly requires the use of Special Service Tool: 09950-60010 (09951-00280) and 09950-70010 (09951-07100) to install a new housing oil seal first followed by insertion of the shaft with pulley and front vane pump side plate installation with new O-rings and then installation of vane pump cam ring rotor plates before securing the snap ring. Fit the rear vane pump housing to its location with a new O-ring while maintaining proper alignment then torquing it to 22 Nm. The pump should have proper preload adjustment before installing the power steering oil pressure sensor with a new O-ring using 21 Nm torque. First attach the flow control valve then install front pump bracket followed by vane pump oil reservoir assembly and its corresponding cap subassembly. The installer should apply power steering fluid to marked parts before installing the vane pump assembly temporarily and correctly adjusting V belt tension while torquing all bolts according to specifications. First install the rear vane pump stay before proceeding to connect the pressure feed tube assembly while torqueing it to 41 Nm. Then check both installation and connections of the return hose and oil pressure sensor. Vane pump V belt adjustments must be performed along with checking Drive Belt flexibility and tension before adding power steering fluid and bleeding the system. The procedure ends with installing the engine under cover (RH) and front wheel (RH) and torquing them to 103 Nm. End your installation by checking the reservoir for power steering fluid and replacing the vane pump oil reservoir cover along with cowl panel sub-assembly, windshield wiper link assembly, cowl top ventilator louvers (LH and RH) and hood to cowl top seal, and front wiper arms (LH and RH).

Related Scion xA Parts
 Scion xA Drag Link
 Scion xA Ignition Switch
 Scion xA Power Steering Hose
 Scion xA Power Steering Reservoir
 Scion xA Rack And Pinion
 Scion xA Rack and Pinion Boot
 Scion xA Steering Angle Sensor
 Scion xA Steering Column
 Scion xA Steering Shaft
 Scion xA Steering Wheel
 Scion xA Tie Rod End
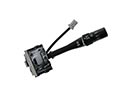 Scion xA Windshield Wiper Switch