×
ToyotaParts- Hello
- Login or Register
- Quick Links
- Live Chat
- Track Order
- Parts Availability
- RMA
- Help Center
- Contact Us
- Shop for
- Toyota Parts
- Scion Parts
My Garage
My Account
Cart
OEM 2004 Scion xA Power Steering Pump
Power Steering Pump Unit- Select Vehicle by Model
- Select Vehicle by VIN
Select Vehicle by Model
orMake
Model
Year
Select Vehicle by VIN
For the most accurate results, select vehicle by your VIN (Vehicle Identification Number).
1 Power Steering Pump found

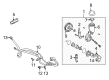
2004 Scion xA Power Steering Pump
Part Number: 44310-52050$342.08 MSRP: $501.32You Save: $159.24 (32%)Ships in 1-3 Business DaysProduct Specifications- Other Name: Pump Assembly, Vane
- Part Name Code: 44320
- Item Weight: 2.70 Pounds
- Item Dimensions: 8.2 x 6.1 x 5.9 inches
- Condition: New
- Fitment Type: Direct Replacement
- SKU: 44310-52050
- Warranty: This genuine part is guaranteed by Toyota's factory warranty.
2004 Scion xA Power Steering Pump
Looking for affordable OEM 2004 Scion xA Power Steering Pump? Explore our comprehensive catalogue of genuine 2004 Scion xA Power Steering Pump. All our parts are covered by the manufacturer's warranty. Plus, our straightforward return policy and speedy delivery service ensure an unparalleled shopping experience. We look forward to your visit!
2004 Scion xA Power Steering Pump Parts Q&A
- Q: How to service and repair the power steering pump on 2004 Scion xA?A: The power steering pump service requires unbolted front wiper arms (LH and RH), hood to cowl top seal, cowl top ventilator louvers (LH and RH), windshield wiper link assembly, cowl panel sub-assembly, and vane pump oil reservoir cover. Start by draining power steering fluid and then remove the front wheel on the right-hand side and engine under cover also on the right. Remove the pressure feed tube assembly by using Special Service Tool: 09023-12700 and disconnect the return hose and the oil pressure sensor connector. The technician should first uninstall the vane pump stay rear by removing the bolt and stay rear and heat insulator. Next, the vane pump assembly can be dismantled with bolts B and C removal while loosening bolt A. After securing the vane pump assembly in a vise using Special Service Tool: 09630-00014 (09631-00132), technicians can proceed to remove the vane pump oil reservoir cap sub-assembly followed by removing the oil reservoir assembly while carefully extracting the O-ring. The next stage requires removal of the pump bracket front followed by the flow control valve and power steering oil pressure sensor and both the vane pump housing rear and its O-ring. With the proper tools remove the w/pulley shaft sub-assembly followed by the vane pump rotor wearing a cam ring as well as the side plate front and its O-rings together with those attached to the housing front. Remove the housing oil seal then inspect vane pump shaft and bush located in the housing front for maximum 0.07 mm oil clearance while checking the rotor and plates for minimum 1.405 to 1.411 mm thickness combined with maximum 0.03 mm clearance. Examine the flow control valve for proper operation while inspecting for leakage then check the compression spring free length (minimum measurement: 29.2 mm). The replacement of entire vane pump assembly must occur when any of its components surpasses their specified dimensions. Press and tool usage of 09950-60010 (09951-00280) and 09950-70010 (09951-07100) is necessary to install a new housing oil seal with correct positioning. Power steering fluid must coat the interior part of the housing front surface before inserting the w/pulley shaft sub-assembly. Then install the side plate front and cam ring while aligning their dents correctly. Insert the vane pump rotor then install the vane pump plates before positioning the snap ring on the w/pulley shaft sub-assembly. Secure the housing rear unit by using a new O-ring while maintaining correct positioning before torquing it to 22 Nm. Test the pump axle preload for steady movement before putting in the pressure sensor with a new O-ring and torquing it to 21 Nm. Secure the flow control valve along with the pressure port union by applying 69 Nm torque before proceeding to install the pump bracket front at a torque specification of 44 Nm. The vane pump oil reservoir assembly requires a new O-ring for installation before torquing it to 9.0 Nm followed by the vane pump oil reservoir cap sub-assembly. Use bolt A to temporarily install the vane pump assembly before putting on the adjusting strut and bolt B and torqueing to 44 Nm. The vane pump stay rear must be installed with the heat insulator while observing appropriate placement and torquing them to 44 Nm. Use Special Service Tool: 09023-12700 to attach the pressure feed tube assembly while tightening it to 41 Nm then verify the correct installation of return hose and oil pressure sensor connector. Start by adjusting the vane pump V belt before inspecting drive belt deflection while checking tension and completing power steering fluid filling and system bleeding before performing a fluid leak inspection. The final steps include reinstalling the engine under cover (RH) with 103 Nm torques on the front wheel (RH). Power steering fluid should be checked in the reservoir before reinstalling the vane pump oil reservoir cover and cowl panel sub-assembly, windshield wiper link assembly, cowl top ventilator louvers (LH and RH), hood to cowl top seal and front wiper arms (LH and RH).
Related 2004 Scion xA Parts
 2004 Scion xA Drag Link
 2004 Scion xA Ignition Switch
 2004 Scion xA Power Steering Hose
 2004 Scion xA Power Steering Reservoir
 2004 Scion xA Rack And Pinion
 2004 Scion xA Rack and Pinion Boot
 2004 Scion xA Steering Angle Sensor
 2004 Scion xA Steering Column
 2004 Scion xA Steering Shaft
 2004 Scion xA Steering Wheel
 2004 Scion xA Tie Rod End
 2004 Scion xA Wiper Switch