×
ToyotaParts- Hello
- Login or Register
- Quick Links
- Live Chat
- Track Order
- Parts Availability
- RMA
- Help Center
- Contact Us
- Shop for
- Toyota Parts
- Scion Parts
My Garage
My Account
Cart
OEM Scion xA Knock Sensor
Engine Knock Sensor- Select Vehicle by Model
- Select Vehicle by VIN
Select Vehicle by Model
orMake
Model
Year
Select Vehicle by VIN
For the most accurate results, select vehicle by your VIN (Vehicle Identification Number).
2 Knock Sensors found


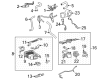
Scion xA Knock Sensor Part Number: 89615-06010
$142.28 MSRP: $201.42You Save: $59.14 (30%)Ships in 1-3 Business Days
Scion xA Knock Sensor Part Number: 89615-52030
$144.75 MSRP: $204.91You Save: $60.16 (30%)
Scion xA Knock Sensor
Choose genuine Knock Sensor that pass strict quality control tests. You can trust the top quality and lasting durability. Shopping for OEM Knock Sensor for your Scion xA? Our website is your one-stop destination. We stock an extensive selection of genuine Scion xA parts. The price is affordable so you can save more. It only takes minutes to browse and find the exact fit. Easily add to cart and check out fast. Our hassle-free return policy will keep you stress-free. We process orders quickly for swift delivery. Your parts will arrive faster, so you can get back on the road sooner.
The Knock Sensor is one of the parts that greatly improve the dependability and effectiveness of the Scion xA automobiles. This is an advanced device that helps in identifying engine knock; this is in view of the fact that knock happens where the ignition timing is slightly off and it ought to work wonders in making the modifications which enhance engine efficiency. Real time signals to PCM of Knock Sensor allows precise adjustments in the ignition timing as a way of diminishing detonation that could be destructive for the engine. Since more consumers use inferior octane rates, this feature is priceless as it enables the Scion xA to perform under different weather conditions. Knock Sensor is available for many xA to be used to improve the efficiency and security of the vehicle among other xA owners. Thus it adapts the piezoelectric technique where it is possible to translate the vibration to signal and have individual cylinders checked for efficiency. Due to the high fuel economy ratings of 27/34 mpg, City/Highway, the Scion xA car equipped with this Knock Sensor makes it among the optimal in the market. Also, luxury aspects including four-wheel disc brakes agricultural with anti-lock and control are also presented in the car. All in all, it can be said that the Knock Sensor is one of the optimal creations of the Scion that focuses on quality, efficiency and performance and it is indeed useful to be incorporated in the Scion xA.
Scion xA Knock Sensor Parts and Q&A
- Q: How to replace the knock sensor on Scion xA?A:The replacement of the knock sensor starts by draining engine coolant before removing the air cleaner assembly along with separating the accelerator control cable assembly. The technician starts by removing two separate sub-assemblies that connect to the transmission oil level gauge. Then they separate the Throttle Body assembly by disconnecting the ISC valve connector along with the throttle position sensor connector (for M/T transaxle) and removing the wire harness clamp and taking out bolt and two nuts to detach the accelerator control cable bracket. This process includes removing the gasket from the intake manifold. Start by removing four cover nuts from the cylinder head cover No.2 as you disconnect the radiator hose inlet and disconnect the oil level gauge sub-assembly. Detach the ventilation hose after disengaging the union to connector tube hose from its support system then unfasten the three wire harness clamps before extracting the three bolts and two nuts in order while carefully obtaining the gasket from the intake manifold. The knock sensor requires the technician to disconnect its connector before utilizing Special Service Tool 09816 30010 to uninstall the sensor. Install the new knock sensor using the same tool while tightening it to 44 N.m (450 kgf.cm, 32 ft.lbf) before reattaching the connector. Reinstall the intake manifold after replacing its gasket by torquing three bolts and two nuts to 30 N.m (306 kgf.cm, 22 ft.lbf) and then secure the three wire harness clamps as well as install the union to connector tube hose and ventilation hose. Begin with installing the oil level gauge sub-assembly followed by connecting the radiator hose inlet and then installing the cylinder head cover No.2 while tightening nut A first then nut B until it reaches 7.0 N.m (71 kgf.cm, 62 in.lbf). The throttle body receives installation with a new gasket before securing it using the bolt and two nuts at 30 N.m (306 kgf.cm, 22 ft.lbf) torque. The procedure includes installation of the wire harness clamp before adding the throttle position sensor connector (for M/T transaxle) and ISC valve connector. The final step includes transmission oil filler tube sub-assembly and transmission oil level gauge sub-assembly installation for the A/T transaxle one after the other followed by the accelerator control cable assembly and air cleaner assembly installation. Furthermore, add engine coolant and perform a leak check of the cooling system.
- Q: How to service the knock sensor on Scion xA?A:Service of the knock sensor starts with a 90-second wait after disconnecting the negative cable from the battery terminal to avoid Air Bag and seat belt pretensioner activation. Start by removing the engine under cover from both left-hand and right-hand sides of the vehicle and then remove the Starter assembly. The sensor connector should be disconnected and the nut and sensor need to be removed. The installation process starts with torquing the new knock sensor and its nut to 20 N.m (204 kgf.cm, 15 ft.lbf) before connecting the sensor connector. Reinstall the starter assembly before installing the engine under covers RH and LH and ending with reconnection of the cable to the negative battery terminal. Users should conduct an initialization process after the cable because some systems need it when disconnecting and reconnecting cables.


Related Scion xA Parts
 Scion xA Ignition Coil
 Scion xA Camshaft Position Sensor
 Scion xA Crankshaft Position Sensor
 Scion xA Daytime Running Light Relay
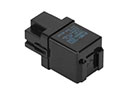 Scion xA Flasher Relay
 Scion xA Headlight Relay
 Scion xA Mass Air Flow Sensor
 Scion xA Radiator Fan Relay
 Scion xA Relay
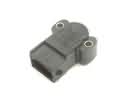 Scion xA Throttle Position Sensor
 Scion xA Turn Signal Flasher
 Scion xA Turn Signal Relay