×
ToyotaParts- Hello
- Login or Register
- Quick Links
- Live Chat
- Track Order
- Parts Availability
- RMA
- Help Center
- Contact Us
- Shop for
- Toyota Parts
- Scion Parts
My Garage
My Account
Cart
OEM Scion xA Exhaust Pipe
Exhaust Tail Pipe- Select Vehicle by Model
- Select Vehicle by VIN
Select Vehicle by Model
orMake
Model
Year
Select Vehicle by VIN
For the most accurate results, select vehicle by your VIN (Vehicle Identification Number).
3 Exhaust Pipes found

Scion xA Front Pipe Part Number: 17410-21441
$1561.07 MSRP: $2095.41You Save: $534.34 (26%)Ships in 1-3 Business Days
Scion xA Muffler & Pipe Part Number: 17430-21480
$247.20 MSRP: $323.27You Save: $76.07 (24%)Ships in 1-3 Business DaysScion xA Muffler & Pipe Part Number: 17430-21601
$294.27 MSRP: $384.82You Save: $90.55 (24%)Ships in 1-3 Business Days
Scion xA Exhaust Pipe
Choose genuine Exhaust Pipe that pass strict quality control tests. You can trust the top quality and lasting durability. Shopping for OEM Exhaust Pipe for your Scion xA? Our website is your one-stop destination. We stock an extensive selection of genuine Scion xA parts. The price is affordable so you can save more. It only takes minutes to browse and find the exact fit. Easily add to cart and check out fast. Our hassle-free return policy will keep you stress-free. We process orders quickly for swift delivery. Your parts will arrive faster, so you can get back on the road sooner.
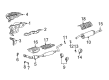
The Scion xA Exhaust Pipe is indeed one of the components that are very significant and considered as facets of the consistent and powerful feature of the vehicle. As a performance car part, this exhaust pipe is manufactured for Scion xA to help discharge dangerous gases such as carbon monoxide from the engine for a safe and optimum drive. Being compatible with different Scion xA models, the exhaust pipe freely fits into the muffler and catalytic converter in order to safely expel engine fumes and increase the car's functionality. Successfully designed with a powerful 1.5 L DOHC I4 engine, the Scion exhaust pipe also plays a crucial role in the friendly fuel economy ratings of 27 / 34 mpg, city / hwy respectively. Further, the Scion xA Exhaust Pipe is such that while there could be only one pipe, in other models they could be two or more with this design making Scion xA stand out in the automobile market. Its strategic positioning in the vehicle facilitates proper working of the gadget; however, external factors can harm them. As for the function of the Scion xA Exhaust Pipe, apart from improving the performance of the car, the company insisted on the exhaust pipes' quality because any corrosion, wear, or rusting in the exhaust system has the potential to endanger the lives of passengers in the event of an accident. In general, it is possible to consider that Scion xA Exhaust Pipe is one of the brand's examples of the diligence and the attention to the details, which makes this part of the car as essential part for Scion xA.
Scion xA Exhaust Pipe Parts and Q&A
- Q: How to service and repair the exhaust pipe assembly on Scion xA?A:Service and repair tasks on the exhaust pipe assembly can commence after shifting the shift lever knob sub-assy and removing the console box assy rear and floor panel brace front with their corresponding 2 bolts. The procedure starts with tail exhaust pipe removal after unboltage of its clamp and unfastening its bolt and separation of its exhaust pipe supports followed by exhaust pipe tail extraction alongside its gasket. The exhaust pipe assembly front requires removal of the 2 heated oxygen sensor connectors after which you should remove the grommet before unscrewing the 2 bolts and 2 compression springs. Begin by disconnecting the 2 exhaust pipe supports and then remove the exhaust pipe front. Perform the next step by removing both the exposed gasket from the exhaust manifold while also removing each of the 2 heated oxygen sensors. The first step in installing the exhaust pipe assy front includes adding the 2 heated oxygen sensors then torquing them to 44 Nm (449 kgf-cm, 32 ft. lbs.). Check the free length of compression springs with calipers since it should measure 40.5 mm (1.594 inch); get new springs when the length is less than that. A plastic-faced hammer needs to tap new gaskets flush with the exhaust manifold under the correct installation direction while using a wooden block and preventing reuse of the replaced gasket. After inserting and securing the exhaust pipe front it is necessary to add both compression springs and bolts which should be tightened to 43 Nm (438 kgf-cm, 32 ft. lbs.). Connect both heated oxygen sensor connectors before adding the grommet into place. You must place a new gasket on the exhaust pipe front then combine the 2 exhaust pipe supports before installing the exhaust pipe tail using a clamp and bolt which should be torqued to 32 Nm (326 kgf-cm, 24 ft. lbs.). Start by installing the floor panel brace front with 20 Nm torque (199 kgf-cm, 14 ft. lbs.) followed by the console box assy rear and ending with the shift lever knob sub-assy for manual transaxle.

Related Scion xA Parts
 Scion xA Catalytic Converter
 Scion xA Muffler
 Scion xA Canister Purge Valve
 Scion xA Exhaust Flange Gasket
 Scion xA Exhaust Hanger
 Scion xA Exhaust Heat Shield
 Scion xA Exhaust Manifold
 Scion xA Exhaust Manifold Gasket
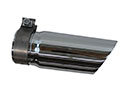 Scion xA Exhaust Tip
 Scion xA Oxygen Sensor
 Scion xA PCV Valve
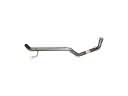 Scion xA Tail Pipe