×
ToyotaParts- Hello
- Login or Register
- Quick Links
- Live Chat
- Track Order
- Parts Availability
- RMA
- Help Center
- Contact Us
- Shop for
- Toyota Parts
- Scion Parts
My Garage
My Account
Cart
OEM Scion xA Blower Motor
A/C Heater Blower Motor- Select Vehicle by Model
- Select Vehicle by VIN
Select Vehicle by Model
orMake
Model
Year
Select Vehicle by VIN
For the most accurate results, select vehicle by your VIN (Vehicle Identification Number).
1 Blower Motor found


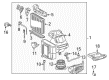
Scion xA Blower Motor Part Number: 87103-52080
Scion xA Blower Motor
Choose genuine Blower Motor that pass strict quality control tests. You can trust the top quality and lasting durability. Shopping for OEM Blower Motor for your Scion xA? Our website is your one-stop destination. We stock an extensive selection of genuine Scion xA parts. The price is affordable so you can save more. It only takes minutes to browse and find the exact fit. Easily add to cart and check out fast. Our hassle-free return policy will keep you stress-free. We process orders quickly for swift delivery. Your parts will arrive faster, so you can get back on the road sooner.
The used car part is known as Scion xA Blower Motor, this is a component in the heating and cooling system of the car. This is the significant component that is charged with the task of supplying hot or cool air within the cabin thereby regulating the climate within the car to suit the outside weather. The function of Scion xA Blower Motor is to power a fan that blows air for rapid heat control by the driver. Integrated as it is to the Scion xA model, it may be favored because it fits well with the model and is available in different models. This part is vital beyond the mere provision of comfort - it is directly involved in regulating cabin conditions that contribute to the efficiency and safety of the Scion xA. A preventive measure is required for the blower motor since it may undergo electronic failure or wiring problem, which can hinder the air blowing controls or even the airflow. In particular, the Scion xA Blower Motor can be viewed as rather unique in the context of automotive market competition because of the company's focus on the product's durability, which guarantees the drivers' constant use of the blower motor for years. Both anti-lock brakes and traction control make this model, the Scion xA for safety with a Blower Motor making the inside comfortable and safe. In sum, the Scion xA Blower Motor here presented is the result of Scion's ongoing concern for quality and increased user satisfaction and therefore constitutes a valuable addition to the Scion xA series.
Scion xA Blower Motor Parts and Q&A
- Q: How to service and repair the blower motor on Scion xA?A:The blower motor service demands a complete refrigerant discharge using Special Service Tool: 07110-58060 (07117-58080, 07117-58090, 07117-78050, 07117-88060, 07117-88070, 07117-88080). Use Special Service Tool: 09870-00015 by installing it onto the piping clamp without tube deformation and activate the tool by pushing down on its release lever while pulling slightly until the clamp releases for removal. Use the bolt removal procedure to split the bracket thus disconnecting the suction hose sub assembly while capping all open fittings to stop outside moisture or dirt from seeping into the system. Use vinyl tape to seal both openings of the suction hose sub assy before removing its two O-rings. Disconnection of liquid tube sub-assy A requires the use of Special Service Tool: 09870-00025 in identical manner to both suction and liquid hose procedures. Start the disassembly process by removing the instrument panel sub assy with passenger Air Bag assy and then proceed with the instrument panel sub assy lower with heater duct and finally separate the air conditioning amplifier assy. Extract the ECM through a three-step procedure of disengaging two claws, connector removal, then two screw extraction and claw release. The air conditioning blower assy removal requires you to first disconnect the clamp before removing connectors while moving the clamps and wire harness into position and then taking out the 2 bolts and 3 nuts and 2 screws. The wire harness needs disconnection and then use the two claws to remove the air filter case. Use the 3 screws to remove the damper servo sub assy while the next step includes disconnecting the blower resistor connector and removing its 2 screws. To remove the blower motor cover disconnect the rod then take out the 4 screws and holding spring that is attached. Next separate the blower w/fan motor sub assy by disconnecting the connector followed by removing the 3 screws. To access cooler thermistor No.1 you must first disengage its 2 claws then extract the air conditioning tube assy through packing and the procedure requires a 5mm hexagon wrench to loosen the installation along with both O-rings. A 4mm hexagon wrench can be used to detach the cooler expansion valve through removal of its 2 bolts. To remove Cooler Evaporator Sub Assy No.1 the mechanic must first unscrew the fastener and unlatch the 2 claws to detach the air duct, remove the 3 screws from the evaporator cover and finally extract the assembly with its pair of O-rings. To install the cooler evaporator sub assy No.1, first apply compressor oil (ND-OIL 8 or equivalent) on the new O-rings and place them before mounting the evaporator cover with the 3 screws and the air duct with its screw and 2 claws. The installation of the cooler expansion valve requires a 4mm hexagon wrench for attaching the 2 bolts which need a torque of 5.4 Nm (55 kgf.cm, 48 in.lbf). Use new O-rings which received compressor oil application and install the air conditioning tube assy applying the 5mm hexagon wrench at a torque setting of 5.4 Nm (55 kgf.cm, 48 in.lbf). Finish the installation by adding the packing. The technical task involves reattaching the instrument panel sub assy lower with heater duct followed by the instrument panel sub assy with passenger Air Bag assy. To install liquid tube sub assy A remove vinyl tape first then lubricate compressor oil on two new O-rings before installation of the tube sub assy A and piping clamp with appropriate checking of claw fittings. Viewpoints on installing the suction hose sub assy begin with tape removal followed by oil treatment of two new O-rings and their subsequent installation. Then attach the suction hose sub assy to its piping clamp before inspecting the claw fit. Install the bracket with the bolt and set its torque at 9.8 Nm (100 kgf.cm, 87 in.lbf). Use Special Service Tool: 07110-58060 (07117-58060, 07117-58070, 07117-58080, 07117-58090, 07117-78050, 07117-88060, 07117-88070, 07117-88080) to charge the refrigerator with 460 ± 30 g (16.2 ± 1.1 oz.) specified amount. Then warm up the engine while inspect for refrigerant leakage.

Related Scion xA Parts
 Scion xA A/C Accumulator
 Scion xA A/C Compressor
 Scion xA A/C Condenser
 Scion xA A/C Expansion Valve
 Scion xA A/C Hose
 Scion xA A/C Switch
 Scion xA Ambient Temperature Sensor
 Scion xA Blend Door Actuator
 Scion xA Blower Control Switches
 Scion xA Blower Motor Resistor
 Scion xA Evaporator
 Scion xA Heater Core