×
ToyotaParts- Hello
- Login or Register
- Quick Links
- Live Chat
- Track Order
- Parts Availability
- RMA
- Help Center
- Contact Us
- Shop for
- Toyota Parts
- Scion Parts
My Garage
My Account
Cart
OEM 2010 Scion tC Vapor Canister
Fuel Vapor Canister- Select Vehicle by Model
- Select Vehicle by VIN
Select Vehicle by Model
orMake
Model
Year
Select Vehicle by VIN
For the most accurate results, select vehicle by your VIN (Vehicle Identification Number).
1 Vapor Canister found


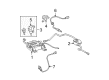
2010 Scion tC Vapor Canister
Part Number: 77740-21011$246.15 MSRP: $351.45You Save: $105.30 (30%)Ships in 1-3 Business DaysProduct Specifications- Other Name: Canister Assembly, Charcoal
- Replaces: 77740-21010
- Part Name Code: 77740
- Item Weight: 8.10 Pounds
- Item Dimensions: 15.8 x 15.2 x 7.4 inches
- Condition: New
- Fitment Type: Direct Replacement
- SKU: 77740-21011
- Warranty: This genuine part is guaranteed by Toyota's factory warranty.
2010 Scion tC Vapor Canister
Looking for affordable OEM 2010 Scion tC Vapor Canister? Explore our comprehensive catalogue of genuine 2010 Scion tC Vapor Canister. All our parts are covered by the manufacturer's warranty. Plus, our straightforward return policy and speedy delivery service ensure an unparalleled shopping experience. We look forward to your visit!
2010 Scion tC Vapor Canister Parts Q&A
- Q: How to remove the Vapor Canister on 2010 Scion tC?A: The first step to extract the Evaporative Emission Control Canister involves disconnecting the negative battery cable but initialization procedures might be needed upon reconnecting it. Start by taking off the front floor panel brace together with the center exhaust pipe assembly and No. 1 fuel tank protector and rear suspension brace lower RH. The canister assembly requires detachment by pulling out the fuel emission hose while removing its two clamps and the leak detection pump connector and the fuel tank vent hose through retainer pinching. Users should inspect for dirt or foreign objects during this procedure. Caution should be taken with the fuel tank vent connector to prevent scratching while manually disconnecting all parts rather than using tools. The disconnected parts should get covered with a plastic bag after separation. A gentle application of force to push and pull operations on stuck fuel tank vent connector and pipe can release them. It is time to disconnect the fuel tank vent hose through the process of pinching the tab to unlock the lock claws before removing the hose from the charcoal canister while maintaining proper hygiene and safe handling procedures. The workshop clip remover tool enables removal of the workshop clip after which the charcoal canister can be taken out by unscrewing its two bolts. You can take out the canister filter sub-assembly by first disconnecting both hoses and after that removing the bolt and the filter.
Related 2010 Scion tC Parts
 2010 Scion tC Fuse Box
 2010 Scion tC Coolant Temperature Sensor
 2010 Scion tC Crankshaft Position Sensor
 2010 Scion tC Headlight Relay
 2010 Scion tC Ignition Coil
 2010 Scion tC Mass Air Flow Sensor
 2010 Scion tC Daytime Running Light Relay
 2010 Scion tC Engine Control Module
 2010 Scion tC Relay
 2010 Scion tC Relay Block
 2010 Scion tC Spark Plug
 2010 Scion tC Turn Signal Flasher