×
ToyotaParts- Hello
- Login or Register
- Quick Links
- Live Chat
- Track Order
- Parts Availability
- RMA
- Help Center
- Contact Us
- Shop for
- Toyota Parts
- Scion Parts
My Garage
My Account
Cart
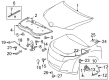
OEM 2009 Toyota Venza Hood Cable
Hood Release Cable- Select Vehicle by Model
- Select Vehicle by VIN
Select Vehicle by Model
orMake
Model
Year
Select Vehicle by VIN
For the most accurate results, select vehicle by your VIN (Vehicle Identification Number).
3 Hood Cables found

2009 Toyota Venza Cable Handle, Gray, Front
Part Number: 53611-AA010-B3$15.05 MSRP: $20.94You Save: $5.89 (29%)Ships in 1-3 Business DaysProduct Specifications- Other Name: Lever, Hood Lock Control; Hood Release Handle, Front; Release Handle; Lever Sub-Assembly, Hood Lock Control
- Position: Front
- Part Name Code: 53601
- Item Weight: 0.70 Pounds
- Item Dimensions: 13.2 x 10.9 x 1.5 inches
- Condition: New
- Fitment Type: Direct Replacement
- SKU: 53611-AA010-B3
- Warranty: This genuine part is guaranteed by Toyota's factory warranty.
2009 Toyota Venza Cable Handle, Front
Part Number: 53611-AA010-A0$13.25 MSRP: $18.45You Save: $5.20 (29%)Ships in 1-3 Business DaysProduct Specifications- Other Name: Lever, Hood Lock Control; Hood Release Handle, Front; Release Lever; Release Handle; Lever Sub-Assembly, Hood Lock Control
- Manufacturer Note: IVORY,TRIM0#
- Position: Front
- Part Name Code: 53601
- Item Weight: 0.70 Pounds
- Item Dimensions: 13.8 x 11.3 x 1.6 inches
- Condition: New
- Fitment Type: Direct Replacement
- SKU: 53611-AA010-A0
- Warranty: This genuine part is guaranteed by Toyota's factory warranty.

2009 Toyota Venza Release Cable, Front
Part Number: 53630-0T010$35.48 MSRP: $49.39You Save: $13.91 (29%)Product Specifications- Other Name: Cable Assembly, Hood Lock; Hood Release Cable, Front; Cable Assembly, Hood Lock Control; Hood Release Cable
- Position: Front
- Part Name Code: 53630
- Item Weight: 0.80 Pounds
- Item Dimensions: 13.7 x 11.0 x 1.7 inches
- Condition: New
- Fitment Type: Direct Replacement
- SKU: 53630-0T010
- Warranty: This genuine part is guaranteed by Toyota's factory warranty.
2009 Toyota Venza Hood Cable
Looking for affordable OEM 2009 Toyota Venza Hood Cable? Explore our comprehensive catalogue of genuine 2009 Toyota Venza Hood Cable. All our parts are covered by the manufacturer's warranty. Plus, our straightforward return policy and speedy delivery service ensure an unparalleled shopping experience. We look forward to your visit!
2009 Toyota Venza Hood Cable Parts Q&A
- Q: How to install the hood cable assembly on 2009 Toyota Venza?A: Begin installation of the hood cable assembly by inserting it through the engine compartment before guiding it through the upper radiator support and finishing the clamps engagement. The installation process requires the lower No. 1 instrument panel finish panel followed by the cowl side trim sub-assembly LH and finishes with the front door scuff plate LH. The installation procedure of this hood lock assembly without the engine hood courtesy switch requires applying MP grease to the lock sliding areas followed by connecting the hood cable then using three bolts torque to specified values: centering bolt at 8.0 Nm (82 kgf-cm, 71 in-lbf), standard bolt at 7.5 Nm (77 kgf-cm, 66 in-lbf) and the other bolt 8.0 Nm (82 kgf-cm, 71 in-lbf). The last step requires the installation of a fresh hood lock nut cap. After performing the same preliminary procedures on the hood lock assembly which has the engine hood courtesy switch users need to attach the connector followed by the new hood lock nut cap installation. Mount the high-pitched horn assembly together with the radiator grille, radiator grille protector and cool air intake duct seal using three new grommets, eight screws, a bolt and four clips while inserting the pin hold clip with vertical slot alignment. The front wheel needs to be installed LH side with 76 ft-lbf torque (1050 kgf-cm, 103 Nm) and the LH front fender mold should be installed simultaneously. A thorough examination of the hood sub-assembly should be performed followed by necessary adjustments.
Related 2009 Toyota Venza Parts
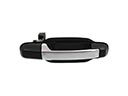 2009 Toyota Venza Door Handle
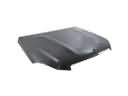 2009 Toyota Venza Hood
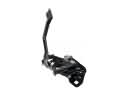 2009 Toyota Venza Hood Latch
 2009 Toyota Venza Door Check
 2009 Toyota Venza Hood Hinge
 2009 Toyota Venza Lift Support
 2009 Toyota Venza Liftgate Lift Support
 2009 Toyota Venza Rear Passenger Door Handle Latch
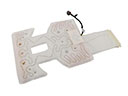 2009 Toyota Venza Seat Heater
 2009 Toyota Venza Weather Strip
 2009 Toyota Venza Window Regulator
 2009 Toyota Venza Window Run