×
ToyotaParts- Hello
- Login or Register
- Quick Links
- Live Chat
- Track Order
- Parts Availability
- RMA
- Help Center
- Contact Us
- Shop for
- Toyota Parts
- Scion Parts
My Garage
My Account
Cart
OEM 2009 Toyota Tacoma Brake Booster
Brake Power Booster- Select Vehicle by Model
- Select Vehicle by VIN
Select Vehicle by Model
orMake
Model
Year
Select Vehicle by VIN
For the most accurate results, select vehicle by your VIN (Vehicle Identification Number).
1 Brake Booster found


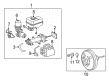
2009 Toyota Tacoma Brake Booster
Part Number: 44610-04182$593.03 MSRP: $869.09You Save: $276.06 (32%)Ships in 1-3 Business DaysProduct Specifications- Other Name: Booster Assembly, Brake; Power Brake Booster; Booster Assembly
- Replaces: 44610-04181, 44610-04171
- Part Name Code: 44610
- Item Weight: 8.10 Pounds
- Item Dimensions: 12.3 x 12.0 x 11.1 inches
- Condition: New
- Fitment Type: Direct Replacement
- SKU: 44610-04182
- Warranty: This genuine part is guaranteed by Toyota's factory warranty.
2009 Toyota Tacoma Brake Booster
Looking for affordable OEM 2009 Toyota Tacoma Brake Booster? Explore our comprehensive catalogue of genuine 2009 Toyota Tacoma Brake Booster. All our parts are covered by the manufacturer's warranty. Plus, our straightforward return policy and speedy delivery service ensure an unparalleled shopping experience. We look forward to your visit!
2009 Toyota Tacoma Brake Booster Parts Q&A
- Q: How to remove and replace the hydraulic brake booster on 2009 Toyota Tacoma?A: A replacement procedure for the hydraulic brake booster starts with turning off the ignition switch and performing more than 20 brake pedal depressions before work begins. High pressure must not cause deformation to brake actuator tube No. 1 during the operation and the ignition switch should remain OFF until the work is finished. First disconnect the negative battery terminal cable and drain the brake fluid before immediately cleaning painted surfaces touched by fluid. You need to take out the front floor footrest as well as the front door scuff plates which exist for Regular Cab, Access Cab, and Double Cab and the cowl side trim boards that belong to each cab variation. Begin by taking out the automatic transmission instrument panel under tray or the manual transmission instrument panel hole cover followed by the instrument panel finish panel lower No. 1. Two procedures must take place: the separation of driver side junction block from master cylinder push rod clevis then proceeding with their disconnection. The technician should disconnect 3 connectors from the hydraulic brake booster before using a union nut wrench to separate the 4 brake lines which require labeling for future reconnection. Finally, remove the 4 nuts to extract the hydraulic brake booster together with its brake booster gasket.
Related 2009 Toyota Tacoma Parts
 2009 Toyota Tacoma Brake Master Cylinder
 2009 Toyota Tacoma Speed Sensor
 2009 Toyota Tacoma ABS Pump And Motor Assembly
 2009 Toyota Tacoma Backing Plate
 2009 Toyota Tacoma Brake Booster Vacuum Hose
 2009 Toyota Tacoma Brake Drum
 2009 Toyota Tacoma Brake Fluid Pump
 2009 Toyota Tacoma Brake Master Cylinder Reservoir
 2009 Toyota Tacoma Brake Shoe Set
 2009 Toyota Tacoma Hydraulic Hose
 2009 Toyota Tacoma Master Cylinder Repair Kit
 2009 Toyota Tacoma Parking Brake Shoe