×
ToyotaParts- Hello
- Login or Register
- Quick Links
- Live Chat
- Track Order
- Parts Availability
- RMA
- Help Center
- Contact Us
- Shop for
- Toyota Parts
- Scion Parts
My Garage
My Account
Cart
OEM 2009 Toyota RAV4 Speed Sensor
Speed Control Sensor- Select Vehicle by Model
- Select Vehicle by VIN
Select Vehicle by Model
orMake
Model
Year
Select Vehicle by VIN
For the most accurate results, select vehicle by your VIN (Vehicle Identification Number).
6 Speed Sensors found


2009 Toyota RAV4 Speed Sensor
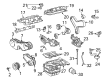
Part Number: 89413-08020$138.64 MSRP: $196.26You Save: $57.62 (30%)Ships in 1-3 Business DaysProduct Specifications- Other Name: Sensor, Transmission; Vehicle Speed Sensor; Automatic Transmission Speed Sensor; Sensor, Speed; Sensor, Transmission Revolution
- Replaces: 89413-33020, 89413-24010, 89411-33010
- Item Weight: 0.60 Pounds
- Item Dimensions: 3.6 x 2.9 x 2.5 inches
- Condition: New
- Fitment Type: Direct Replacement
- SKU: 89413-08020
- Warranty: This genuine part is guaranteed by Toyota's factory warranty.

2009 Toyota RAV4 Sensor, Transmission Revolution
Part Number: 89413-48010$129.12 MSRP: $157.01You Save: $27.89 (18%)Ships in 1-3 Business DaysProduct Specifications- Other Name: Sensor, Transmission; Sensor, Speed; Vehicle Speed Sensor
- Replaces: 89413-33010, 89413-08010
- Item Weight: 0.60 Pounds
- Item Dimensions: 4.7 x 2.6 x 1.7 inches
- Condition: New
- Fitment Type: Direct Replacement
- SKU: 89413-48010
- Warranty: This genuine part is guaranteed by Toyota's factory warranty.


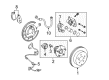
2009 Toyota RAV4 Rear Speed Sensor, Driver Side
Part Number: 89546-42040$280.75 MSRP: $400.85You Save: $120.10 (30%)Ships in 1-3 Business DaysProduct Specifications- Other Name: Sensor, Speed, Rear Left-Hand; ABS Wheel Speed Sensor; ABS Sensor; ABS Sensor Wire; Sensor, Speed, Rear Driver Side
- Position: Rear Driver Side
- Part Name Code: 89546
- Item Weight: 0.90 Pounds
- Item Dimensions: 10.0 x 6.5 x 2.1 inches
- Condition: New
- Fitment Type: Direct Replacement
- SKU: 89546-42040
- Warranty: This genuine part is guaranteed by Toyota's factory warranty.


2009 Toyota RAV4 Rear Speed Sensor, Passenger Side
Part Number: 89545-42040$251.74 MSRP: $359.43You Save: $107.69 (30%)Ships in 1-3 Business DaysProduct Specifications- Other Name: Sensor, Speed, Rear Right-Hand; ABS Wheel Speed Sensor; ABS Sensor; ABS Sensor Wire; Sensor, Speed, Rear Passenger Side
- Position: Rear Passenger Side
- Part Name Code: 89545
- Item Weight: 0.70 Pounds
- Item Dimensions: 10.1 x 6.6 x 2.2 inches
- Condition: New
- Fitment Type: Direct Replacement
- SKU: 89545-42040
- Warranty: This genuine part is guaranteed by Toyota's factory warranty.


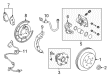
2009 Toyota RAV4 ABS Sensor, Front Driver Side
Part Number: 89543-0R010$237.30 MSRP: $338.81You Save: $101.51 (30%)Ships in 1 Business DayProduct Specifications- Other Name: Sensor, Speed, Front Left-Hand; ABS Wheel Speed Sensor, Front Left; Speed Sensor; Front Speed Sensor; Sensor, Speed, Front Driver Side; ABS Wheel Speed Sensor
- Position: Front Driver Side
- Replaces: 89543-42050
- Part Name Code: 89543
- Item Weight: 0.90 Pounds
- Item Dimensions: 18.5 x 14.6 x 7.4 inches
- Condition: New
- Fitment Type: Direct Replacement
- SKU: 89543-0R010
- Warranty: This genuine part is guaranteed by Toyota's factory warranty.


2009 Toyota RAV4 ABS Sensor, Front Passenger Side
Part Number: 89542-0R010$224.83 MSRP: $321.01You Save: $96.18 (30%)Ships in 1-3 Business DaysProduct Specifications- Other Name: Sensor, Speed, Front Right-Hand; ABS Wheel Speed Sensor, Front Right; Speed Sensor; Front Speed Sensor; Sensor, Speed, Front Passenger Side; ABS Wheel Speed Sensor
- Position: Front Passenger Side
- Replaces: 89542-42050
- Part Name Code: 89542
- Item Weight: 2.40 Pounds
- Item Dimensions: 17.9 x 7.3 x 5.3 inches
- Condition: New
- Fitment Type: Direct Replacement
- SKU: 89542-0R010
- Warranty: This genuine part is guaranteed by Toyota's factory warranty.
2009 Toyota RAV4 Speed Sensor
Looking for affordable OEM 2009 Toyota RAV4 Speed Sensor? Explore our comprehensive catalogue of genuine 2009 Toyota RAV4 Speed Sensor. All our parts are covered by the manufacturer's warranty. Plus, our straightforward return policy and speedy delivery service ensure an unparalleled shopping experience. We look forward to your visit!
2009 Toyota RAV4 Speed Sensor Parts Q&A
- Q: How to install the speed sensor for the U241E automatic transaxle and the battery on 2009 Toyota RAV4?A: Before attaching the speed sensor to the U241E automatic transaxle users should apply ATF to a new O-ring before insertion. Fasten the sensor using a bolt and apply a torque of 11 Nm (112 kgf-cm, 8 ft-lbf), then connect its corresponding connector. Follow the same steps for sensor NT by preparing its O-ring with ATF and applying the same installation method at the specified torque levels while connecting the sensor connector. The installation procedure starts with reinforcing the battery bracket through two bolts which require a torque setting of 20 Nm (204 kgf-cm, 15 ft-lbf). After that, install the battery carrier by tightening four bolts with the same torque measurement. The operator should first place the battery tray before installing the battery through the battery clamp. The torque level should be 17 Nm (168 kgf-cm, 21 in-lbf) for the bolt and 4.9 Nm (50 kgf-cm, 43 in-lbf) for the nut. Attach the cable to the terminal that carries a negative electric charge.
Related 2009 Toyota RAV4 Parts
 2009 Toyota RAV4 Wheel Bearing
 2009 Toyota RAV4 Brake Caliper
 2009 Toyota RAV4 Wheel Hub
 2009 Toyota RAV4 Backing Plate
 2009 Toyota RAV4 Brake Caliper Bracket
 2009 Toyota RAV4 Brake Line
 2009 Toyota RAV4 Brake Pad Set
 2009 Toyota RAV4 Brake Shoe Set
 2009 Toyota RAV4 Hydraulic Hose
 2009 Toyota RAV4 Parking Brake Shoe
 2009 Toyota RAV4 Wheel Cylinder
 2009 Toyota RAV4 Wheel Stud