×
ToyotaParts- Hello
- Login or Register
- Quick Links
- Live Chat
- Track Order
- Parts Availability
- RMA
- Help Center
- Contact Us
- Shop for
- Toyota Parts
- Scion Parts
My Garage
My Account
Cart
OEM 2009 Scion xB A/C Compressor
Air Conditioning Compressor- Select Vehicle by Model
- Select Vehicle by VIN
Select Vehicle by Model
orMake
Model
Year
Select Vehicle by VIN
For the most accurate results, select vehicle by your VIN (Vehicle Identification Number).
1 A/C Compressor found

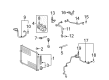
2009 Scion xB Compressor Assembly
Part Number: 88310-02520$384.30 MSRP: $563.20You Save: $178.90 (32%)Ships in 1-3 Business DaysProduct Specifications- Other Name: Compressor Assembly, With Pulley; A/C Compressor; New A/C Compressor; Compressor; Compressor Assembly, W/Pulley
- Replaces: 88310-02520-84
- Part Name Code: 88310
- Item Weight: 15.50 Pounds
- Item Dimensions: 11.2 x 8.1 x 8.1 inches
- Condition: New
- Fitment Type: Direct Replacement
- SKU: 88310-02520
- Warranty: This genuine part is guaranteed by Toyota's factory warranty.
2009 Scion xB A/C Compressor
Looking for affordable OEM 2009 Scion xB A/C Compressor? Explore our comprehensive catalogue of genuine 2009 Scion xB A/C Compressor. All our parts are covered by the manufacturer's warranty. Plus, our straightforward return policy and speedy delivery service ensure an unparalleled shopping experience. We look forward to your visit!
2009 Scion xB A/C Compressor Parts Q&A
- Q: How to remove the A/C Compressor on 2009 Scion xB?A: The first step to remove the 2AZ-FE engine HVAC compressor requires the recovery of refrigerant from the refrigeration system. Begin by taking off both the rear engine under cover right-hand side along with the No. 1 engine under cover. Next detach the fan-operated V belt and generator V belt. Users must disconnect the suction hose sub-assembly by removing its bolt and O-ring while using vinyl tape to block entry of moisture and foreign matter through the opened parts. Following the same procedure disconnect the discharge hose sub-assembly by unbolt its components including the O-ring then seal all openings with vinyl tape. The last step involves removing the compressor assembly after disconnecting its connector and unfastening the two bolts and two nuts then using a "TORX" socket wrench (E8) to extract the two stud bolts and the compressor.
Related 2009 Scion xB Parts
 2009 Scion xB Blower Motor
 2009 Scion xB Heater Core
 2009 Scion xB Blower Motor Resistor
 2009 Scion xB A/C Accumulator
 2009 Scion xB A/C Condenser
 2009 Scion xB A/C Expansion Valve
 2009 Scion xB A/C Hose
 2009 Scion xB A/C Switch
 2009 Scion xB Ambient Temperature Sensor
 2009 Scion xB Blend Door Actuator
 2009 Scion xB Evaporator
 2009 Scion xB HVAC Pressure Switch