×
ToyotaParts- Hello
- Login or Register
- Quick Links
- Live Chat
- Track Order
- Parts Availability
- RMA
- Help Center
- Contact Us
- Shop for
- Toyota Parts
- Scion Parts
My Garage
My Account
Cart
OEM 2008 Toyota Prius Shock Absorber
Suspension Shock Absorber- Select Vehicle by Model
- Select Vehicle by VIN
Select Vehicle by Model
orMake
Model
Year
Select Vehicle by VIN
For the most accurate results, select vehicle by your VIN (Vehicle Identification Number).
4 Shock Absorbers found


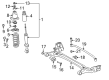
2008 Toyota Prius Shock Absorber, Rear Passenger Side
Part Number: 48530-49735$101.07 MSRP: $141.87You Save: $40.80 (29%)Ships in 1-2 Business DaysProduct Specifications- Other Name: Absorber Set, Rear Right-Hand; Suspension Strut Assembly Kit; Complete Strut Kit; Complete Strut; Strut; Absorber Assembly, Shock, Rear Passenger Side; Absorber Assembly, Shock, Rear Driver Side
- Manufacturer Note: MARK 48530-47041,TIRE & DISC WHEEL-195/55R16 6JJ ALUMINUM
- Position: Rear Passenger Side
- Item Weight: 1.40 Pounds
- Item Dimensions: 26.1 x 6.6 x 5.7 inches
- Condition: New
- Fitment Type: Direct Replacement
- SKU: 48530-49735
- Warranty: This genuine part is guaranteed by Toyota's factory warranty.

2008 Toyota Prius Shock Absorber, Rear Passenger Side
Part Number: 48530-49715$68.36 MSRP: $95.96You Save: $27.60 (29%)Ships in 1 Business DayProduct Specifications- Other Name: Absorber Set, Rear Right-Hand; Suspension Strut Assembly Kit; Complete Strut Kit; Complete Strut; Strut; Absorber Assembly, Shock, Rear Passenger Side; Absorber Assembly, Shock, Rear Driver Side
- Manufacturer Note: MARK 48530-47031
- Position: Rear Passenger Side
- Item Weight: 4.30 Pounds
- Item Dimensions: 26.1 x 6.5 x 5.8 inches
- Condition: New
- Fitment Type: Direct Replacement
- SKU: 48530-49715
- Warranty: This genuine part is guaranteed by Toyota's factory warranty.


2008 Toyota Prius Strut, Front Driver Side
Part Number: 48520-80081$150.27 MSRP: $212.72You Save: $62.45 (30%)Ships in 1-2 Business DaysProduct Specifications- Other Name: Absorber Assembly, Shock; Suspension Strut, Front Left
- Position: Front Driver Side
- Condition: New
- SKU: 48520-80081
- Warranty: This genuine part is guaranteed by Toyota's factory warranty.
2008 Toyota Prius Strut, Front Passenger Side
Part Number: 48510-80295$151.68 MSRP: $214.72You Save: $63.04 (30%)Ships in 1-3 Business DaysProduct Specifications- Other Name: Absorber Assembly, Shock; Suspension Strut, Front Right
- Position: Front Passenger Side
- Condition: New
- SKU: 48510-80295
- Warranty: This genuine part is guaranteed by Toyota's factory warranty.
2008 Toyota Prius Shock Absorber
Looking for affordable OEM 2008 Toyota Prius Shock Absorber? Explore our comprehensive catalogue of genuine 2008 Toyota Prius Shock Absorber. All our parts are covered by the manufacturer's warranty. Plus, our straightforward return policy and speedy delivery service ensure an unparalleled shopping experience. We look forward to your visit!
2008 Toyota Prius Shock Absorber Parts Q&A
- Q: How to install the rear shock absorber with coil spring on 2008 Toyota Prius?A: Before hooking up the rear shock absorber with coil spring to the rear axle beam the spacer must be placed while the nut should be temporarily tightened. Begin by lifting the rear axle beam using the jack but place a wooden block between the jack and beam first to avoid erosion. Elevate the beam only until the front part of the rear spring bracket stud bolt fits into position properly. The next installation step requires the tightening of the bolt and two nuts on the upper side of the rear shock absorber with coil spring to a torque level of 80 Nm (816 kgf-cm, 59 ft-lbf). Finally, install the rear wheel while torquing it to a value of 103 Nm (1,050 kgf-cm or 76 ft-lbf). Lower the vehicle and perform bouncing maneuvers to stabilize the rear suspension until the lower side installation nut of the rear shock absorber with coil spring reaches a torque of 80 Nm (816 kgf-cm, 59 ft-lbf) while the vehicle remains on the ground. Install the battery carrier bracket followed by the deck trim side panel assembly LH and deck floor box LH and proceed with installation of rear No. 4 floor board and rear side seatback frame LH and rear floor board No. 1 and rear seatback assembly LH and tonneau cover assembly together with rear deck trim cover and rear deck floor box and rear No. 2 floor board. Conclude the procedure by checking the rear wheel alignment then initializing the system while remembering that specific systems need initialization steps when reattaching battery cable connections to the negative (-) terminal.
Related 2008 Toyota Prius Parts
 2008 Toyota Prius Ball Joint
 2008 Toyota Prius Control Arm
 2008 Toyota Prius Alignment Bolt
 2008 Toyota Prius Coil Spring Insulator
 2008 Toyota Prius Coil Springs
 2008 Toyota Prius Control Arm Bolt
 2008 Toyota Prius Front Cross-Member
 2008 Toyota Prius Shock and Strut Boot
 2008 Toyota Prius Steering Knuckle
 2008 Toyota Prius Strut Housing
 2008 Toyota Prius Sway Bar Bracket
 2008 Toyota Prius Sway Bar Kit