×
ToyotaParts- Hello
- Login or Register
- Quick Links
- Live Chat
- Track Order
- Parts Availability
- RMA
- Help Center
- Contact Us
- Shop for
- Toyota Parts
- Scion Parts
My Garage
My Account
Cart
OEM 2007 Toyota Prius Shock Absorber
Suspension Shock Absorber- Select Vehicle by Model
- Select Vehicle by VIN
Select Vehicle by Model
orMake
Model
Year
Select Vehicle by VIN
For the most accurate results, select vehicle by your VIN (Vehicle Identification Number).
4 Shock Absorbers found


2007 Toyota Prius Shock Absorber, Rear Passenger Side
Part Number: 48530-49735$101.07 MSRP: $141.87You Save: $40.80 (29%)Ships in 1-2 Business DaysProduct Specifications- Other Name: Absorber Set, Rear Right-Hand; Suspension Strut Assembly Kit; Complete Strut Kit; Complete Strut; Strut; Absorber Assembly, Shock, Rear Passenger Side; Absorber Assembly, Shock, Rear Driver Side
- Manufacturer Note: MARK 48530-47041,TIRE & DISC WHEEL-195/55R16 6JJ ALUMINUM
- Position: Rear Passenger Side
- Item Weight: 1.40 Pounds
- Item Dimensions: 26.1 x 6.6 x 5.7 inches
- Condition: New
- Fitment Type: Direct Replacement
- SKU: 48530-49735
- Warranty: This genuine part is guaranteed by Toyota's factory warranty.

2007 Toyota Prius Shock Absorber, Rear Passenger Side
Part Number: 48530-49715$68.36 MSRP: $95.96You Save: $27.60 (29%)Ships in 1 Business DayProduct Specifications- Other Name: Absorber Set, Rear Right-Hand; Suspension Strut Assembly Kit; Complete Strut Kit; Complete Strut; Strut; Absorber Assembly, Shock, Rear Passenger Side; Absorber Assembly, Shock, Rear Driver Side
- Manufacturer Note: MARK 48530-47031
- Position: Rear Passenger Side
- Item Weight: 4.30 Pounds
- Item Dimensions: 26.1 x 6.5 x 5.8 inches
- Condition: New
- Fitment Type: Direct Replacement
- SKU: 48530-49715
- Warranty: This genuine part is guaranteed by Toyota's factory warranty.


2007 Toyota Prius Strut, Front Driver Side
Part Number: 48520-80081$150.27 MSRP: $212.72You Save: $62.45 (30%)Ships in 1-2 Business DaysProduct Specifications- Other Name: Absorber Assembly, Shock; Suspension Strut, Front Left
- Position: Front Driver Side
- Condition: New
- SKU: 48520-80081
- Warranty: This genuine part is guaranteed by Toyota's factory warranty.
2007 Toyota Prius Strut, Front Passenger Side
Part Number: 48510-80295$151.68 MSRP: $214.72You Save: $63.04 (30%)Ships in 1-3 Business DaysProduct Specifications- Other Name: Absorber Assembly, Shock; Suspension Strut, Front Right
- Position: Front Passenger Side
- Condition: New
- SKU: 48510-80295
- Warranty: This genuine part is guaranteed by Toyota's factory warranty.
2007 Toyota Prius Shock Absorber
Looking for affordable OEM 2007 Toyota Prius Shock Absorber? Explore our comprehensive catalogue of genuine 2007 Toyota Prius Shock Absorber. All our parts are covered by the manufacturer's warranty. Plus, our straightforward return policy and speedy delivery service ensure an unparalleled shopping experience. We look forward to your visit!
2007 Toyota Prius Shock Absorber Parts Q&A
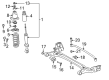
- Q: How to service and repair the rear shock absorber with coil spring on 2007 Toyota Prius?A: All service and repairs on the rear shock absorber with coil spring must start by taking out the rear No. 2 floor board and following it up with the removal of the rear deck floor box and rear deck trim cover and tonneau cover assembly and rear seatback assembly LH and rear No. 1 floor board and rear side seatback frame LH and rear No. 4 floor board and deck floor box LH and deck trim side panel assembly LH and battery carrier bracket and rear wheel. Start by elevating the rear axle beam through a jack system which rests upon a wooden support to protect from damage. Then turn off the two upper shock absorber bolts together with its coil spring and subsequent removal of the lower side nut and spacer. Lower the jack unit for shock absorber removal. To disassemble the piston rod requires usage of a 6 mm socket hexagon wrench that loosens the nut while keeping it in place. The Special Service Tool: 09727-30021 (04727-00021, 04727-00031, 04727-00031) should be used to compress the coil spring after installation. After achieving free movement, remove the nut along with the No. 1 cushion washer, No. 1 cushion, rear spring front bracket, rear suspension support, rear coil spring insulator upper, and rear No. 1 spring bumper components. Check the rear shock absorber assembly LH rod for normal resistance and sound during compression and extension by exercising caution to replace if it does not work properly. Install the rear coil spring insulator upper and rear No. 1 spring bumper along with the rear suspension support and rear spring front bracket and No. 1 cushion and No. 1 cushion washer after placing the coil spring end into the shock absorber assembly lower seat with the help of Special Service Tool: 09727-30021 while ensuring all components stay properly aligned. Tighten the shock absorber piston rod nut to 56 Nm (571 kgf-cm, 41 ft. lbs.) using Special Service Tool: 09727-30021 then remove the tool. Secure the rear shock absorber with coil spring to the rear axle beam but first start the nut loosely. After that lift the rear axle beam to install its upper section while securing all fasteners to 80 Nm (816 kgf-cm, 59 ft. lbs.). First reinstall the rear wheel with a torque reach of 103 Nm (1,050 kgf-cm, 76 ft. lbs.) before conducting vehicle suspension bouncing for stabilization and performing final tightness control of the lower side installation nut to 80 Nm (816 kgf-cm, 59 ft. lbs.) when the vehicle is in its lowered position. The task includes reinstalling the battery carrier bracket, deck trim side panel assembly LH, deck floor box LH, rear No. 4 floor board, rear side seatback frame LH, rear No. 1 floor board, rear seatback assembly LH, tonneau cover assembly, rear deck trim cover, and rear deck floor box before checking the rear wheel alignment and performing system initializations that need battery negative (-) terminal reconnection. The disposal process requires extending the shock absorber rod before drilling a hole into the cylinder while using proper safety equipment due to the non-poisonous colorless and odorless gas.
Related 2007 Toyota Prius Parts
 2007 Toyota Prius Ball Joint
 2007 Toyota Prius Control Arm
 2007 Toyota Prius Alignment Bolt
 2007 Toyota Prius Coil Spring Insulator
 2007 Toyota Prius Coil Springs
 2007 Toyota Prius Control Arm Bolt
 2007 Toyota Prius Front Cross-Member
 2007 Toyota Prius Shock and Strut Boot
 2007 Toyota Prius Steering Knuckle
 2007 Toyota Prius Strut Housing
 2007 Toyota Prius Sway Bar Bracket
 2007 Toyota Prius Sway Bar Kit