×
ToyotaParts- Hello
- Login or Register
- Quick Links
- Live Chat
- Track Order
- Parts Availability
- RMA
- Help Center
- Contact Us
- Shop for
- Toyota Parts
- Scion Parts
My Garage
My Account
Cart
OEM 2007 Toyota 4Runner Exhaust Pipe
Exhaust Tail Pipe- Select Vehicle by Model
- Select Vehicle by VIN
Select Vehicle by Model
orMake
Model
Year
Select Vehicle by VIN
For the most accurate results, select vehicle by your VIN (Vehicle Identification Number).
8 Exhaust Pipes found


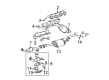
2007 Toyota 4Runner Resonator & Pipe
Part Number: 17430-50220$261.65 MSRP: $342.17You Save: $80.52 (24%)Ships in 1-3 Business DaysProduct Specifications- Other Name: Pipe Assembly, Exhaust Tail; Direct-Fit Exhaust; System Kit; Resonator; Muffler; Muffler & Tail Pipe; Tailpipe; Pipe Assembly, Exhaust, Tail
- Part Name Code: 17430
- Item Weight: 10.60 Pounds
- Item Dimensions: 44.5 x 13.3 x 9.5 inches
- Condition: New
- Fitment Type: Direct Replacement
- SKU: 17430-50220
- Warranty: This genuine part is guaranteed by Toyota's factory warranty.


2007 Toyota 4Runner Crossover Pipe, Front Driver Side
Part Number: 17450-50121$1296.39 MSRP: $1740.12You Save: $443.73 (26%)Ships in 1-3 Business DaysProduct Specifications- Other Name: Pipe Assembly, Exhaust Front; Catalytic Converter, Left; Exhaust Pipe; Front Pipe; Converter & Pipe; Cross Over Pipe; Pipe Assembly, Exhaust, Front; Catalytic Converter
- Position: Front Driver Side
- Part Name Code: 17450B
- Item Weight: 11.50 Pounds
- Item Dimensions: 40.0 x 14.3 x 8.7 inches
- Condition: New
- Fitment Type: Direct Replacement
- SKU: 17450-50121
- Warranty: This genuine part is guaranteed by Toyota's factory warranty.


2007 Toyota 4Runner Intermediate Pipe, Center
Part Number: 17420-50260$547.06 MSRP: $734.32You Save: $187.26 (26%)Ships in 1-3 Business DaysProduct Specifications- Other Name: Pipe Assembly, Exhaust; Muffler Assembly; Direct-Fit Exhaust; System Kit; Tail Pipe; Muffler & Pipe Assembly; Muffler & Tail Pipe; Muffler & Pipe; Pipe Assembly, Exhaust, Center; Muffler
- Position: Center
- Part Name Code: 17420
- Item Weight: 17.50 Pounds
- Item Dimensions: 53.5 x 20.8 x 9.3 inches
- Condition: New
- Fitment Type: Direct Replacement
- SKU: 17420-50260
- Warranty: This genuine part is guaranteed by Toyota's factory warranty.

2007 Toyota 4Runner Resonator & Pipe
Part Number: 17430-31410$257.57 MSRP: $336.83You Save: $79.26 (24%)Ships in 1-3 Business DaysProduct Specifications- Other Name: Pipe Assembly, Exhaust Tail; Direct-Fit Exhaust System Kit; Resonator; Muffler; Muffler & Tail Pipe; Pipe Assembly, Exhaust, Tail
- Part Name Code: 17430
- Item Weight: 10.40 Pounds
- Item Dimensions: 46.6 x 12.9 x 9.3 inches
- Condition: New
- Fitment Type: Direct Replacement
- SKU: 17430-31410
- Warranty: This genuine part is guaranteed by Toyota's factory warranty.

2007 Toyota 4Runner Front Pipe, Driver Side
Part Number: 17450-31030$1284.01 MSRP: $1723.52You Save: $439.51 (26%)Ships in 1-3 Business DaysProduct Specifications- Other Name: Pipe Assembly, Exhaust Front; Catalytic Converter, Left, Rear Left; Exhaust Pipe; Converter & Pipe; Pipe Assembly, Exhaust, Front; Catalytic Converter
- Manufacturer Note: *114=TOYOTA/T38/Y
- Position: Front Driver Side
- Part Name Code: 17450B
- Item Weight: 7.30 Pounds
- Item Dimensions: 35.4 x 5.1 x 17.4 inches
- Condition: New
- Fitment Type: Direct Replacement
- SKU: 17450-31030
- Warranty: This genuine part is guaranteed by Toyota's factory warranty.

2007 Toyota 4Runner Front Pipe
Part Number: 17410-50450$1207.86 MSRP: $1621.29You Save: $413.43 (26%)Ships in 1-3 Business DaysProduct Specifications- Other Name: Pipe Assembly, Exhaust; Catalytic Converter, Right; Exhaust Pipe; Converter & Pipe; Pipe Assembly, Exhaust, Front; Catalytic Converter
- Position: Front
- Part Name Code: 17410
- Item Weight: 8.30 Pounds
- Item Dimensions: 34.8 x 7.5 x 18.8 inches
- Condition: New
- Fitment Type: Direct Replacement
- SKU: 17410-50450
- Warranty: This genuine part is guaranteed by Toyota's factory warranty.

2007 Toyota 4Runner Front Pipe
Part Number: 17410-31450$1197.53 MSRP: $1607.43You Save: $409.90 (26%)Ships in 1-3 Business DaysProduct Specifications- Other Name: Pipe Assembly, Exhaust; Catalytic Converter, Rear Right, Right; Exhaust Pipe; Converter & Pipe; Pipe Assembly, Exhaust, Front; Catalytic Converter
- Manufacturer Note: *114=TOYOTA/T37/Y
- Position: Front
- Part Name Code: 17410
- Item Weight: 10.00 Pounds
- Item Dimensions: 35.0 x 5.3 x 19.8 inches
- Condition: New
- Fitment Type: Direct Replacement
- SKU: 17410-31450
- Warranty: This genuine part is guaranteed by Toyota's factory warranty.

2007 Toyota 4Runner Pipe Assembly, Exhaust, Center
Part Number: 17420-50220$541.61 MSRP: $727.00You Save: $185.39 (26%)Ships in 1-3 Business DaysProduct Specifications- Other Name: Pipe Assembly, Exhaust; Exhaust Muffler Assembly; Exhaust System Kit; Exhaust Pipe; Tail Pipe; Muffler
- Position: Center
- Part Name Code: 17420
- Item Weight: 16.10 Pounds
- Item Dimensions: 54.5 x 21.6 x 9.4 inches
- Condition: New
- Fitment Type: Direct Replacement
- SKU: 17420-50220
- Warranty: This genuine part is guaranteed by Toyota's factory warranty.
2007 Toyota 4Runner Exhaust Pipe
Looking for affordable OEM 2007 Toyota 4Runner Exhaust Pipe? Explore our comprehensive catalogue of genuine 2007 Toyota 4Runner Exhaust Pipe. All our parts are covered by the manufacturer's warranty. Plus, our straightforward return policy and speedy delivery service ensure an unparalleled shopping experience. We look forward to your visit!
2007 Toyota 4Runner Exhaust Pipe Parts Q&A
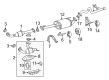
- Q: How to service and repair the exhaust pipe on 2007 Toyota 4Runner?A: A proper servicing process for the exhaust pipe starts with disabling the exhaust pipe tail assembly by unfastening its two mounting bolts and exhaust pipe support along with the tail pipe. Begin by detaching the 2 bolts then removing the 2 compression springs from the exhaust pipe assembly center after which you should remove its 4 exhaust pipe supports and exhaust pipe center. You need to detach the No. 2 exhaust front pipe assembly with its two bolts and two nuts and the assembly altogether. After disconnecting the heated oxygen sensor connector you should remove the heated oxygen sensor for Bank 1 and then remove the exhaust pipe assembly front by loosening its 2 nuts. The process needs to be repeated for the heated oxygen sensor of Bank 2 after connection removal and sensor extraction. Begin heater oxygen sensor Bank 2 installation by attaching it to the exhaust pipe front and tightening it to 44 Nm (450 kgf/cm, 33 ft. lbs.) before connecting the sensor connector while checking for wire distortion. The procedure for the exhaust pipe front installation requires two steps: inserting a new gasket before attaching the exhaust assembly to the manifold while employing 2 nuts that reach a torque level of 62 Nm (630 kgf/cm and 46 ft. lbs.). Place the heated oxygen sensor for Bank 1 onto the exhaust pipe front and tighten it to 44 Nm (450 kgf/cm, 33 ft. lbs.) before attaching its sensor connector while verifying that the wire remains untwisted. The release of the No. 2 exhaust front pipe assembly requires 2 new gaskets and mounting it to the exhaust manifold with 2 bolts and 2 nuts which should be torqued to 62 Nm (630 kgf/cm, 46 ft. lbs.) for the nuts and 48 Nm (490 kgf/cm, 35 ft. lbs.) for the bolts. A verification of the compression spring length through a vernier caliper for at least 40.5 mm (4.5645 in.) must occur before installing the exhaust pipe assembly center; a new spring needs to be used if this requirement is not met. The exhaust pipe assembly front requires a new gasket before securing it with 2 bolts and 2 springs which should be torqued to 43 Nm (440 kgf/cm, 32 ft. lbs.). Place the end of the exhaust pipe onto the tailpipe before fixing it using 2 bolts with 48 Nm (490 kgf/cm, 35 ft. lbs.) torque then check for exhaust gas leakage.
Related 2007 Toyota 4Runner Parts
 2007 Toyota 4Runner Catalytic Converter
 2007 Toyota 4Runner Exhaust Manifold
 2007 Toyota 4Runner Muffler
 2007 Toyota 4Runner Air Injection Pump
 2007 Toyota 4Runner Diverter Valve
 2007 Toyota 4Runner Exhaust Heat Shield
 2007 Toyota 4Runner Exhaust Manifold Gasket
 2007 Toyota 4Runner PCV Valve
 2007 Toyota 4Runner Vapor Canister