×
ToyotaParts- Hello
- Login or Register
- Quick Links
- Live Chat
- Track Order
- Parts Availability
- RMA
- Help Center
- Contact Us
- Shop for
- Toyota Parts
- Scion Parts
My Garage
My Account
Cart
OEM 2006 Toyota Sienna Windshield
Glass Windshield- Select Vehicle by Model
- Select Vehicle by VIN
Select Vehicle by Model
orMake
Model
Year
Select Vehicle by VIN
For the most accurate results, select vehicle by your VIN (Vehicle Identification Number).
1 Windshield found

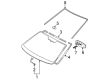
2006 Toyota Sienna Glass, Front
Part Number: 56101-AE041$824.91 MSRP: $1208.91You Save: $384.00 (32%)Ships in 1-3 Business DaysProduct Specifications- Other Name: Glass Sub-Assembly, Windshield; Windshield Glass, Front; Glass, Windshield
- Position: Front
- Replaces: 56101-AE040
- Part Name Code: 56111
- Item Weight: 59.90 Pounds
- Condition: New
- Fitment Type: Direct Replacement
- SKU: 56101-AE041
- Warranty: This genuine part is guaranteed by Toyota's factory warranty.
2006 Toyota Sienna Windshield
Looking for affordable OEM 2006 Toyota Sienna Windshield? Explore our comprehensive catalogue of genuine 2006 Toyota Sienna Windshield. All our parts are covered by the manufacturer's warranty. Plus, our straightforward return policy and speedy delivery service ensure an unparalleled shopping experience. We look forward to your visit!
2006 Toyota Sienna Windshield Parts Q&A
- Q: How to remove and install a windshield on 2006 Toyota Sienna?A: Windshield removal starts with stripping off the front door opening trim Weather Strip LH and RH followed by the front pillar garnish LH and RH, visor assembly LH and RH, assist grip sub-assembly, visor holder, roof console box assembly, sunroof opening trim moulding (if equipped), inner rear view mirror assembly, roof headlining assembly, front wiper arm head cap, front wiper arms LH and RH, front fender to cowl side seals LH and RH and the cowl top ventilator louver sub-assembly. Cut off the outer upper windshield moulding using a knife to avoid damaging the vehicle body while disconnecting the connector if the vehicle has a deicer. To remove windshield glass you should pass a piano wire through the inside vehicle body to glass and connect wire ends to wooden blocks then cover the vehicle exterior with protective tape. To remove the glass from the vehicle body effectively use the piano wire to cut and disengage the stoppers before applying a suction cup to remove the glass with maximum adhesive remaining on the body. Clean the windshield glass by clearing all affected stoppers, dams, and adhesive while avoiding contact with the glass itself before cleaning its outer circumference with white gasoline. Begin by covering the installation area of windshield glass No.2 stopper with Primer G before waiting at least three minutes for drying then installing two new stoppers on the glass. Apply Primer G to the installation part of windshield glass adhesive dam before placing a new dam with double-sided tape that covers the glass except for the stopper locations. The glass edges together with the vehicle body contact surface need coating with Primer G before installing the outer upper windshield moulding. After cleaning the contact surface one must leave as much adhesive exposed. Place the glass on the vehicle body using a suction cup before checking the contact surfaces and applying Primer M over the vehicle body which requires a drying time of 3 minutes. The edge of the glass and contact surface gets a Primer G coating followed by adhesive application (part no.08850-00801 or equivalent) before installing the glass with proper reference mark alignment and tight fit. The removal of extra adhesive must be done before waiting for the specified period of time and then driving the vehicle. Finally, reinstall the windshield moulding outside LH, install the windshield moulding outside RH, check for leaks and repair with auto glass sealer, and reinstall the cowl top ventilator louver sub-assembly, front wiper arms, roof headlining assembly, inner rear view mirror assembly, sunroof opening trim moulding (if equipped), roof console box assembly, visor holder, assist grip sub-assembly, and both visor assemblies and front pillar garnishes, followed by the front door opening trim Weather Strips.
Related 2006 Toyota Sienna Parts
 2006 Toyota Sienna Windshield Washer Nozzle
 2006 Toyota Sienna Wiper Arm
 2006 Toyota Sienna Car Mirror
 2006 Toyota Sienna Mirror Actuator
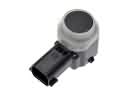 2006 Toyota Sienna Parking Assist Distance Sensor
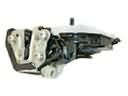 2006 Toyota Sienna Rear Passenger Door Handle Latch
 2006 Toyota Sienna Washer Pump
 2006 Toyota Sienna Washer Reservoir
 2006 Toyota Sienna Windshield Wiper
 2006 Toyota Sienna Wiper Blade
 2006 Toyota Sienna Wiper Linkage
 2006 Toyota Sienna Wiper Motor