×
ToyotaParts- Hello
- Login or Register
- Quick Links
- Live Chat
- Track Order
- Parts Availability
- RMA
- Help Center
- Contact Us
- Shop for
- Toyota Parts
- Scion Parts
My Garage
My Account
Cart
OEM 2006 Toyota Prius PCV Valve
Position Crank Ventilation Valve- Select Vehicle by Model
- Select Vehicle by VIN
Select Vehicle by Model
orMake
Model
Year
Select Vehicle by VIN
For the most accurate results, select vehicle by your VIN (Vehicle Identification Number).
1 PCV Valve found


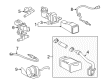
2006 Toyota Prius PCV Valve
Part Number: 12204-21011$13.61 MSRP: $18.95You Save: $5.34 (29%)Ships in 1-3 Business DaysProduct Specifications- Other Name: Valve Sub-Assembly, Vent; Crankcase Vent Valve; Valve Sub-Assembly, Ventilation
- Manufacturer Note: MARK 12204-21011
- Replaces: 12204-21010
- Part Name Code: 12204
- Item Weight: 0.50 Pounds
- Item Dimensions: 2.1 x 1.1 x 0.9 inches
- Condition: New
- Fitment Type: Direct Replacement
- SKU: 12204-21011
- Warranty: This genuine part is guaranteed by Toyota's factory warranty.
2006 Toyota Prius PCV Valve
Looking for affordable OEM 2006 Toyota Prius PCV Valve? Explore our comprehensive catalogue of genuine 2006 Toyota Prius PCV Valve. All our parts are covered by the manufacturer's warranty. Plus, our straightforward return policy and speedy delivery service ensure an unparalleled shopping experience. We look forward to your visit!
2006 Toyota Prius PCV Valve Parts Q&A
- Q: How to service the PCV Valve on 2006 Toyota Prius?A: The service for the Positive Crankcase Ventilation Valve starts with removing three floor boards including the rear No. 2 floor board along with the rear floor deck box and the rear No. 3 floor board. Wait at least 90 seconds before removing the negative battery cable because this precaution prevents the activation of Air Bags and seat belt pretensioners. The first step involves removing the engine room No. 2 relay block which requires unfastening the two bolts and relay block and afterward removing the four wire harness clamps. The technician should start by disconnecting the No. 1 air cleaner inlet from the air cleaner case while loosening the clamp followed by removing the wire harness clamp and mass air flow meter connector. The 2 clamps should be loosened followed by removing the 2 bolts which allows extraction of the air cleaner assembly. It is necessary to disconnect both the fuel injector connector and the ignition coil connector before removing the wire harness. After that remove the brake master cylinder reservoir cover. The installation requires removing a ventilation valve after disconnecting an attached ventilation hose. User installation requires you to place the ventilation valve onto the cylinder head cover before torquing it to 27 N.m (275 kgf.cm, 20 ft.lbf). Secure the wire harness and brake master cylinder reservoir cover by using 3 bolts with torques at 9.0 N.m (92 kgf.cm, 80 in.lbf) and reattach the fuel injector and ignition coil connectors. Pursue the following steps for installing the air cleaner assembly: tighten the clamp bolt to 7.0 N.m and clamp to 3.0 N.m while connecting the air cleaner's No. 1 inlet to the assembly before finishing with clamp torque of 3.0 N.m. Reinstall the engine room No. 2 relay block by tightening 2 bolts to 8.4 N.m (86 kgf.cm, 74 in.lbf) then reconnect the negative battery cable before putting back the rear No. 3 floor board, rear deck floor box and rear No. 2 floor board.
Related 2006 Toyota Prius Parts
 2006 Toyota Prius Catalytic Converter
 2006 Toyota Prius Exhaust Heat Shield
 2006 Toyota Prius Exhaust Pipe
 2006 Toyota Prius Muffler
 2006 Toyota Prius Canister Purge Valve
 2006 Toyota Prius Diverter Valve
 2006 Toyota Prius Exhaust Flange Gasket
 2006 Toyota Prius Exhaust Manifold
 2006 Toyota Prius Exhaust Manifold Gasket
 2006 Toyota Prius Vapor Canister
 2006 Toyota Prius Vapor Pressure Sensor